Using Jira for Customer Support: A Comprehensive Guide
Jira is best known for its project management capabilities (especially for technical teams), but the same features that make Jira a good fit for project management also make an interesting option for customer support, too.
In this blog post, we’ll explore:
- Why Jira can work for customer support (and some of its limitations)
- How to set up customer support workflows in Jira
- How to share customer support data with stakeholders using Visor
The short answer to that last one is, it’s really easy! Find out how Visor can let you visualize data from Jira, Asana, and more in one, easy-to-use system. Try it for free!
Why Jira Can Work for Customer Support
Before diving into how to use Jira for customer support, it’s essential to understand why Jira can be used for it. At its heart, Jira is an issue and project tracking tool that helps teams plan, track, and manage agile software development.
If you’re using Google Sheets (or an alternative to it) to manage your customer support processes on spreadsheets your first encounter with Jira will make you feel like it can do anything. Jira has some capabilities that make it useful for customer support as well, including:
- Customizable Workflows: Jira allows users to create custom workflows tailored to their specific processes, including customer support.
- Issue Tracking: Users can create, track, and manage issues or requests from inception to resolution. Combining project tracking with customer support allows you to get real-time feedback from customers and create bug tickets directly through your customer support team.
- Reporting and Analytics: Jira provides some reporting tools to track performance metrics and identify areas for improvement, which can be useful in tracking time spent on customer support.
- Integration Capabilities: Jira can integrate with various third-party applications, allowing you to connect with customer support programs, or even tools like Visor, which lets you visualize data for customer support as well as other teams in your organization
However, Jira is not without its limitations, below I cover these limitations and solutions to overcome them.
Visor offers Jira-friendly templates, such as customer onboarding templates a product roadmap template, and templates for product backlogs. You can share ALL of these Jira visualizations in Visor with external stakeholders who don’t use Jira.
Limitations of Jira for Customer Support (and How to Overcome Them with Visor)
While Jira is a powerful tool for managing issues and workflows, it has certain limitations when applied to customer support. But you can address those limits with Visor. Visor lets you visualize and share project data across the portfolio of your projects, and makes it easy to combine your customer support data with data from other teams. Here are a few of the ways it can help you overcome Jira’s limits.
Complex Setup for Non-Technical Users
The Limitation: Jira is powerful… but it also comes with a pretty steep learning curve, especially for non-technical users. Configuring workflows, automation, and notifications for customer support may feel overwhelming, particularly if your team isn’t familiar with project management tools.
Solution: Visor offers a more intuitive and user-friendly interface. By integrating it with Jira, customer support teams can manage workflows without needing to navigate Jira’s more technical features.
Inefficient Collaboration Across Teams
The Limitation: While Jira allows basic collaboration through comments and mentions, it doesn’t always support the smooth collaboration needed between cross-functional teams or external departments (like sales or product teams), especially when you’re dealing with complex customer issues.
Solution: Visor makes collaboration simpler by integrating multiple project management tools (such as Asana, Salesforce, and Jira). This means support teams can communicate and collaborate more efficiently with other departments without switching between different tools.
Lack of Support For Portfolios of Longer-Term Customer Support Projects
Sometimes customer issues are not simple enough to fix in a day with a single ticket. A customer support manager may have a range of projects to manage, for example, on-site consultancy, bespoke development, or support with data migration. Managing these overlapping projects with various examples of project milestones, and interwoven dependencies in Jira can be challenging without plugins or add-ons.
Solution: Visor enables you to create “portfolio” and program views that combine multiple Jira projects, like Gantt charts with multiple projects. These views can include all of your projects’ milestones and Jira issue links (aka dependencies), and are easy to switch from high-level to highly detailed.
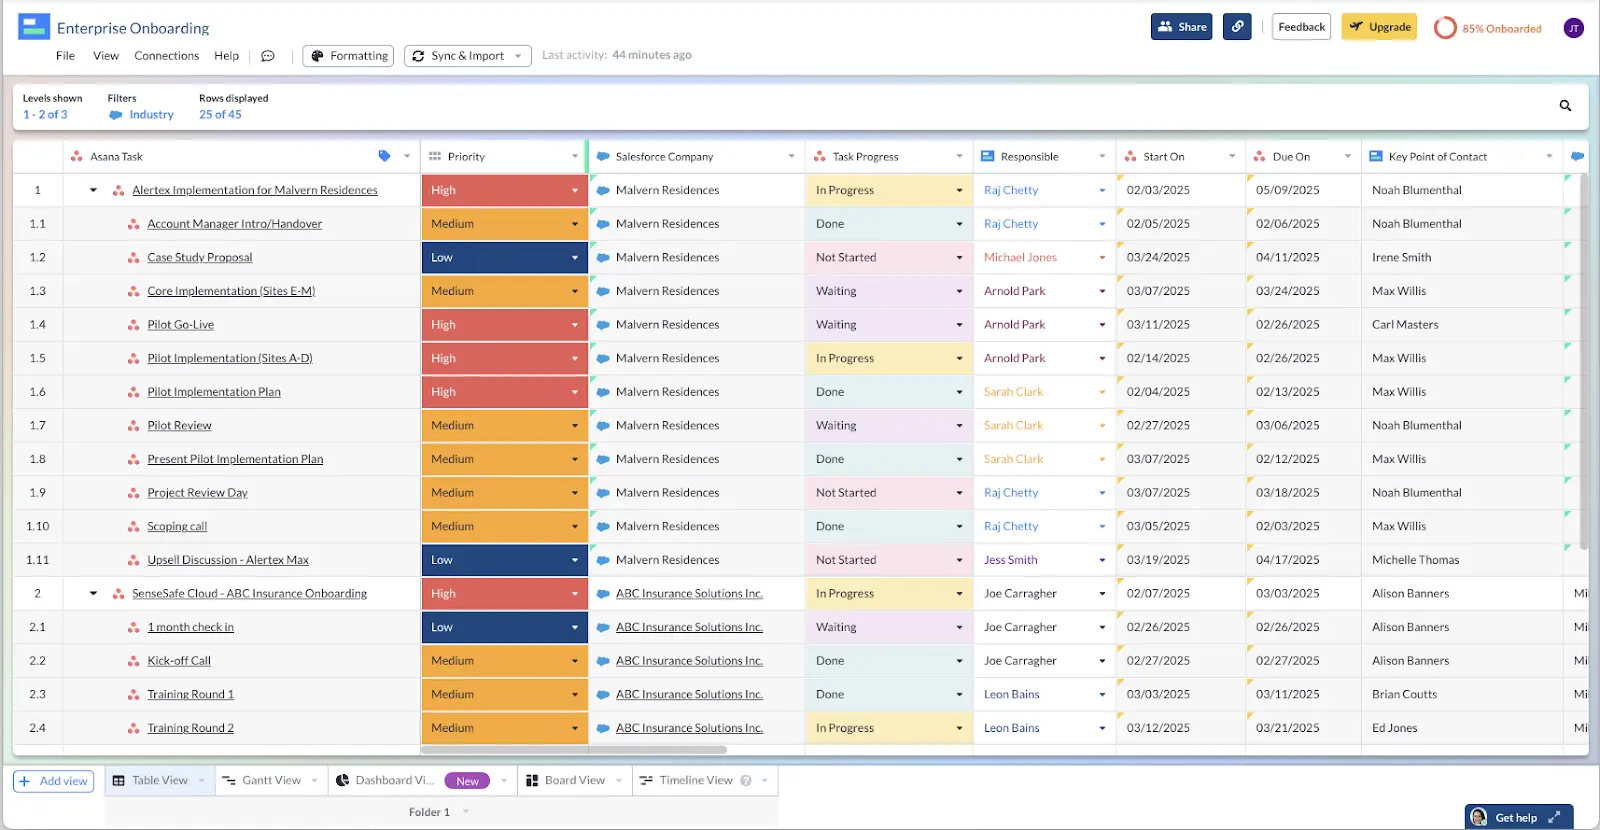
Table view in Visor that combines Salesforce and Asana data (you can also view data from connected apps in roadmaps and Gantt charts):

Limited Customer-Facing Features
The Limitation: Jira is not designed to function as a way to communicate with customers. In fact, in most cases you wouldn’t want your customers accessing your Jira accounts (nor would you want to pay for seats for customers). However, with more important clients, you may want to offer insights into the progress on their tickets, but Jira doesn’t allow guest access.
Solution: By integrating Jira with Visor, you can extend functionality to include customer-friendly views. Visor can display simplified ticket dashboards and charts that are easy for customers to navigate, allowing them to check the status of their requests. At the same time, you’re reducing the need for constant follow-up communication and giving customers a better overall experience.
Disconnect between Customer Support and Engineering
The Limitation: Even within Jira, the lines of communication between Engineering and Customer Success can be strained. Often, it’s hard for Customer Support to get the info it needs to keep customers updated on the progress of bugs or new features.
Solution: By using Visor, tech teams can make custom views just for Customer Support so that support teams quickly see details about the latest fixes and features.
Setting Up Jira for Customer Support
Despite its limitations, Jira has a lot to offer a customer support team – if it’s set up properly. So let’s dig into how to turn Jira into a customer support system:
Step 1: Define Your Support Workflow
Before you start working in Jira, spend some time mapping out your customer support workflow. Consider the following stages:
- Ticket Creation: How do customers submit support requests? Will it be through email, a web form, or a chat tool?
- Ticket Triage: How will tickets be prioritized and assigned to support agents?
- Resolution Process: What steps are taken to resolve issues? This may include investigating, communicating with the customer, and closing the ticket.
- Follow-up and Feedback: How will you gather customer feedback after a ticket is resolved?
Once you have a clear understanding of your workflow, you jump into Jira and start putting your plan into action.
Step 2: Create a Custom Project
Jira allows you to create projects tailored to specific needs. To set up a customer support project:
- Navigate to Projects: Go to the Jira dashboard and select “Projects.”
- Create a New Project: Click on “Create Project,” and choose a template that fits your support needs (the Customer Service Management template under Service Management is a great choice).
- Configure Project Settings: Customize settings such as issue types, workflows, and permissions to suit your customer support team.
Step 3: Define Issue Types
In Jira, issues can represent different types of work. For customer support, consider defining the following issue types:
- Support Request: General customer inquiries or issues.
- Bug Report: Issues related to product malfunctions.
- Feature Request: Suggestions from customers for product improvements.

Step 4: Set Up Custom Fields
To collect all necessary information from customers, set up custom fields. These may include:
- Customer name
- Contact information
- Product or service details
- Description of the issue
- Urgency level
You can find a Create Custom Field link at the bottom of Fields sidebar.
After you click the link, a popup will appear prompting you to select your field type. For instance, you could use short text for something like a Customer Name field.
Once you’ve selected your field type and given it a name and description, you should associate the field type with relevant screens in Jira. For instance, you’d want the Customer Name to appear in customer support screens, but not ones that DevOps or other teams regularly use.
Step 5: Configure Notifications
If you want to use Jira for customer support, you should probably configure notifications to ensure that the relevant team members and stakeholders get alerts when key events (like ticket creation, status changes, or issue resolution) occur. Here’s how to do it:
1. Define the Events to Notify
Identify the key events in your customer support workflow that require notifications. Common events might include:
- Issue Created: When a customer submits a support ticket.
- Issue Updated: When the ticket is updated (e.g., new comments or status changes).
- Issue Resolved: When the support request is resolved.
- Issue Closed: When the ticket is closed after resolution.
- Comment Added: When a customer or support agent adds a comment to the ticket.
- Issue Reopened: If the ticket is reopened after being resolved or closed.
2. Set Up a Notification Scheme
Next you’ll want to configure a notification scheme (rules for when notifications are sent out) that matches your customer support needs.
- Go to Jira Settings: Click on the gear icon in the top right and select Issues under Jira settings.
- Navigate to Notification Schemes: In the left-hand panel under Issue Attributes, click on Notification Schemes.
- Create a New Scheme: If you don’t want to modify the default scheme, click on Add Notification Scheme to create a new one. Give it a meaningful name, like “Customer Support Notification Scheme.”
- Add Notifications for Specific Events: In the scheme, add notifications for the events you defined earlier (e.g., issue created, issue resolved). You can choose who to notify here.
Here’s an Example Setup:
- Issue Created: Notify the Assignee and Reporter.
- Issue Updated: Notify the Assignee and Reporter.
- Issue Resolved: Notify the Reporter and the Assignee (to confirm closure).
- Comment Added: Notify the Assignee and the Reporter.
- Issue Reopened: Notify the Assignee, Reporter, and Project Lead.
- Issue Closed: Notify the Reporter and the Project Lead.
3. Associate the Notification Scheme with a Project
Once your notification scheme is ready, you need to assign it to your customer support project.
- Go to the Project Settings: Navigate to Projects > Your Customer Support Project > Project Settings.
- Select Notifications: In the project settings, click on Notifications in the left-hand menu.
- Associate Your Scheme: Select your newly created notification scheme (e.g., “Customer Support Notification Scheme”) from the list.
4. Customize Notifications for Customer Communication
If your support workflow involves external customers, you can ensure that the Reporter (the customer) is notified for every relevant action on their ticket. It’s also a good idea to customize the email templates (if needed) to make notifications clearer and more customer-friendly.
5. Optional: Integrate with Other Tools (Slack, Email Automation)
If your support team uses tools like Slack or Microsoft Teams, you can extend notifications to these platforms using Jira integrations or automation tools (such as webhooks, automation rules, or third-party add-ons).
Example:
- Slack Integration: Set up an integration that sends a message to a specific support channel when a high-priority issue is created.
- Automation Rules: Use Jira automation rules to send email notifications to customers based on issue status changes.
6. Test Your Notification Scheme
Once the notification scheme is configured, test it by creating and updating issues in your customer support project. Ensure that notifications are reaching the intended recipients (support agents, project leads, and customers).
Managing Customer Support Tickets
Once your Jira project is set up, managing customer support tickets efficiently is key to providing excellent service. Here are some best practices for ticket management.
Best Practice 1: Prioritize Tickets
Implement a system for prioritizing tickets based on urgency and impact. You might use labels or custom fields to categorize tickets as high, medium, or low priority. This ensures that your team addresses the most critical issues first.
Best Practice 2: Make It Easy to Collaborate
Encourage team collaboration. You can do this in Jira by using comments within tickets. Agents can share updates, ask questions, or tag team members using the “@” symbol to draw their attention to specific issues. This fosters communication and helps prevent any ticket from slipping through the cracks.
If you want more detailed collaboration options, consider sharing details about your customer support tickets using Visor. Visor makes it easy for stakeholders and important customers to see the status of tickets, even if they’re not regular Jira users. It can add transparency and clarity, while limiting the number of Jira accounts required to access your data.
Best Practice 3: Maintain Clear Documentation
Document all interactions with customers within the ticket. This includes initial responses, resolutions provided, and any follow-up communications. Clear documentation not only helps the current agent but also provides valuable context for anyone who may handle the ticket in the future.
Best Practice 4: Set SLAs
Service Level Agreements (SLAs) help define the expected response and resolution times for tickets. Configure SLAs in Jira to set clear expectations for your team and your customers. This can help ensure that tickets are handled promptly.
Reporting and Analytics
You have a few options in Jira for reporting. Here’s how to leverage these tools:
Using Dashboards in Visor
There are some limitations to the Jira Dashboard – for instance, it doesn’t handle cross-project reporting well, nor is it easy to manage collaboration on dashboards.
So if you want a way to create a more customizable, collaborative dashboard, Visor offers a straightforward solution that can keep your stakeholders informed. Essentially, you can pull any numerical data from across Jira (and other programs, like Asana) and use it to create a variety of reports, using pie charts, bar graphs, and other report types.
You can also share data in customizable Jira Gantt charts, Board Views, and Jira spreadsheets to convey more detail. Charts can be filtered so that they show only the information you need, and you can create as many different Views as you want.
To create a Dashboard or any other View in Visor, simply click the + Add View button on the bottom-left-hand side of your screen.
Dashboard illustrating key metrics from Jira in Visor

Creating Custom Dashboards in Jira
- Navigate to Dashboards: Go to the “Dashboards” section in Jira.
- Create a New Dashboard: Select “Create Dashboard” to set up a customized view of key metrics.
- Add Gadgets: Include gadgets such as pie charts, bar charts, and filter results that display ticket statuses, response times, and agent performance.

Utilizing Built-in Reports
Jira comes with several built-in reporting options that can be beneficial for customer support teams, including:
- Control Chart: Visualizes cycle time for issues, helping you assess the efficiency of your support process.
- Average Age Report: Shows the average age of open issues, which can help identify bottlenecks.
- Resolution Time Report: Tracks how long it takes to resolve issues, providing insights into team performance.
Integrating Jira with Other Tools
To maximize the effectiveness of your customer support operations, consider integrating Jira with other tools your team uses. Here are a few integration options:
Communication Tools
Integrate Jira with communication tools like Slack or Microsoft Teams to receive real-time notifications about ticket updates. This keeps your team informed and allows for quick collaboration.
You can also use a portfolio management tool, like Visor, to share information with stakeholders, contractors, and teams that don’t use Jira. Visor lets you combine information from multiple sources, including apps like Jira, Asana, and Salesforce, so you can get a more complete picture of what multiple teams are working on.
Gantt Chart in Visor Showing Customer Support Initiatives

Customer Relationship Management (CRM) Systems
Integrate Jira with your CRM to ensure that customer information and interactions are centralized. This can streamline the support process by providing agents with relevant context about the customer.
Helpdesk and Ticketing Systems
If you use a dedicated helpdesk or ticketing system, consider integrating it with Jira to consolidate all support requests in one platform. This can improve visibility and tracking across different channels.
Knowledge Base Tools
Link Jira with knowledge base tools like Confluence (you can find a tutorial from Atlassian here). This allows agents to access relevant documentation and solutions directly within Jira, enhancing their ability to resolve issues efficiently.
Training and Onboarding
To ensure your customer support team can effectively use Jira, invest time in training and onboarding. Here are some tips:
Provide Comprehensive Training
Organize training sessions that cover:
- Basic navigation of Jira
- Creating and managing tickets
- Using reports and dashboards
- Best practices for communication and documentation
Create Documentation
Develop a comprehensive user manual or knowledge base that team members can reference. This should include guidelines on how to use Jira effectively for customer support.
Encourage Continuous Learning
Promote a culture of continuous improvement by encouraging team members to share tips, tricks, and best practices they discover while using Jira. This can lead to enhanced efficiency and team cohesion.
Combining Visor and Jira for Better Service
Jira has a lot to offer customer support teams. And integrating Jira with Visor creates an even stronger solution by simplifying workflows, enhancing collaboration across teams, and improving the visibility of support data for stakeholders. By using both tools together, support teams can streamline ticket management, improve response times, and deliver a more efficient, customer-friendly service.


