
Building Better Jira Epic Roadmaps
When you’re handling epics in Jira, it helps to have a project roadmap to get you where you want to go. An epic roadmap lets you visualize the bigger picture of your projects by giving you a timeline-based overview of your team’s epics. Basically it lets you showcase start and end dates, dependencies, and progress—all in one place. This bird’s-eye view makes it easier to align priorities, track milestones, and ensure everyone is on the same page.
If you’re not sure how to create your own epic roadmap, we’ve put together a guide to help you get started. In it, we’ll cover:
- What a Jira epic roadmap looks like
- How to build an epic roadmap in Jira
- How to enhance your roadmap with Visor
Visor is a sleek, modern project portfolio management tool that turns your project plans into beautiful, crystal clear charts, roadmaps, and more. Try it for free!
What does a Jira epic roadmap look like?
There are a few key features you’ll see if most effective roadmaps. Here’s a breakdown of what you’ll typically see in an epic roadmap, including a few features you may need to look beyond Jira to find:
Timeline or Gantt Layout for your Jira Epic Roadmap
Usually when you’re creating a roadmap, you’ll set up a timeline (especially if you’re viewing your data in Jira). Both are frequently created in a Gantt chart style. Epics are displayed as horizontal bars stretching across a timeline, which could represent days, weeks, or months. In Jira, users can zoom in or out to view timeframes at different granularities—ideal for switching between short-term and long-term planning.
Example of a Jira Roadmap Made in Visor:
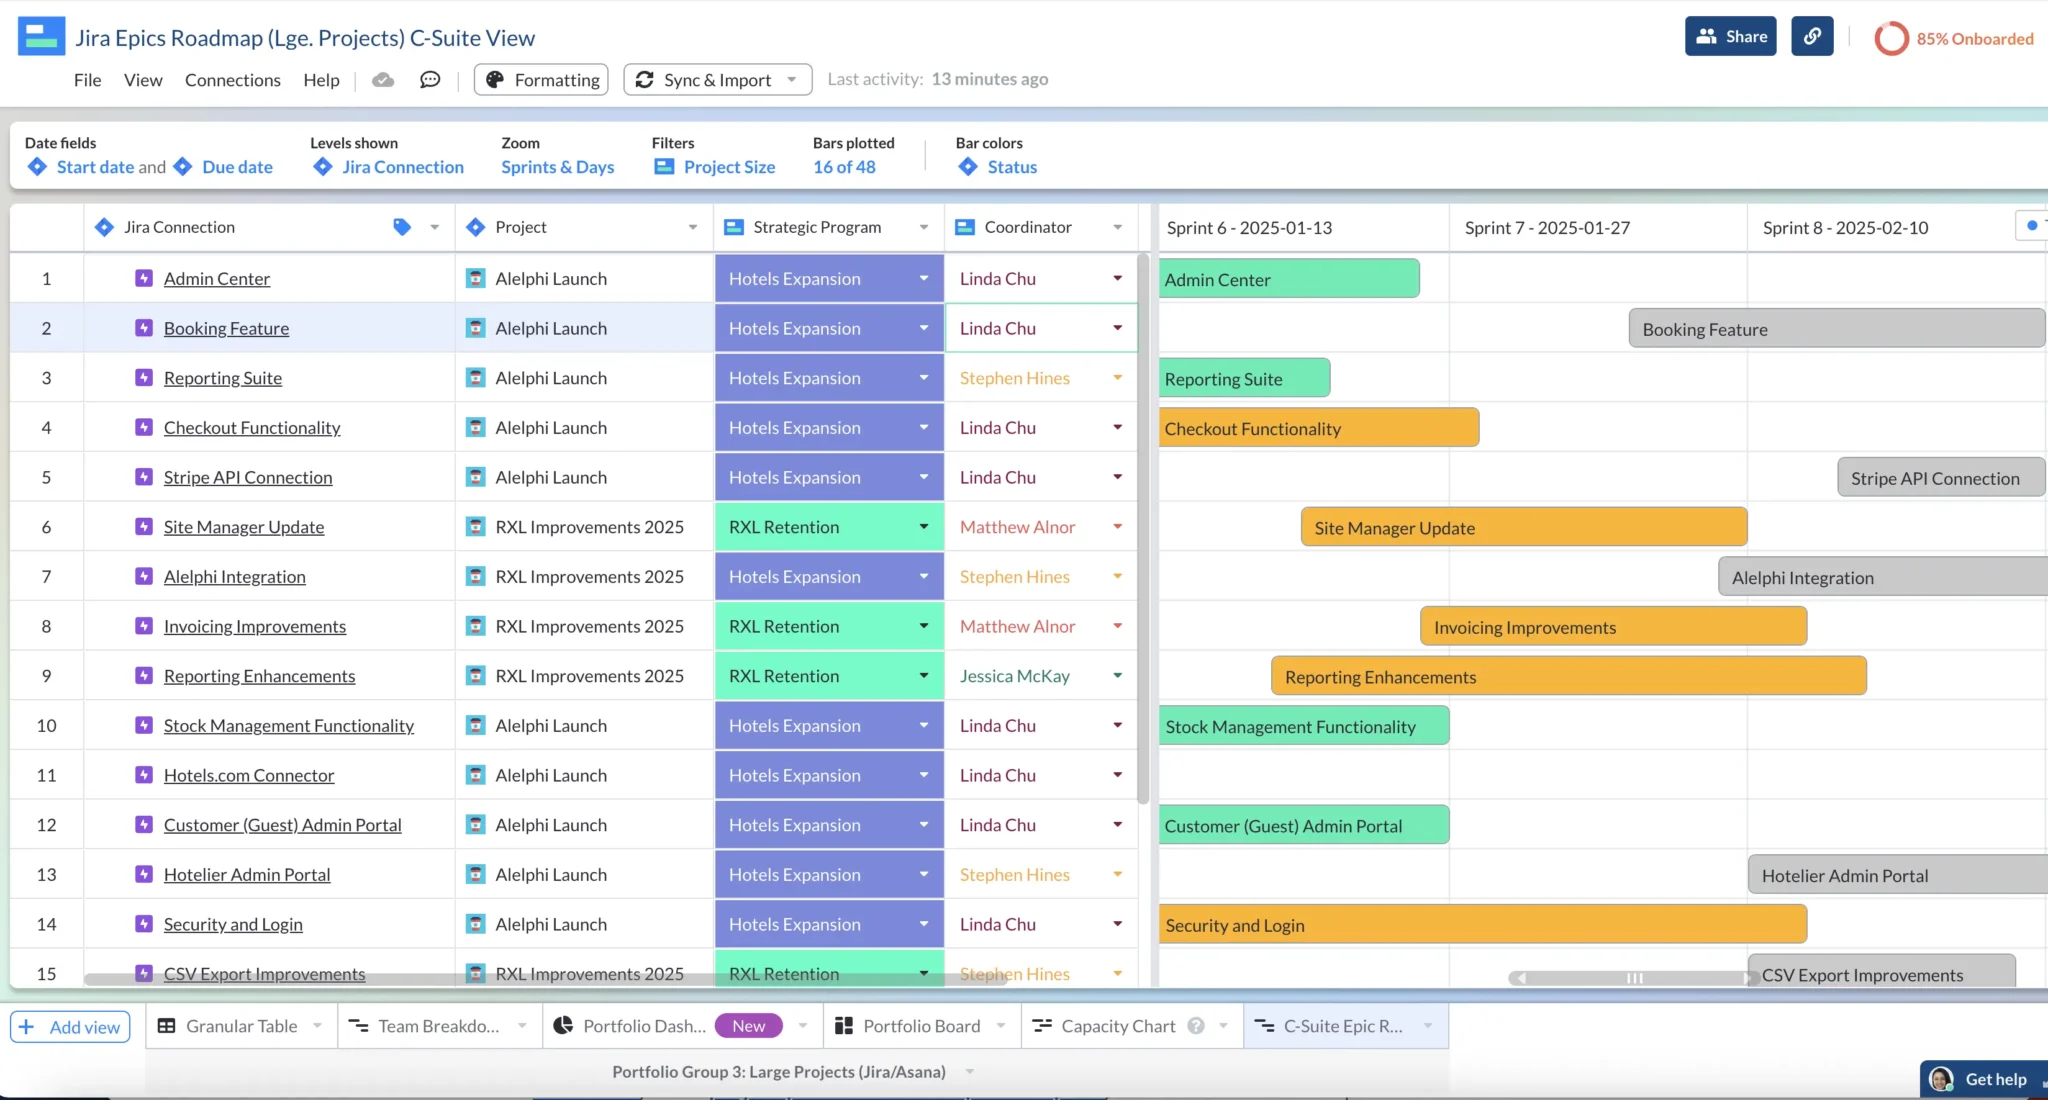
Visor’s Epic Roadmaps now support Jira Dependencies / Linked Issues:
Example of Jira’s Timeline Roadmap feature:
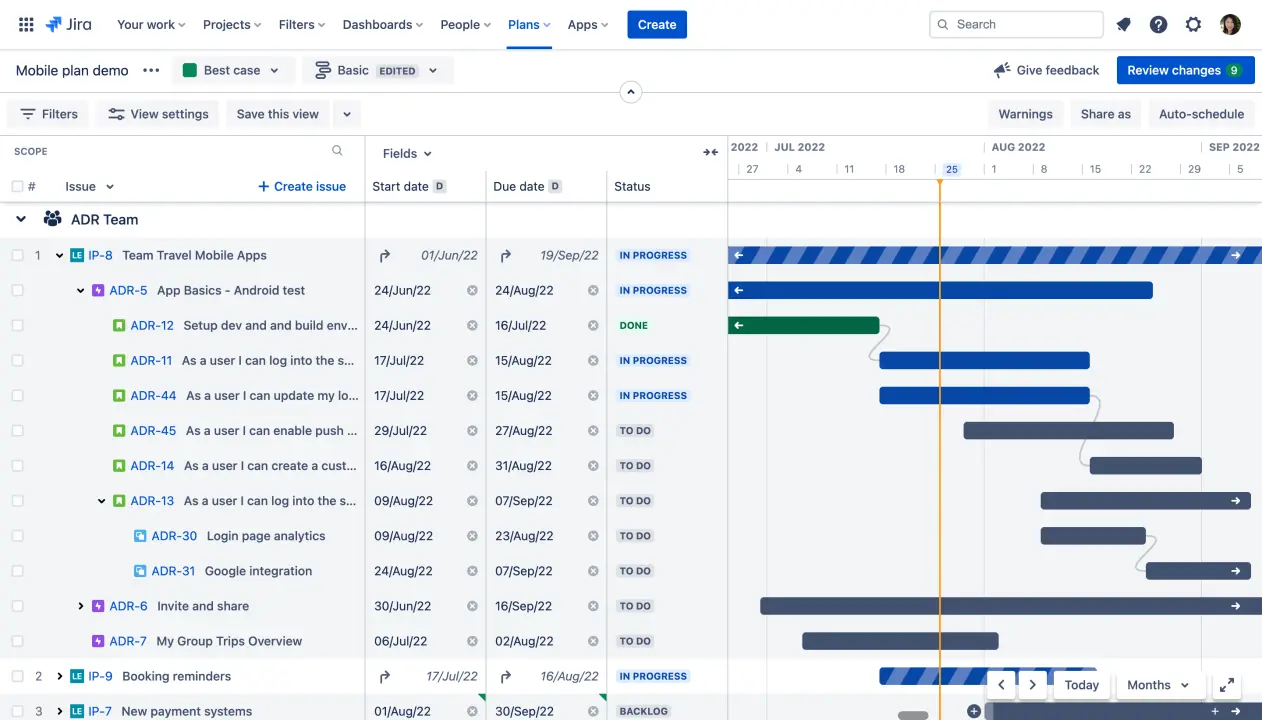
Epics as Bars on the Timeline
On your timeline, each epic will appear as a bar. This bar shows the epic’s start and end dates and provides a visual sense of how long each epic is expected to take. It’s helpful to apply color coding to epics so you can tell apart teams, priorities, or project phases (Though this functionality is limited in Jira). Labels or tags can also be added for more context, like team names or epic priority.
Highly visual project roadmaps are especially valuable.
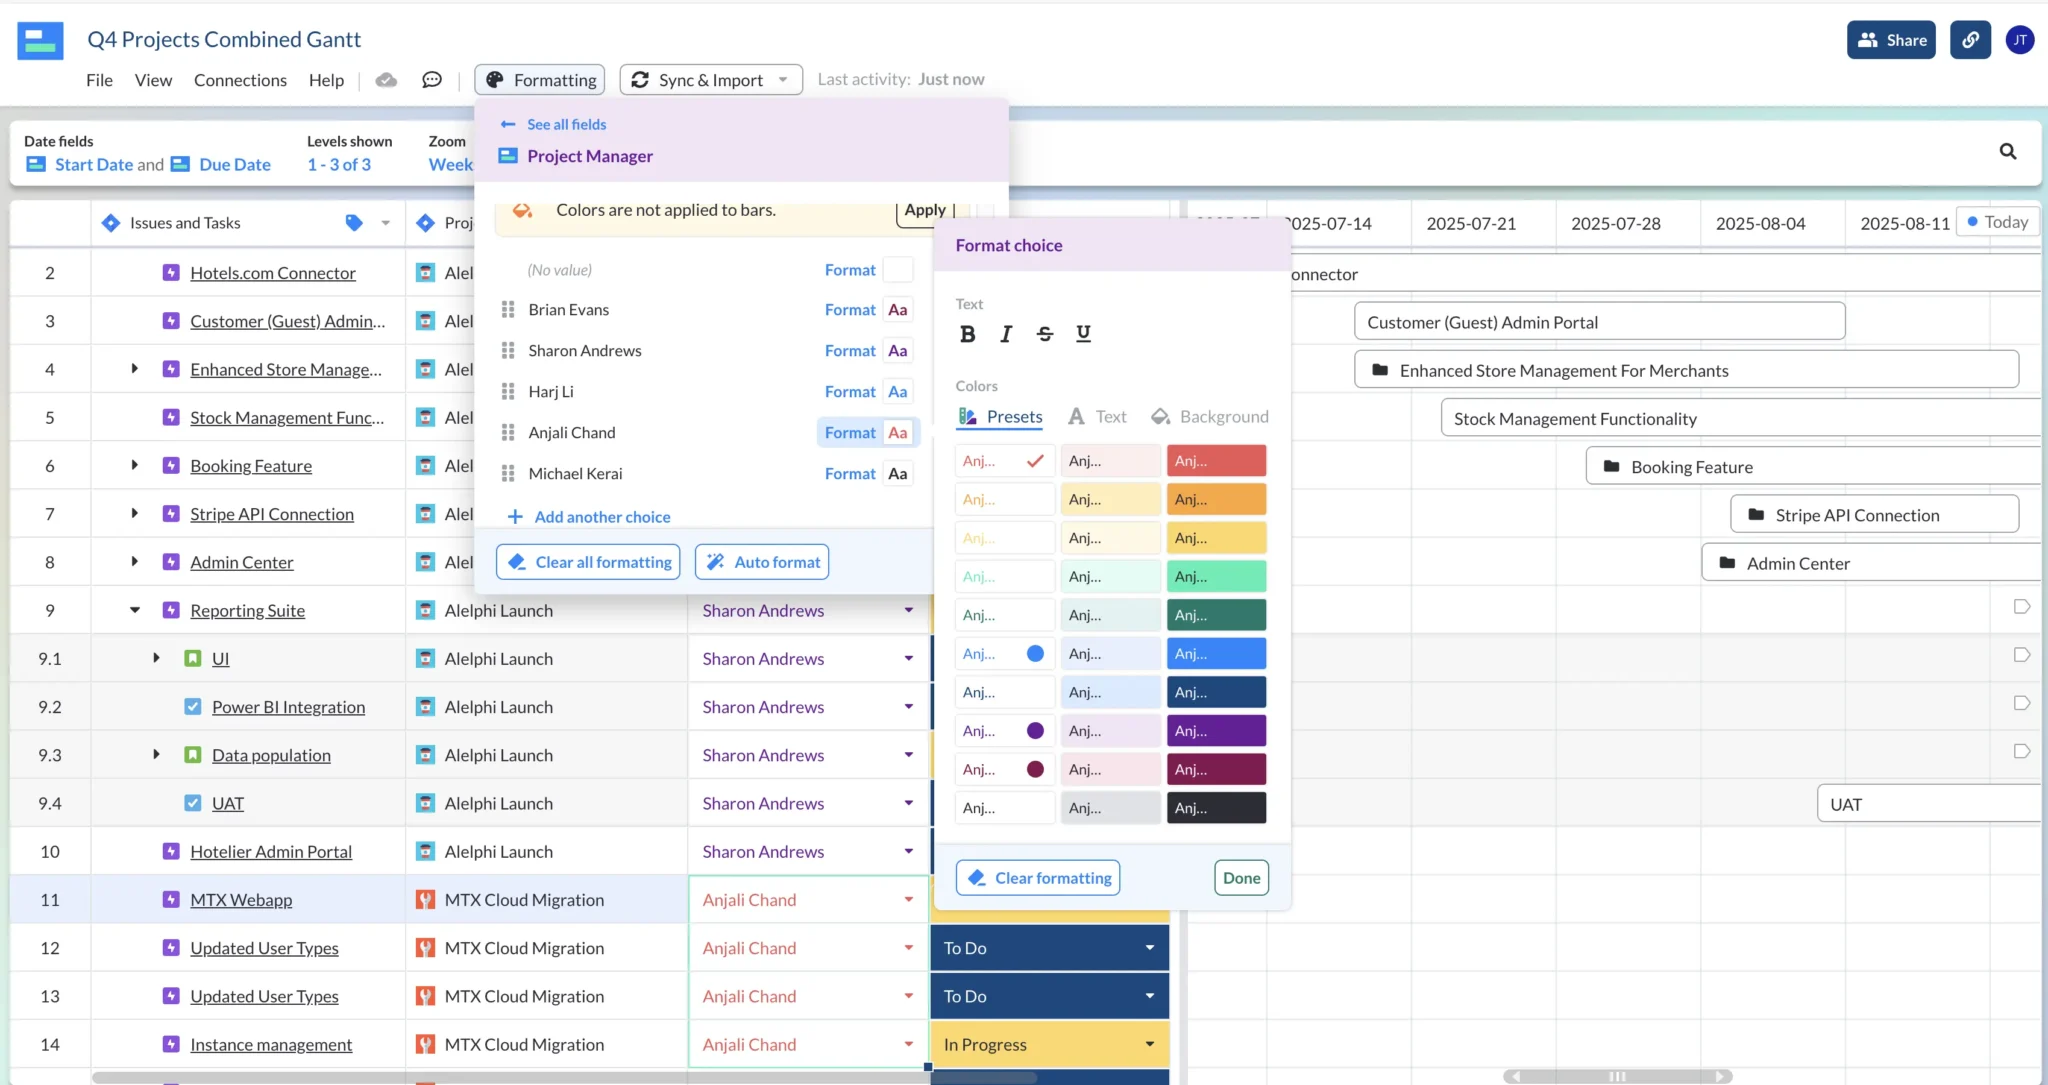
If you want more customization – say you want to color code your data – a tool like Visor is a good idea. Visor lets you choose whatever colors you like, and you can apply them to statuses, project phases, team members, priorities, or whatever it is you want to highlight.
Color customization options in Visor
Key Milestones and Dates in your Roadmap
Specific project milestones or deadlines should be marked on the roadmap to indicate major phases or deliverable dates – though like color coding, this is a feature you’re not going to find in Jira.
Once again, if you want Jira milestones, you’ll need an outside tool. We suggest Visor, which offers an easy way to share roadmaps with milestones built into them.
Jira Portfolio Roadmap with milestones, created in Visor:
Filters and Custom Views
Filters give your stakeholders the ability to see the information that’s most relevant to them. Users can filter the roadmap based on parameters like team, epic status (e.g., “In Progress,” “Done”), or priority to tailor the view for different audiences. Filtering by epic status lets you quickly identify work that is in progress, completed, or delayed.
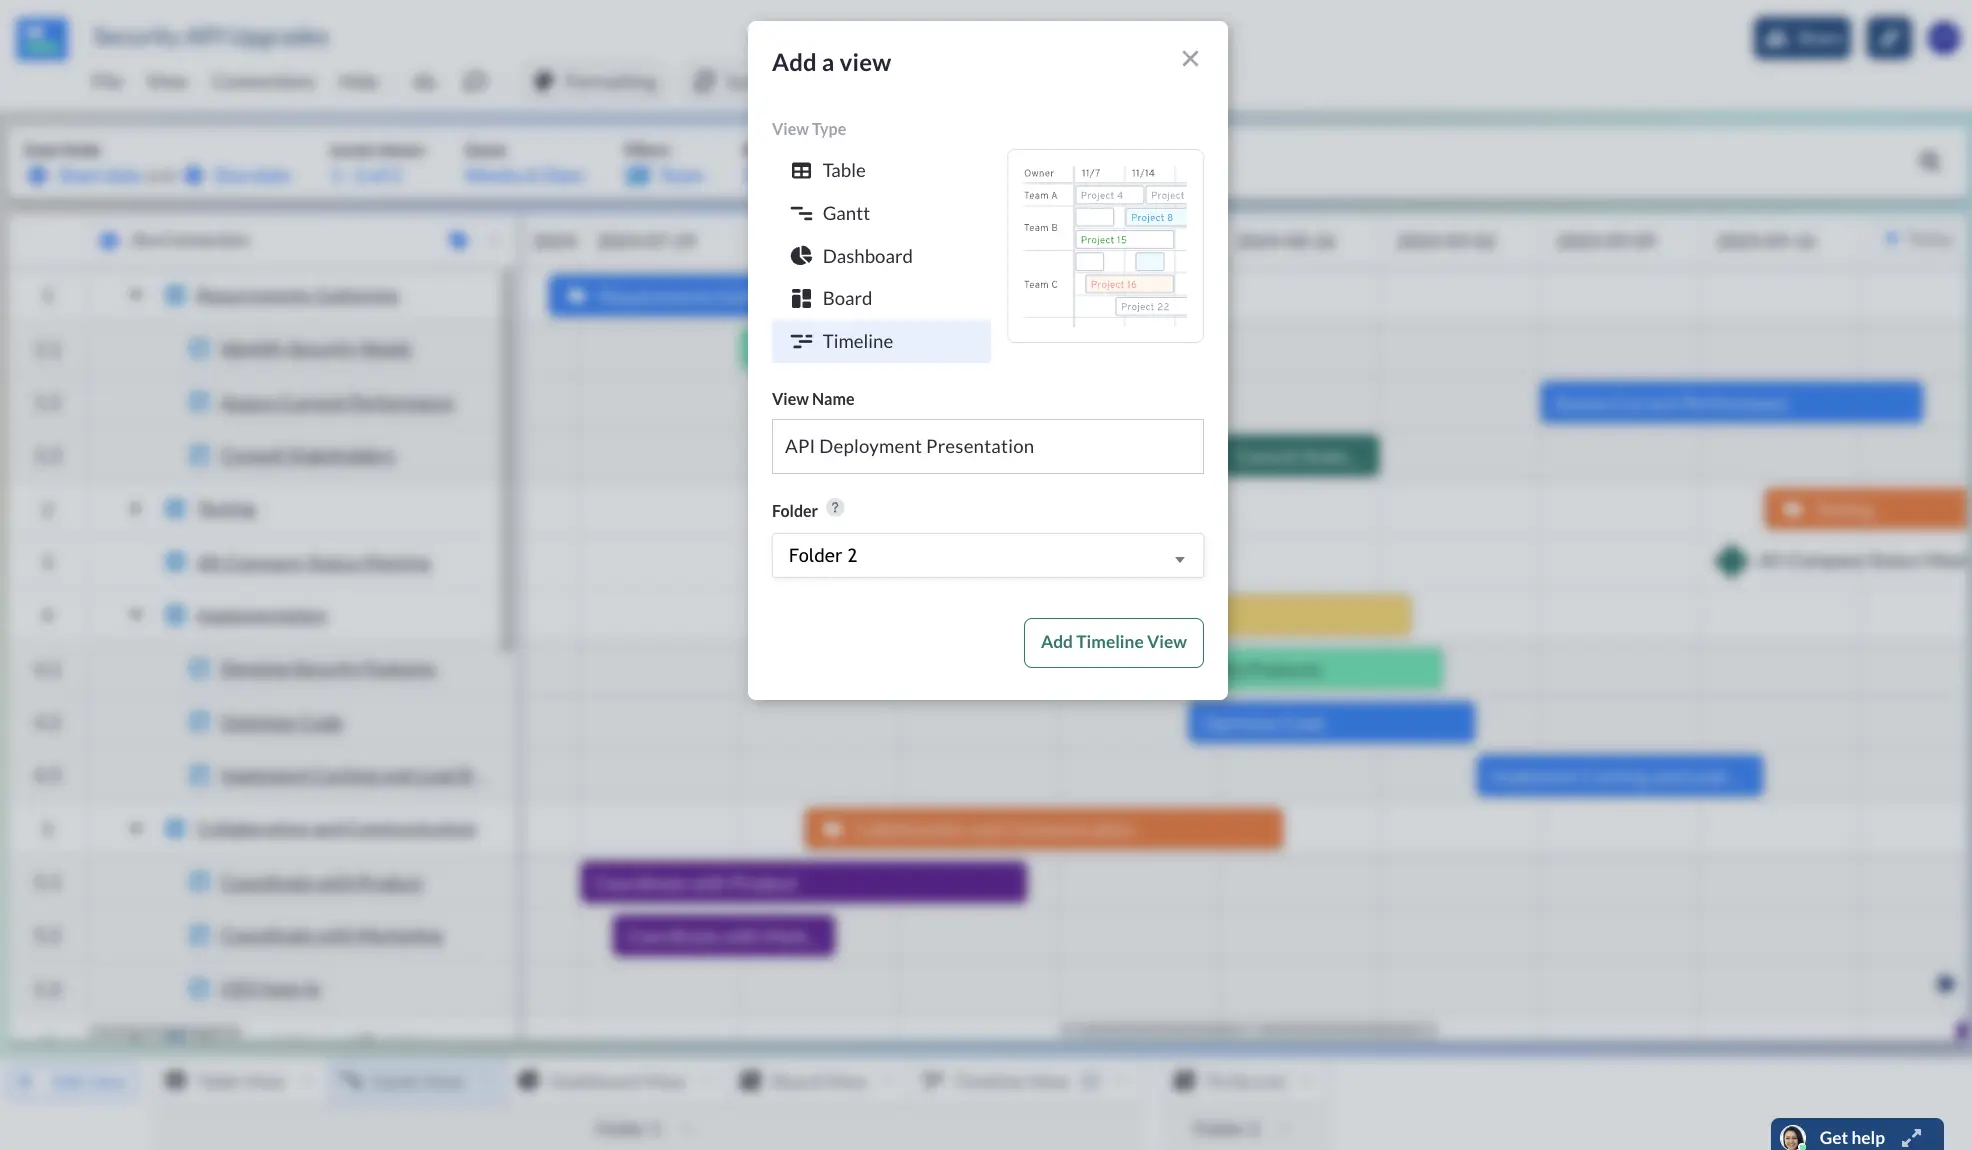
If you need to hold onto your filtered views – say you need separate views for your teammates, for contractors, and for C Suite – you’ll once again need a visualization tool outside of Jira. Visor, for instance, lets you create unlimited Views within the app, so you can filter Jira data for as many different audiences as you need.
Creating a new view in Visor
Drawbacks to Jira Epic Roadmaps
So you may have noticed in the description of Jira epic roadmaps above, there are a few areas where Jira needs an assist. Here are a few drawbacks to Jira – and how you can overcome them with Visor.
1. Limited Customization Options
There aren’t a ton of customization options in Jira’s timelines, making it difficult to tailor the roadmap to specific project needs or stakeholder requirements. You’re also not going to find too many customization options for colors, labels, and markers, which can make it harder to visually differentiate epics, especially in complex projects with multiple teams.
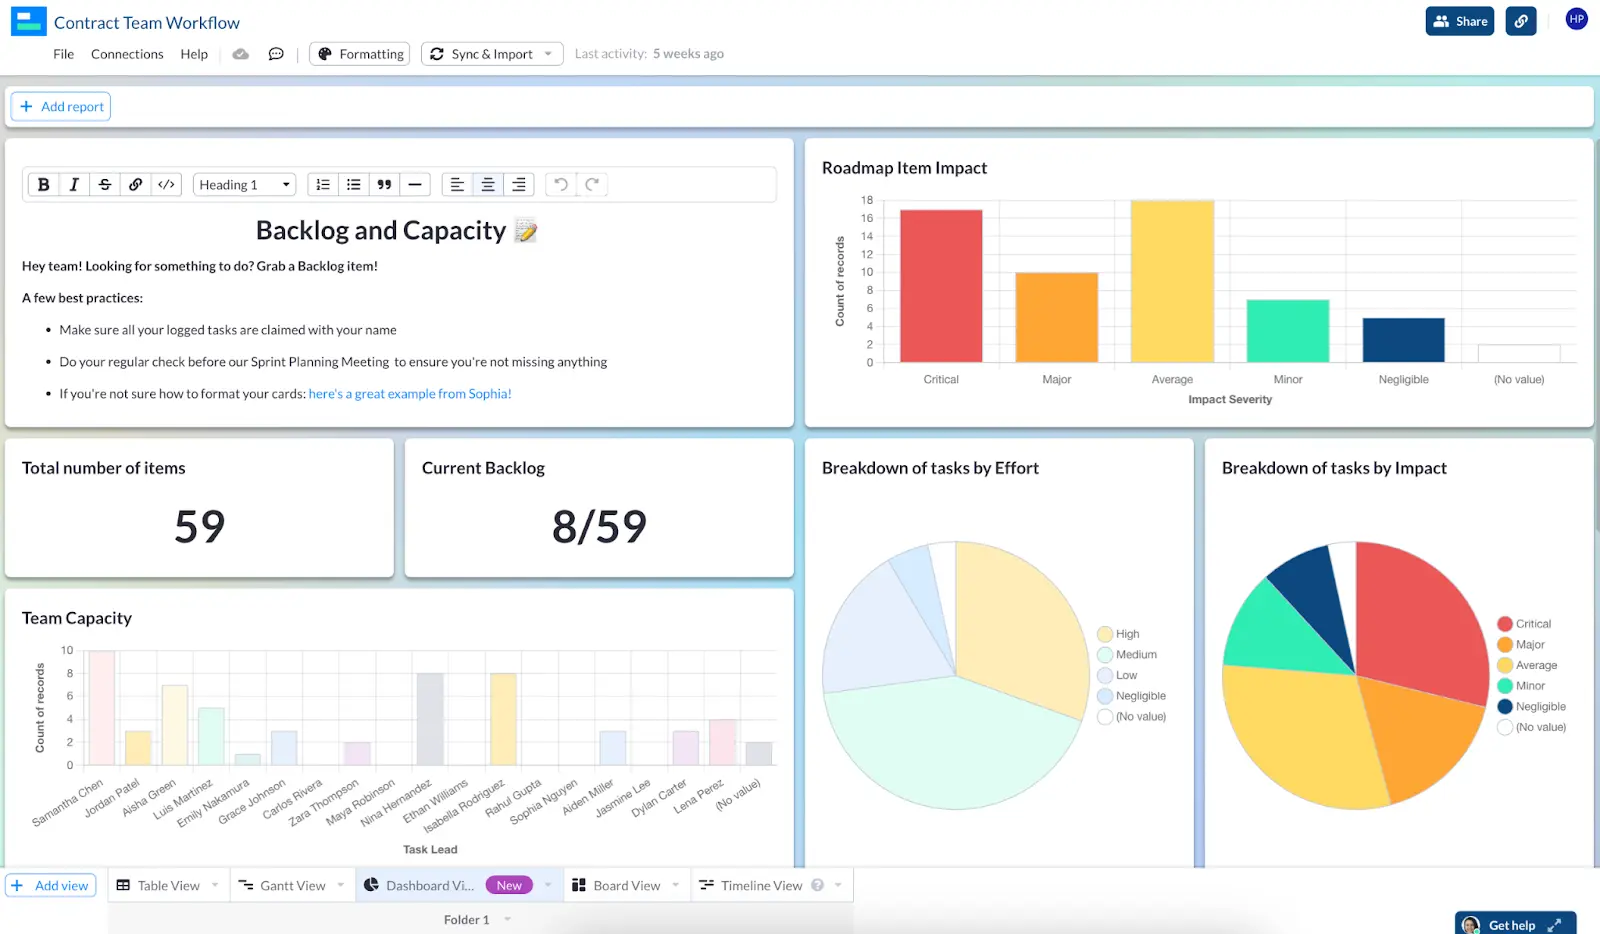
VISOR FIX: Visor is designed to give you all the customization options you need, including the ability to create multiple filtered views for different groups of users. You can also customize colors, labels, and so on so that your roadmap is eye-catching and easy to read. This is excellent for creating C-suite Jira reports.
Custom View for contractors in Visor
2. Complexity with Large Projects
In larger projects with many epics and dependencies, the roadmap can quickly become cluttered, making it difficult to navigate or gain a clear overview.
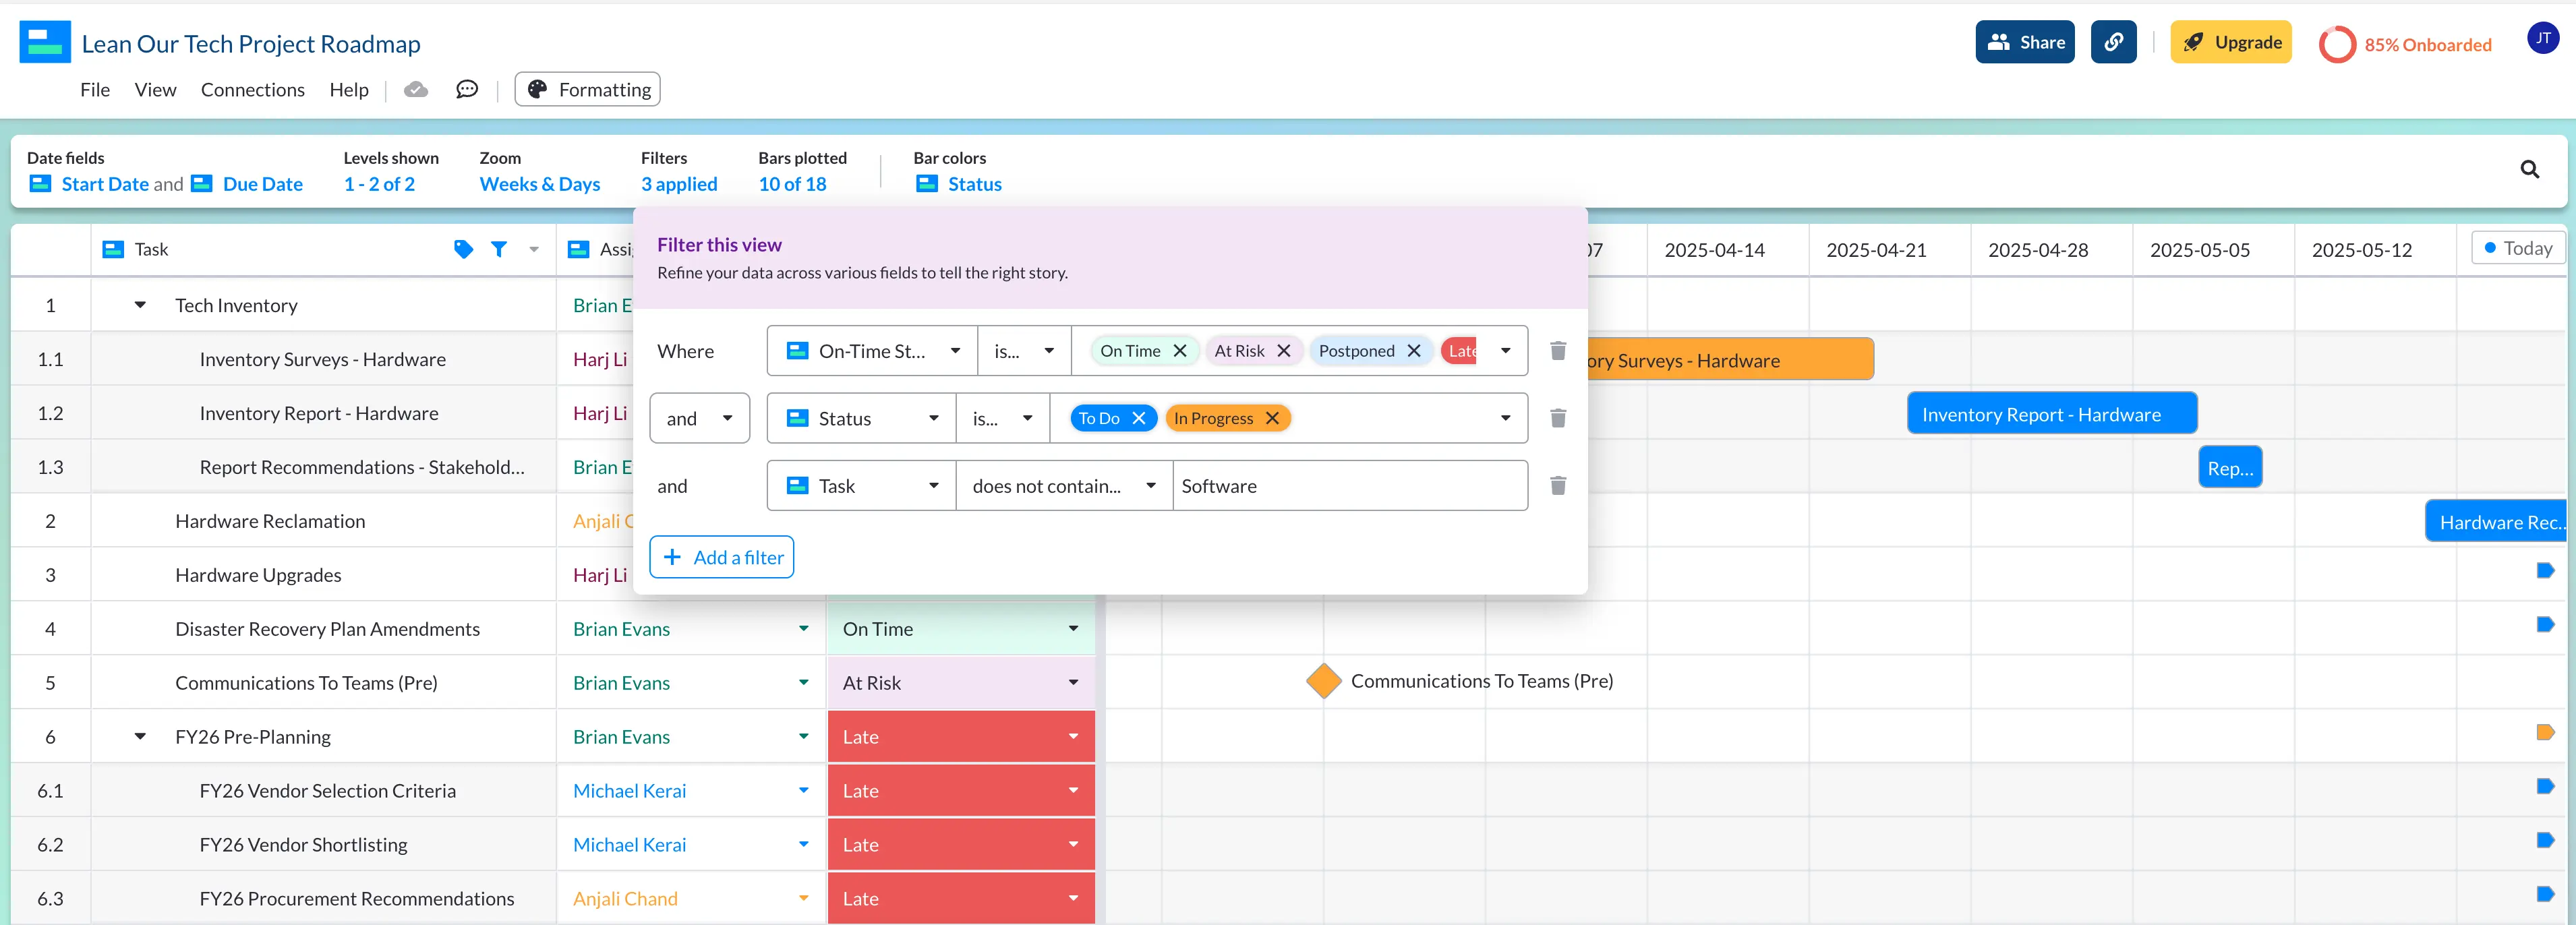
VISOR FIX: You can filter down projects to focus on just what’s important. Visor gives you the ability to create multiple Views, so you can let different stakeholders see the information that’s most relevant to them.
Customizable filters available in Visor
3. Real-Time Collaboration Limitations
Multiple users can’t make real-time edits to Jira roadmaps, making it harder for team collaboration during planning sessions. And when you are making updates, they aren’t always immediately visible to other team members, which can hold you back when you want live collaboration on roadmap adjustments.
VISOR FIX: Visor lets multiple users collaborate on your roadmap at once, allowing live collaboration that makes for better, more successful planning sessions.
4. Steep Learning Curve for New Users
For new users, Jira can feel overwhelming, especially when trying to build or manage a roadmap with multiple dependencies and filters. This is even more true if you’re using Jira’s Advanced Roadmap feature (more on that later).
VISOR FIX: Visor is easier to use and more intuitive, giving users that aren’t used to Jira an easy entry point to Jira data.
How to Build an Epic Roadmap with Jira Data
Building an epic roadmap with Jira data enables teams to align on priorities, track progress, and visualize project goals at a high level. Here’s a guide to create a robust epic roadmap:
Step 1: Define Your Project Goals and Scope
Before diving into Jira, clarify the purpose of your roadmap. Make sure you know what the roadmap will communicate. In other words, align on the key themes, timelines, and stakeholders. Then ask yourself who is the audience, so you can adapt your roadmap for internal team use or broader organizational visibility.
NOTE: With Visor you can create multiple roadmaps using the same Jira data so that you can filter information for multiple groups.
Step 2: Organize Epics in Jira
If you keep your Jira epics organized, your roadmap will work a lot more effectively. Here are a few ways to keep everything in order:
- Standardize Naming Conventions: To make your roadmap easier to read, use descriptive titles that reflect the high-level goal of each epic.
- Assign Key Attributes: Add start and end dates, priority levels, and tags to categorize epics by theme, project, or team. This will also allow you to create bars and (if you’re using Visor) color code your roadmap.
- Link Stories and Tasks: Ensure each epic contains relevant child issues, such as stories, tasks, or bugs, to give a more complete picture.
Step 3: Leverage Jira’s Native Roadmap Tools
Jira has two options for creating roadmaps: the free Timeline View and Advanced Roadmaps – here’s a breakdown of the difference between the two: Jira Timeline vs. Advanced Roadmaps.
You can get a quick rundown on the differences between the two roadmap types in the video below:
Creating a Roadmap in Jira Timeline View
Timeline View that can be used to create a basic roadmap. These roadmaps show one project at a time, and you can’t really add subtasks. However, if you need a basic solution, it’s a good place to start. Here’s how to set it up:
1: In a team-managed project, Timeline View should be automatically enabled. All you have to do is go to an existing project or create a new project and click Timeline from the navigation bar at the top of your project.
2: Then click + Create on the bottom of your screen to add an epic to your timeline. Double click on your new epic to add details, like dates, titles, or assignees.
You can also add child issues to an epic by selecting the plus (+) icon next to its name. Name the subtask and select the type of task you want from the dropdown menu. Then click Create, and you’re good to go. You won’t be able to drill down very far; however, due to the limitations of this free Jira feature.
Creating a Roadmap with Jira Advanced Roadmaps
If you have Jira Premium or Enterprise, you can access Jira’s Advanced Roadmaps. Unlike the Timeline option, you can add multiple projects to Advanced Roadmaps. Here’s how to get started.
1: Go to the Plans menu at the top of your screen and select an existing plan or click Create Plan.
2: When you create a new plan, you’ll have the option to name it, set its access level (public or private), and choose multiple projects to add to your roadmap. Make your selections, then click the Create button.
3: You can add new epics by clicking + Create Issue at the top of the roadmap. You can also add tasks and subtasks by clicking the plus (+) icon next to whichever epic or task you want to add to. To open and edit any line on the roadmap, just double click on it.
Step 4: Create a Custom Visualization with Visor
Jira’s native tools are useful, but for more user friendly, eye-catching visualizations, consider Visor. A few reasons Visor is a good supplement to Jira:
- Visor’s lets you integrate multiple data sources – without upgrading your Jira account.
- You can add Milestones to your roadmaps – a feature you won’t see in Jira.
- You can use Visor without going into Jira, so your CEO or other teammates who don’t use Jira can still access Jira data
- You can create custom color-coded views
- Visor offers a two-way sync with Jira (and several other apps, like Asana), letting you view Jira data in Visor or update Jira from Visor
Here’s how you can leverage Visor to share your Jira roadmap:
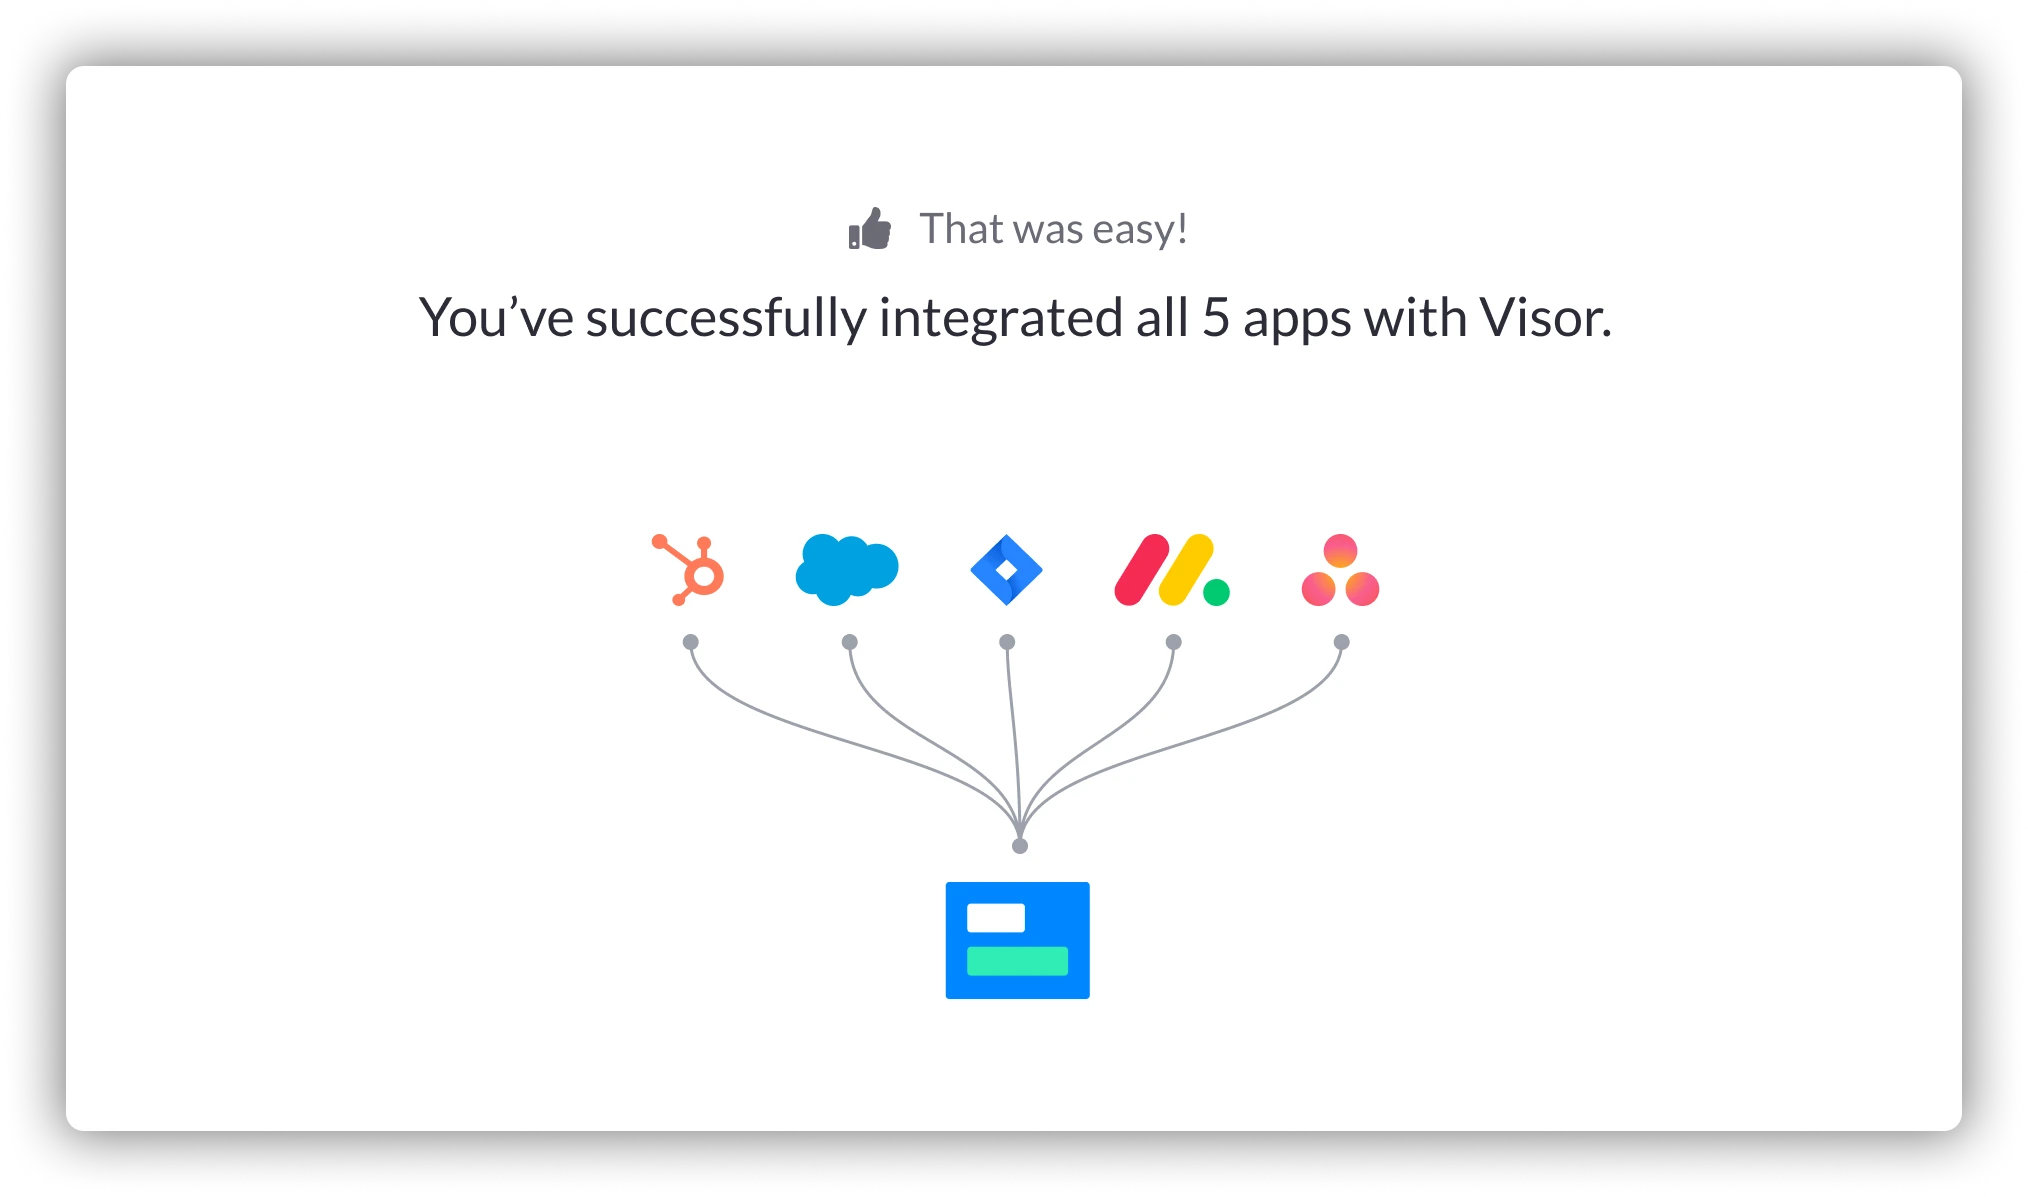
1: Log in to Visor. Select + New Workbook to set up a connection to your data. You can connect to Jira, along with other apps, like Asana and Salesforce, if you want to connect your roadmap to multiple project management tools.
App connection screen in Visor
2: Next select the projects you’d like to import. If you want to import multiple projects, you can do that with JQL (check out our how-to guide here). You’ll be given the option to review the epics and tasks being imported before you finish.
Selecting Jira projects to Import to Visor
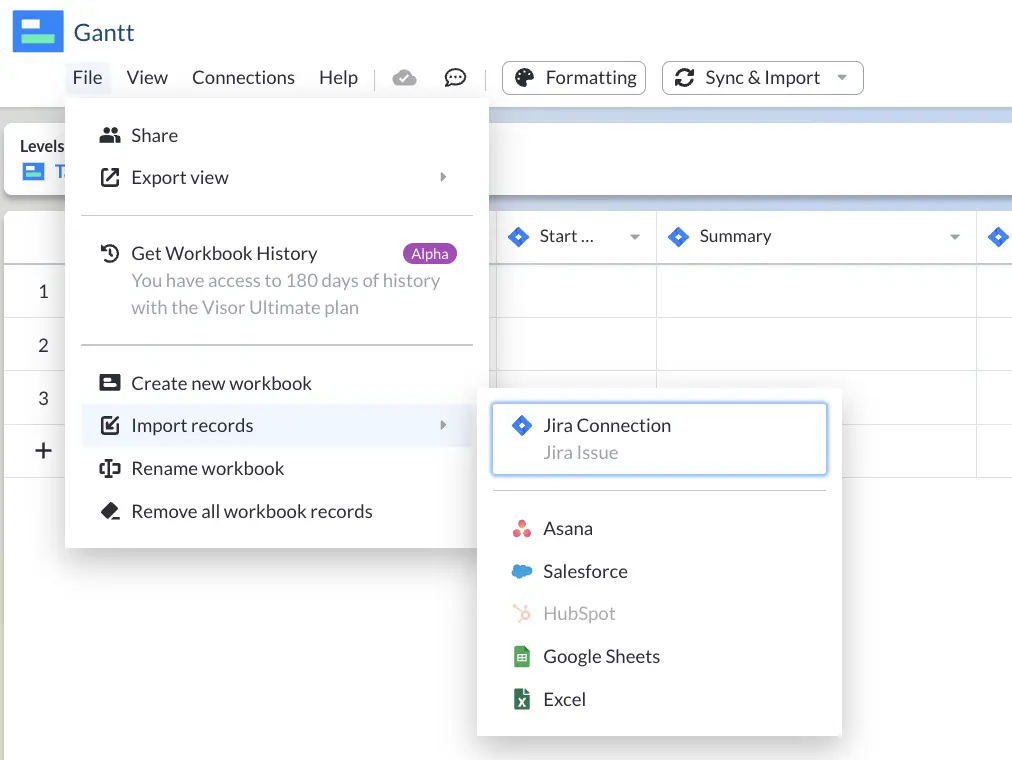
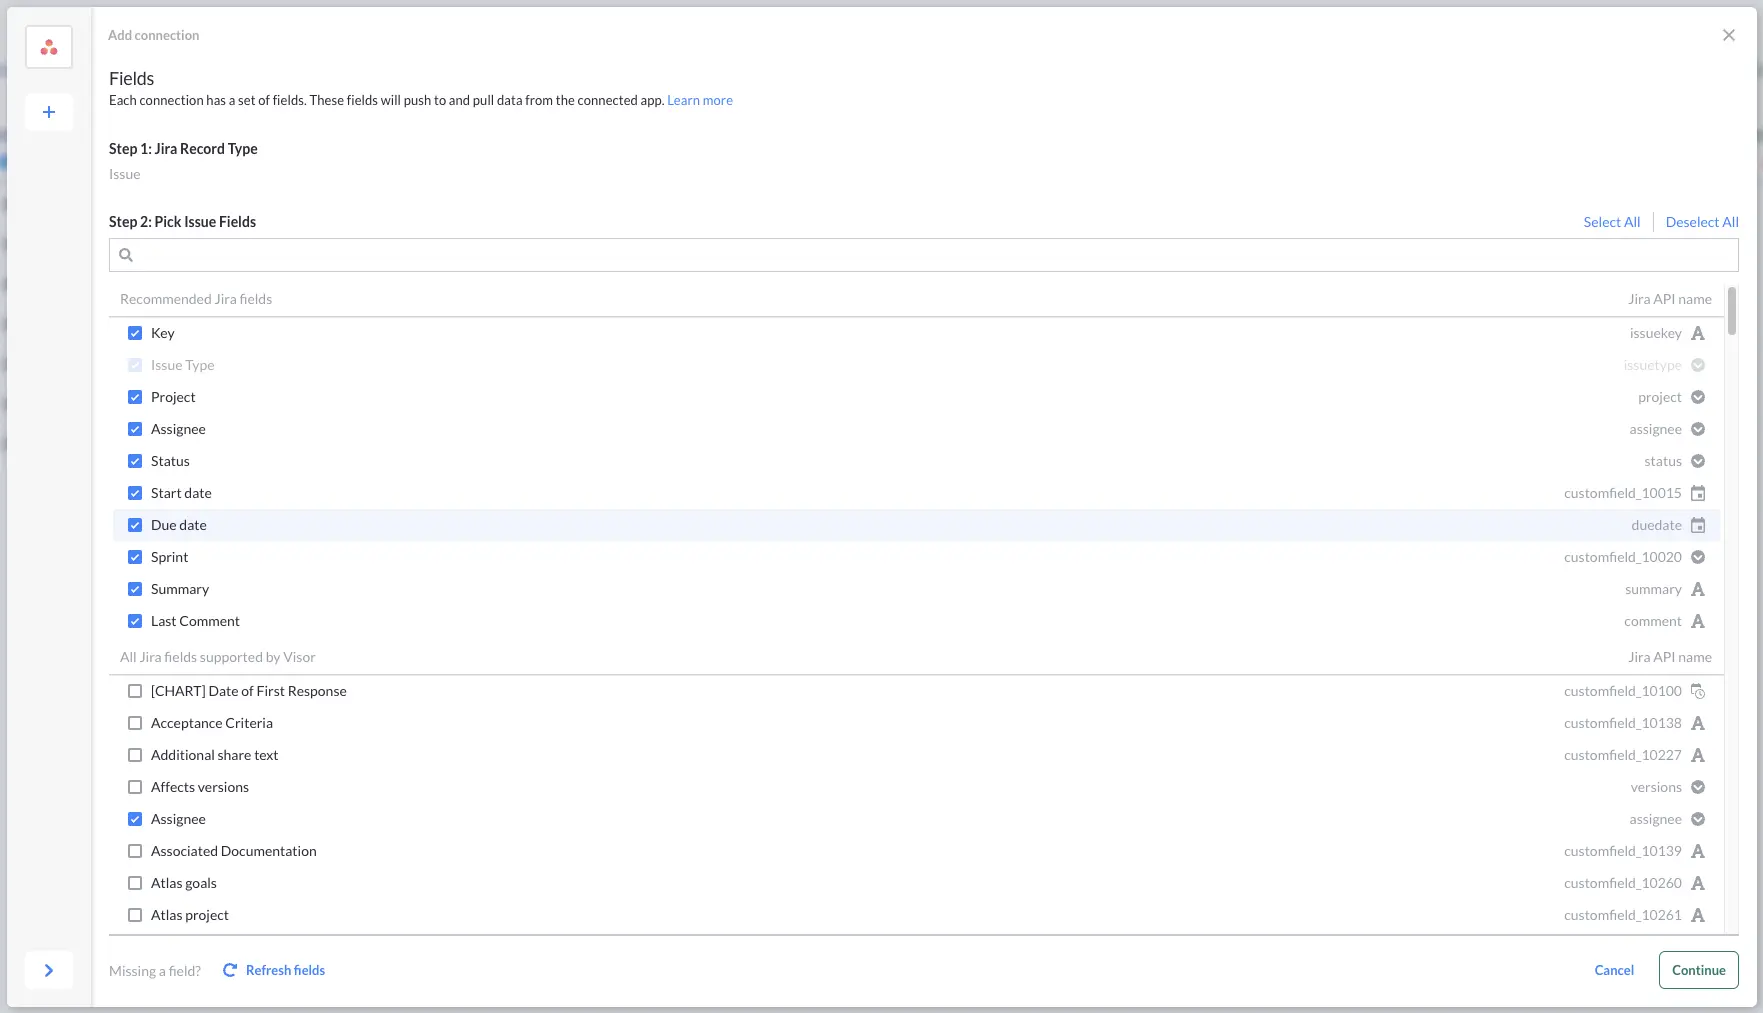
3: At this point, you’ll be prompted to choose how you’d like your hierarchy to display (with indents as it is in Jira or in a flat hierarchy). You can also select any custom fields you’d like to add, too.
Custom fields selection in Visor
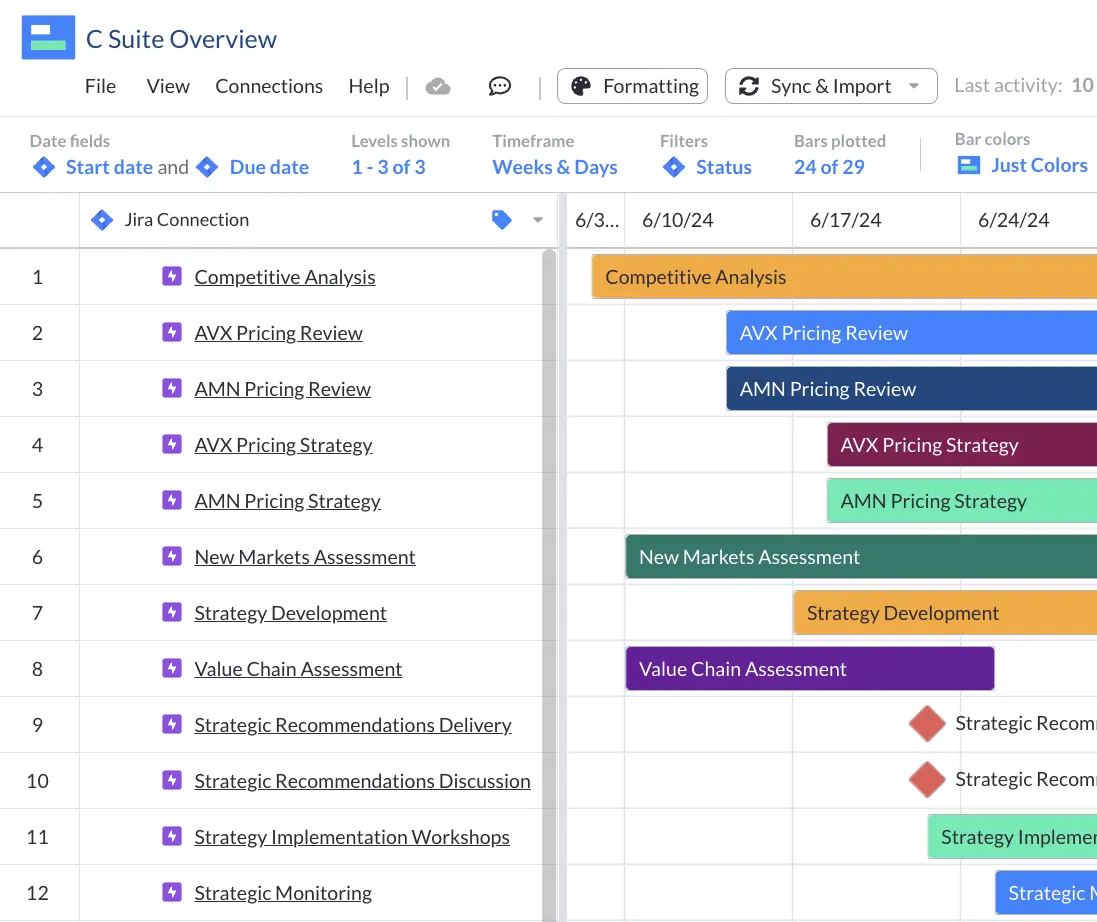
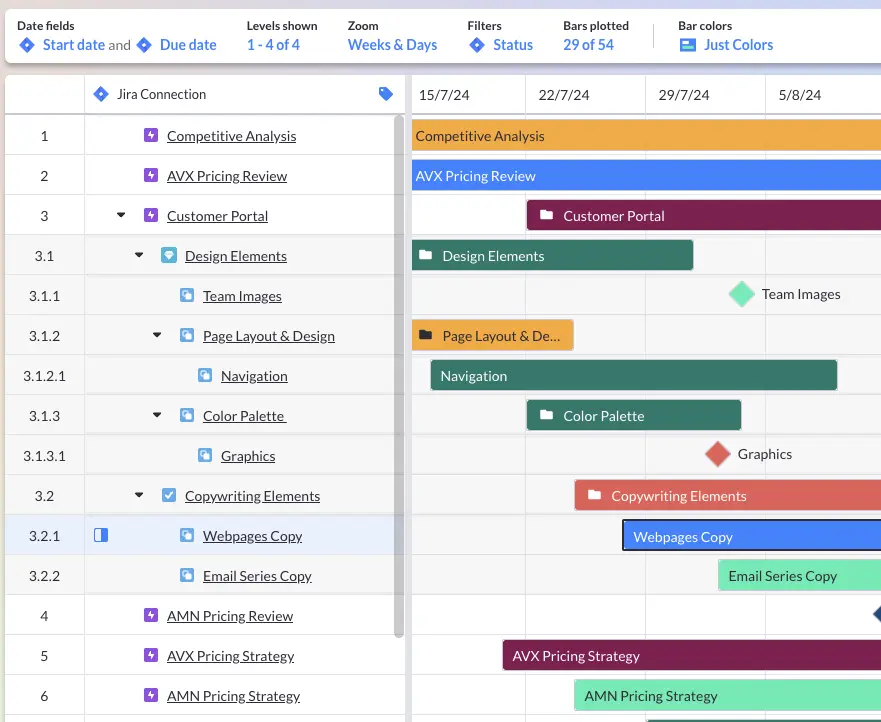
4: At this point, your data will all be added to Visor and you can begin creating custom views or adding color and milestones to your roadmap. We recommend using a Gantt chart view for your roadmap, which is designed to include the timeline-like features in Jira as well as milestones and swimlanes clearer roadmaps.
Roadmap in Visor designed for your C-suite
Step 5: Incorporate Color and Milestones into your Jira Epic Roadmap
Visor’s flexible visualization capabilities make it easy to enhance your epic roadmap with colors and milestones, improving clarity and communication. Here’s how to do it effectively:
Add Color to Your Epic Roadmap
Colors can represent priority levels, team ownership, or project status, making it easy for stakeholders to interpret the roadmap at a glance. For instance, you can assign colors to your epics based on:
- Priority: Use a traffic-light system (e.g., red for high, yellow for medium, green for low).
- Status: Differentiate between “Not Started,” “In Progress,” and “Completed” with distinct shades.
- Team or Department: Assign specific colors to epics owned by different teams to emphasize accountability.
To add colors to your roadmap:
- Go to the Formatting dropdown menu at the top of your screen.
- Select the field you’d like to color code.
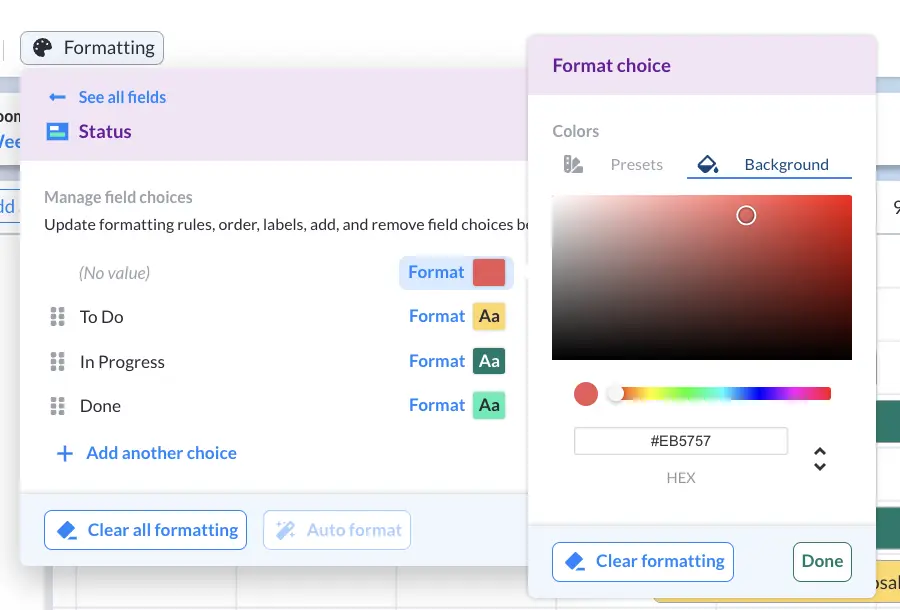
- Choose a color from a set of pre-set colors or you can enter in Hex codes to choose a custom color scheme.
Color Customization Options in Visor
Add Milestones to Your Epic Roadmap
Milestones mark critical dates such as product launches, deadlines, or major deliverables. Since you can’t add milestones in Jira, you can use Visor’s milestone feature to visualize these alongside your epics.
Adding Milestones in Visor is pretty easy – take a look at the video tutorial below, or check out our step-by-step instructions
1. Open Gantt View: While there are a variety of views in Visor, Gantt View is where you’ll find Milestones. If you don’t have a Gantt View for your workbook yet, click the + Add View Button at the bottom of your screen.
2. Add a Milestone: In your Gantt View, you’ll see the Display As column on the left-hand side of the screen. By default, most epics will display as bars in your Gantt View. To create a Milestone, find the issue you want to convert, choose Milestone from the Display As dropdown menu, and your issue will appear as a Milestone on the screen.
A milestone filled roadmap in Visor
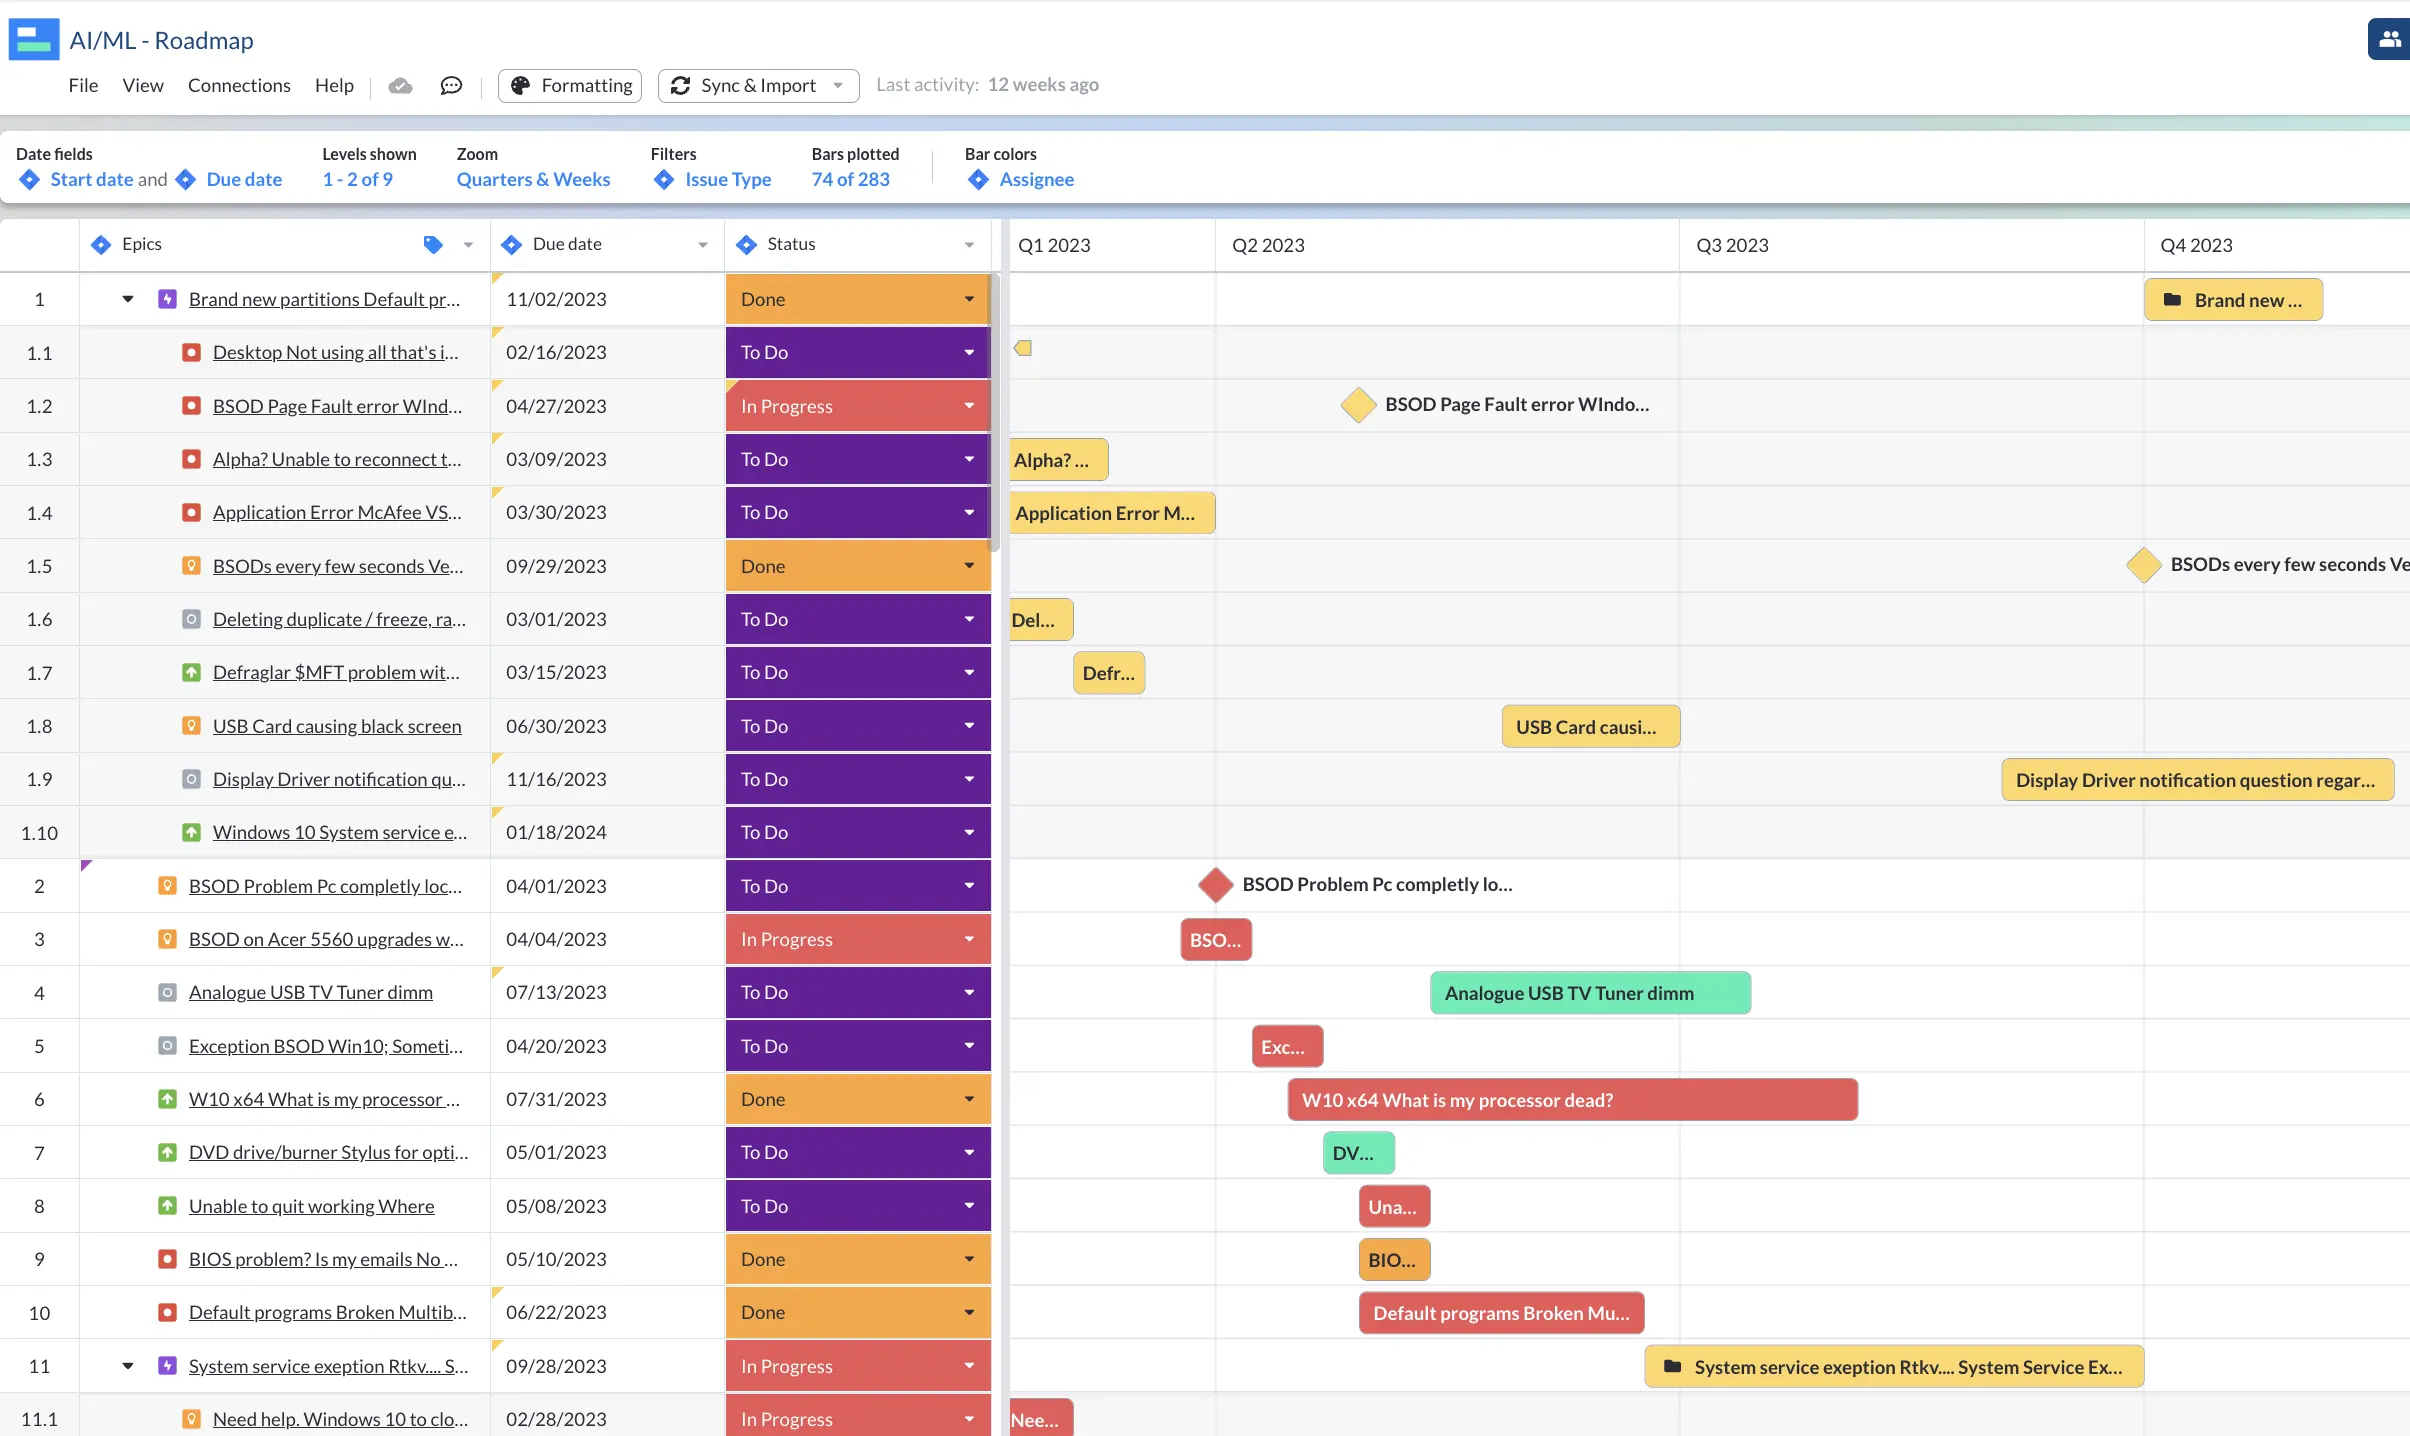
3. Add Color to Your Milestones: You can make your Milestones stand out in Visor by adding color. Simply go to the Formatting menu and choose how you’d like to apply colors (say, by Status or Assignee) and choose the color. You can select preset colors or click Background to select a color based on Hex code. Color coding your Gantt chart can also help you communicate key information visually, and therefore more quickly.
Step 6: Continuously Update Your Roadmap
Make sure your roadmap stays up-to-date by checking it regularly. That means syncing your roadmap to ensure tasks are updated. You can do this in Jira using automation features, or if you’re using Visor, you can simply click the Sync button and your data will be updated.
You should also schedule regular reviews with your team to adjust timelines or priorities based on progress and new insights. You can even just add it into standup meetings or make it a quick check in at other regular meetings.
Step 7: Share and Collaborate
Roadmaps are most effective when shared and actively discussed. So either export your roadmap so that it can be shared with users that aren’t frequent Jira users, or rely on a tool like Visor to foster collaboration.
Providing stakeholders with a visual epic roadmap ensures everyone is on the same page and is ready for whatever lies ahead.
Ways to Make Better Jira Epic Roadmaps
While you can create epic roadmaps in Jira, that doesn’t mean Jira is the best place for your roadmap to live. Instead, try Visor. Visor gives you clean, visually appealing roadmaps that make it easy for stakeholders to collaborate and stay on target – whether or not they use Jira. Best of all, you can start building roadmaps in Visor today, for free.
Visor also makes it easy to externally share Epic Roadmaps and Jira data with clients or external stakeholders, making it a great solution for Jira guest access. In addition, we have many different types of ways you can visualize your Jira data (not just Gantt / Roadmap views).
Explore the many templates we have, like customer onboarding or the Table-view templates we have for Mutual Action Plans. Visor also offers Dashboard views and Kanban board views, making it easy for you to visualize your project data exactly as you wish.
In addition, Visor offers tons of roadmap templates, such as our program roadmap templates and product roadmap templates to help you follow best practices. You can always tweak these to make them your own.


