Root Cause Analysis – How Project Managers Can Use It To Understand and Address Project Challenges

Start using Visor today
- Visualize all your projects and data

- Roll up multiple projects into portfolio views
- Try Visor for FREE
Root cause analysis (also called RCA) is looking at either a problem or a success story and figuring out the reason behind it. In other words, you look for the root of the problem to come up with a long-lasting fix. Everything happens for a reason – that’s the basic principle behind root cause analysis.
That’s key in project management where timelines are tight, and you need to deliver solutions quickly when things go wrong.
If you’ve never performed a root cause analysis before but want to give it a try, we’re here to help. In this post we’ll dig into:
- What root cause analysis is
- Root cause analysis best practices
- Different ways you can perform an RCA
- Tips on what to do after you perform a root cause analysis
Data is one of the best ways to identify where a problem is coming from, and Visor offers a simple way to share data with stakeholders throughout your organization. Try Visor for free to see how it can bring greater clarity to your root cause analysis.
What Is Route Cause Analysis In Project Management
The idea behind root cause analysis is that problems don’t just happen; they come from a source – the root cause of the problem (hence the name). The goal of RCA is to determine what happened, why it happened, and how to prevent it from happening again.
This is in contrast to more stop-gap attempts to solve issues – when a team tries to solve a problem by tackling the symptoms rather than the root cause. The advantage is that stopping problems at their root often prevents the issue from recurring, and can lead to improvements in overall system performance and reliability. So if you’ve got a project that’s struggling, performing RCA can help you solve for that problem, but it helps you develop a plan your team can follow in the future.
By the way, RCA isn’t just for problems (though that language crops up a lot in this post). You can also use it to figure out why something went right. Say there was a sudden surge in web traffic or productivity was up significantly month over month – as a project manager, root cause analysis can help you determine what you did right so that you and your team can keep on doing it.
RCA Best Practices for Project Managers
Root cause analysis is more or less detective work, so if you’ve ever read or watched a mystery, the process will seem familiar, albeit with some business-themed adjustments.
Step 1: Define the Problem
At the start of your mystery a crime is called in. Okay, so your issue likely isn’t a crime, but it is a problem, and you can’t fix a problem if you can’t identify it. So at this stage you want to clearly state the problem, including:
- What happened?
- When did it happen?
- Where did it happen?
- What’s the scope and impact of the problem?
Step 2: Collect Data
What does any good detective do next? They look for clues. The same applies to root cause analysis – you want to start gathering data and evidence related to the problem. Depending on the problem, you might want to perform interviews, jot down observations, or review records, logs, and physical evidence. Then develop a timeline of events leading up to and following the problem to understand when the issue occurred and escalated.
By the way, while you’re looking to develop that timeline, give Visor a try. Visor offers an easy-to-use data-sharing solution, especially if you’re looking to develop a timeline of events or share data with stakeholders as you brainstorm.
Step 3: Identify Possible Causal Factors
At this point in your RCA, you want to start figuring out the potential causes that could have contributed to the problem. You’ll want to expand your pool of detectives, though, so engage with your team to brainstorm potential causes. After all, a variety of perspectives can help uncover more possible factors than just one person alone.
Here’s also where you should start to use different tools to narrow down the suspects for the root cause of the problem. Tools like Fishbone Diagrams can break down potential causes into major categories such as people, processes, equipment, materials, environment, and management.
Step 4: Identify the Root Cause(s)
It’s time to ID your suspect. You’ve got some causal factors figured out – here’s where you get down to the root cause (or causes, as you might have more than one).
Once again, you’re looking for the fundamental reason the problem was triggered, rather than symptoms or immediate causes. The 5 Whys Technique and Change Analysis are both ways to narrow down the suspects (more on them in the Root Cause Analysis Methods section). And once again, as a PM you’ll want to involve your team here to get as much information as possible.
Step 5: Develop and Implement Solutions
You’ve got your suspect in custody – now what? At this point, you want to find ways to fix the root cause of your problem. You’re looking for solutions that are specific, actionable, and feasible.
Towards that end, it’s time to develop an action plan that lays out what needs to be done, who’s responsible for doing it, and timelines for implementing the plan. (And of course implementing that plan with your team.)
Step 6: Monitor and Evaluate
We don’t want recidivism, so monitor the solutions you came up with through RCA to make sure they’re effectively addressing the root cause of your problem. Then make necessary adjustments based on feedback and the results you see to ensure the problem is fully resolved and doesn’t come back.
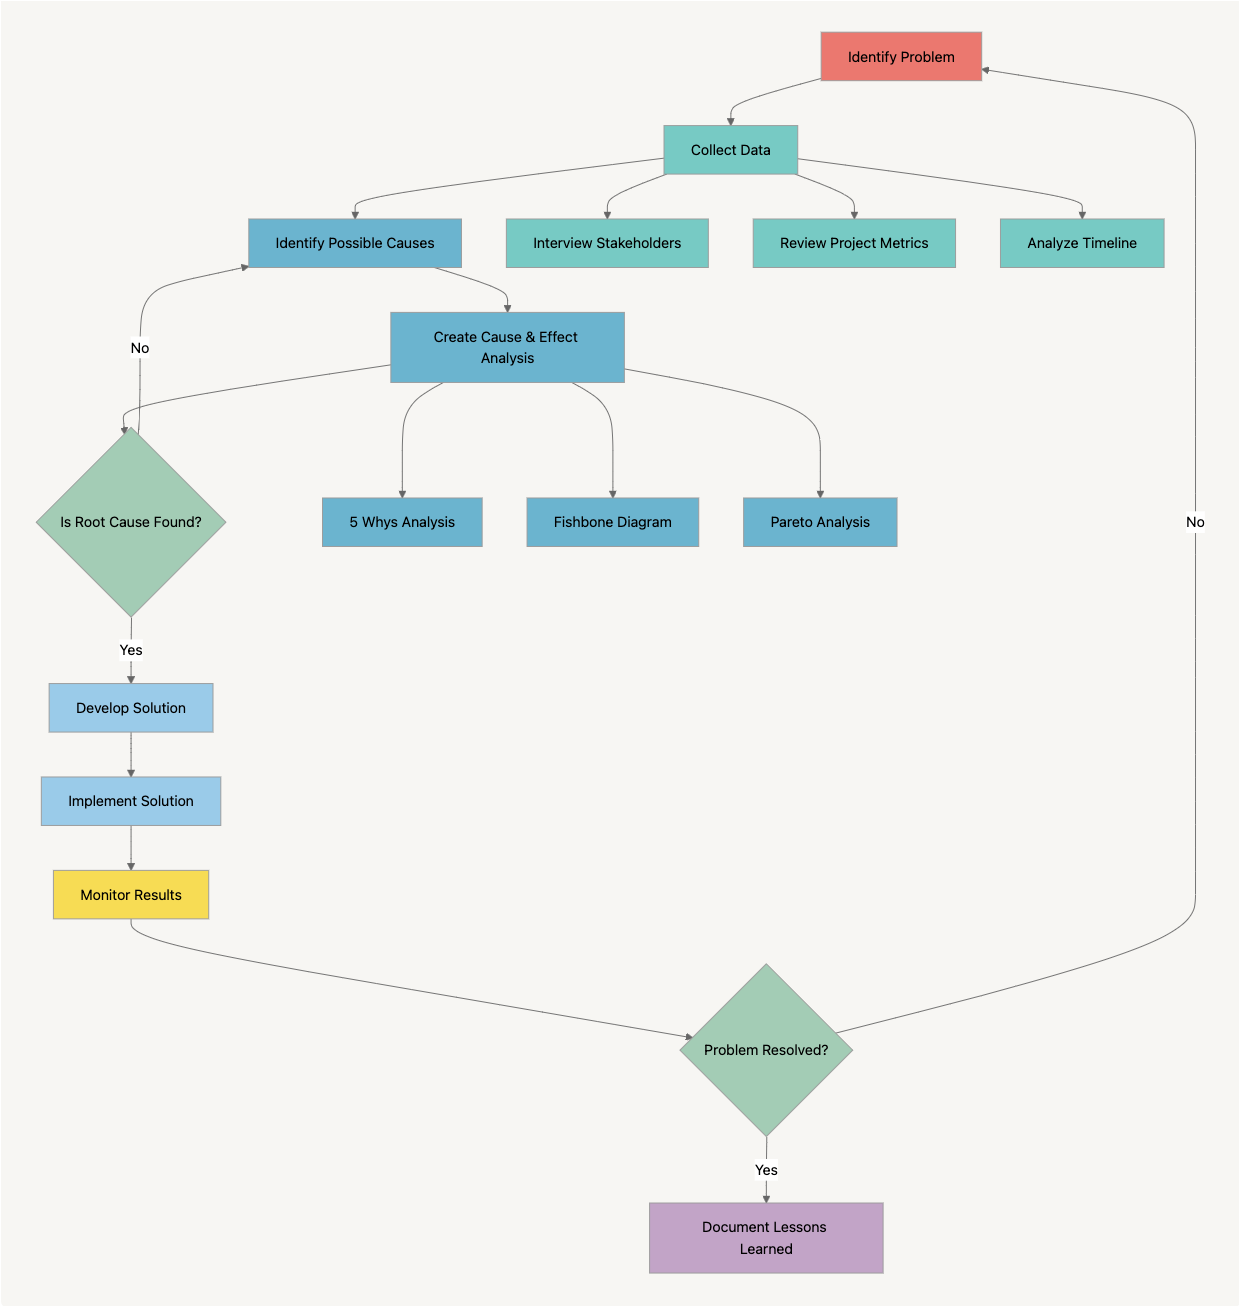
Root Cause Analysis Template/Diagram
Here is a flowchart showing how to implement the root cause analysis methods that are described in detail below the flowchart:
Root Cause Analysis Methods
There are plenty of ways to perform a root cause analysis, but the ones listed below are some of the most popular, since they can be applied to a broad spectrum of issues and are easy to do.
The 5 Whys Method
Ready to get in touch with your inner child? Children will sometimes ask you “Why?” over and over until you’re ready to lose your mind, but it turns out they’ve hit on a good way to get information. In the 5 Whys method, you’re also going to ask why quite a bit (though maybe not as much as your average child will).
The 5 Whys method is a simple, yet powerful, way to explore the cause-and-effect relationships underlying a particular problem. Here’s how it works:
Steps in the 5 Whys Method
- Identify the Problem: Lay out the problem you want to solve. (Make sure to write down the specific issue so you know everyone understands it.)
- Ask the First Why: Ask why the problem occurred. Try to look for an answer that is grounded in facts and data.
- Ask Why A Bunch More: For each answer you get, ask why it happened. Then do that until you reach the root cause. Even though this method is called the 5 Whys, it may take more or less than five tries to get where you’re going.
- Document Each Answer: Write down each why and its corresponding answer. This paper trail will help you understand the problem-solving process and make sure that each step is clear and logical.
- Identify the Root Cause: Keep asking why until you reach a point where you run out of helpful answers. This is the point where you’ll often find the true root cause.
- Take Corrective Action: Once the root cause is identified, develop and implement an action plan to address it and stop it from happening again.
So you understand what it is in theory, let’s take a look at an example to see how the 5 Whys work in practice.
Example: Software Bug in a Web Application
Problem: The web application crashes when users submit a form.
- Why does the web application crash when users submit a form?
- The application throws a null pointer exception.
- Why does the application throw a null pointer exception?
- The form submission handler code attempts to access a variable that hasn’t been initialized.
- Why is the variable not initialized?
- The variable depends on data from a database query that returns no results.
- Why does the database query return no results?
- The query is filtering records based on incorrect criteria.
- Why are the criteria in the database query incorrect?
- The criteria were based on outdated requirements that were not updated during the last feature enhancement.
Root Cause: The criteria in the database query were based on outdated requirements that were not updated during the last feature enhancement.
Once you know the root cause you can plan for how to fix it – and make sure it doesn’t happen again.
Fishbone Diagram (Ishikawa)
A Fishbone Diagram, also known as an Ishikawa Diagram, is a way to identify and present the potential causes of a specific problem or effect. Basically a Fishbone Diagram lets you organize potential causes into categories, making it easier to identify the root causes. It gets its name from the way it looks – a bit like the skeleton of a fish, with the problem at the head and the causes extending out like bones.
This type of diagram serves a few different purposes. It’s a tool for brainstorming, so your team can categorize potential causes. It’s also a simple way to organize your thoughts, laying out complex problems and the factors that may have led to them.
Components of a Fishbone Diagram
There are only a few basic elements to a Fishbone Diagram. Like the 5 Whys, it’s a simple brainstorming exercise designed to help you narrow down possible causes of your issue.
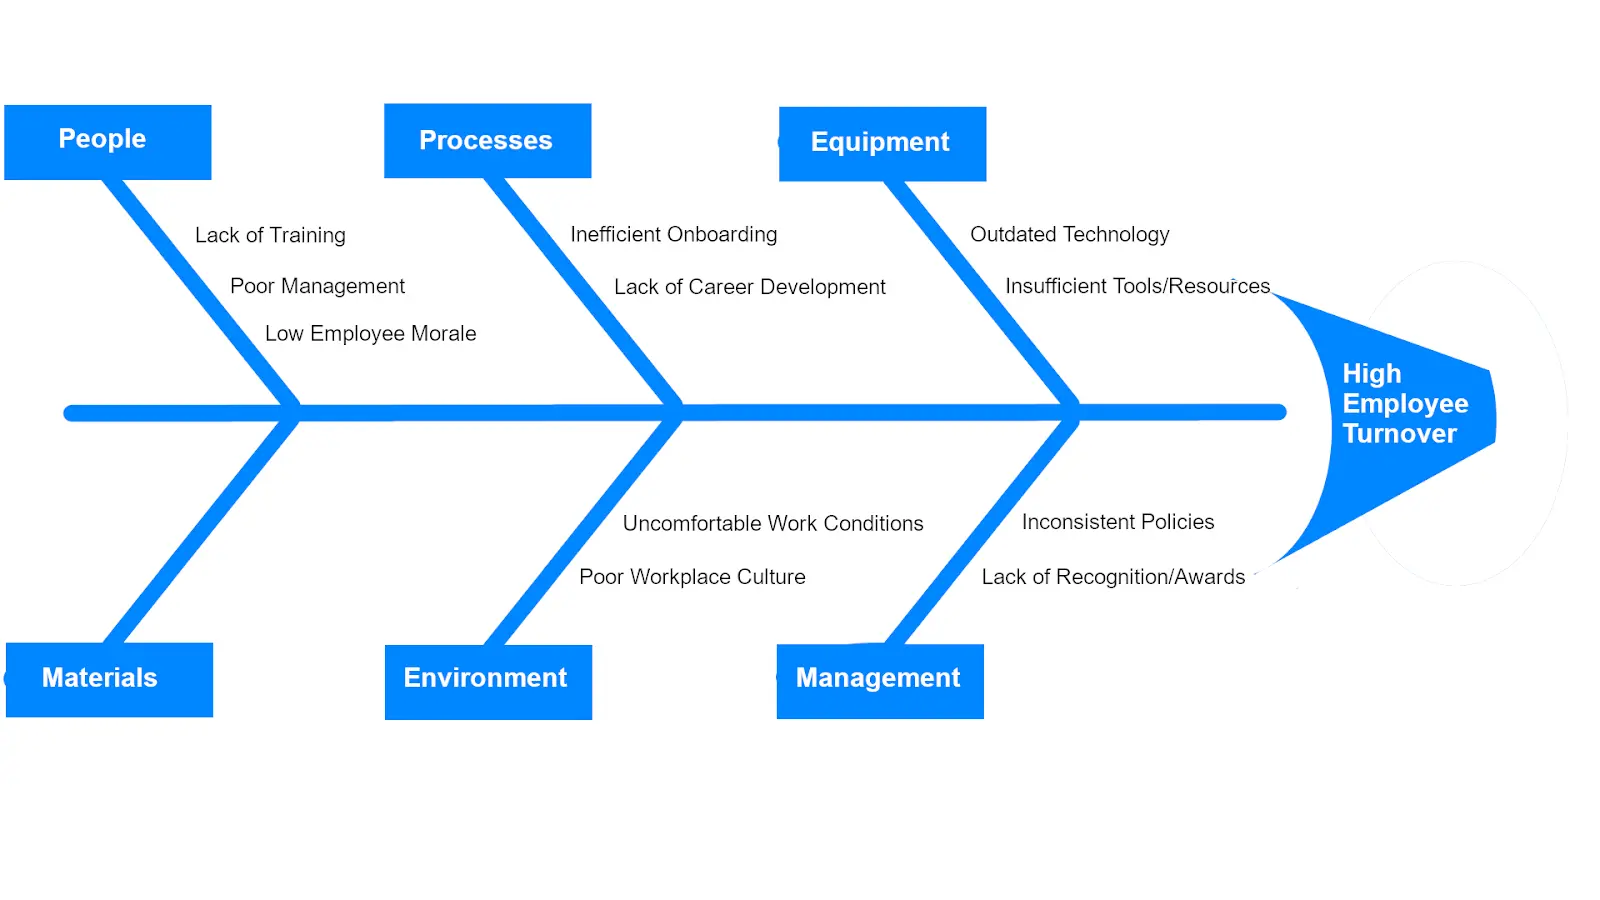
- Head: The head represents the problem or effect you are trying to analyze. In the example below, the issue being addressed is high employee turnover
- Spine: This is the main arrow or line that points to the head, symbolizing the direction of influence.
- Bones: These are the branches off the spine representing major categories of causes. For example, people, equipment, management, environment, and so on.
- Sub-bones: Here we find smaller branches stemming from the bones, detailing specific factors within each category. In the example below, the Processes category has two sub-bones, Inefficient Onboarding and Lack of Career Development, since these are two processes that might contribute to the problem identified on the head.
Steps to Create a Fishbone Diagram
If you’re looking to create your own Fishbone Diagram, the process is pretty simple:
- Define the Problem: Write down the problem or effect at the head of your fishbone diagram.
- Identify Major Categories: Next figure out the main categories for your potential causes. Common categories include People, Processes, Equipment, Materials, Environment, and Management. Note that you may not need all of them in every diagram.
- Brainstorm Causes: For each category, work with your team to brainstorm possible causes and add them as branches off the corresponding bone. So outdated technology might fall under the Equipment bone, lack of training could fall under People, etc.
- Analyze the Diagram: Take a look at the diagram and see if you can identify the most likely root causes. In particular, look for causes that appear multiple times or across multiple categories.
- Prioritize Causes: It’s time to take action! Choose which causes to address based on their impact and how likely it is they are contributing to the problem.
At this point you will have at least narrowed down your options so that you can start to work out a plan, and at best you’ll have surfaced several issues you can look at to make your organization work better.
Change Analysis
This is the method to use if everything was working correctly until suddenly it wasn’t. Change analysis focuses on identifying changes in conditions, processes, or environments that might have affected the way things operate. It’s especially useful when you’re troubleshooting problems in complex systems or where multiple factors might be gumming up the works. Take a look at how it works:
Steps in Change Analysis
- Define the Problem: Clearly describe the problem. That includes when the problem was first noticed, what the symptoms are, and the impact of the problem.
- Establish a Baseline: You want to lay out the conditions, processes, and environment when the system was working correctly (before the problem occurred).
- Identify Changes: Next you want to list all changes that have occurred between the time the system was working correctly and when the problem was first noticed. These changes can include:
- Changes in processes or procedures
- Changes in equipment or materials
- Changes in personnel or roles
- Environmental changes
- Software updates or configuration changes
- Analyze Changes: Examine each change to determine its potential impact on the problem. Then consider how each change might have contributed to the issue (some may not have an effect on the problem at all).
- Determine the Root Cause: Take a look at your list of changes and narrow things down to one change or combination of changes that are most likely responsible for the problem. You may need to do more analysis, testing, or experimentation here to figure this out.
Example of Change Analysis
That’s the basics of how a change analysis works, but how does this type of root cause analysis look in practice? Here’s a sample change analysis to give you a better idea.
Problem: A company’s website experienced a significant decline in traffic over the past month.
- Define the Problem: Website traffic has dropped by 30% compared to the previous month.
- Establish a Baseline: The website had stable traffic of approximately 10,000 visitors per day in the months leading up to the decline.
- Identify Changes:
- There were recent changes in website content and structure.
- A major update to the website’s content management system (CMS) went through
- Marketing made a change to the digital marketing strategy, including new keywords and ad campaigns.
- The team implemented a new website analytics tool.
- There was a recent update to search engine algorithms.
- Analyze Changes:
- Website Content and Structure: Review the changes made to the website’s content and structure to make sure they are not negatively impacting user experience or SEO.
- CMS Update: Check for any issues or bugs introduced during the CMS update that might affect website performance or accessibility.
- Digital Marketing Strategy: Evaluate the new keywords and ad campaigns to see if they are less effective than previous strategies.
- Analytics Tool: Ensure the new analytics tool is correctly implemented and not affecting website performance.
- Search Engine Algorithm Update: Investigate if the website’s SEO practices are still aligned with the latest search engine algorithms.
- Determine the Root Cause: Upon investigation, the team finds that the recent CMS update inadvertently disabled several important SEO plugins, negatively affecting the website’s search engine rankings.
What to Do Once You Determine the Root Cause
Performing a root cause analysis is really just step one in the process of fixing your problem (or reproducing your success). Once you’ve done your RCA, here’s what comes next:
Prioritize the Causes of your Problem
If there’s only one issue, you can skip this, but if you’ve found a few causes that might be contributing to your issue, it’s time to decide which you’ll tackle first. Create a list of causes and rank them based on the impact they’re having on your issue.
Document Everything
Problems can crop up more than once. Successes offer future opportunities. And if you don’t write down what happened during the RCA process, you’re back at square one. So document everything – the problem definition, the data you collected, your analysis, the root causes you identified, the solutions you implemented, and their outcomes.
Then share what you learned with stakeholders so that next time around your organization will already have a plan in place.
Decide What To Do Next
It’s all well and good to know what’s causing your problem. The hard part is determining what to do. We mentioned developing solutions up top, but it’s worth coming back to. No RCA is complete with an action plan that actually addresses the issues you’ve uncovered.
That means monitoring your solutions as well. It’s important to establish your action plan is actually working to get to the root of your problem.
Getting For Data For Your Analysis
Root cause analysis can help you solve problems more effectively and gain insights that drive continuous improvement in your organization. So next time you face a problem or want to replicate a success, delve deep, ask the right questions, and make data-driven decisions to keep moving forward.
Of course successfully performing an RCA means having the data you need to uncover issues and drive decisions. Visor gives you a simple way to find the data you need to do your root cause analysis and then share it with stakeholders throughout your organization. Try Visor for free to see how it can bring greater clarity to your root cause analysis.
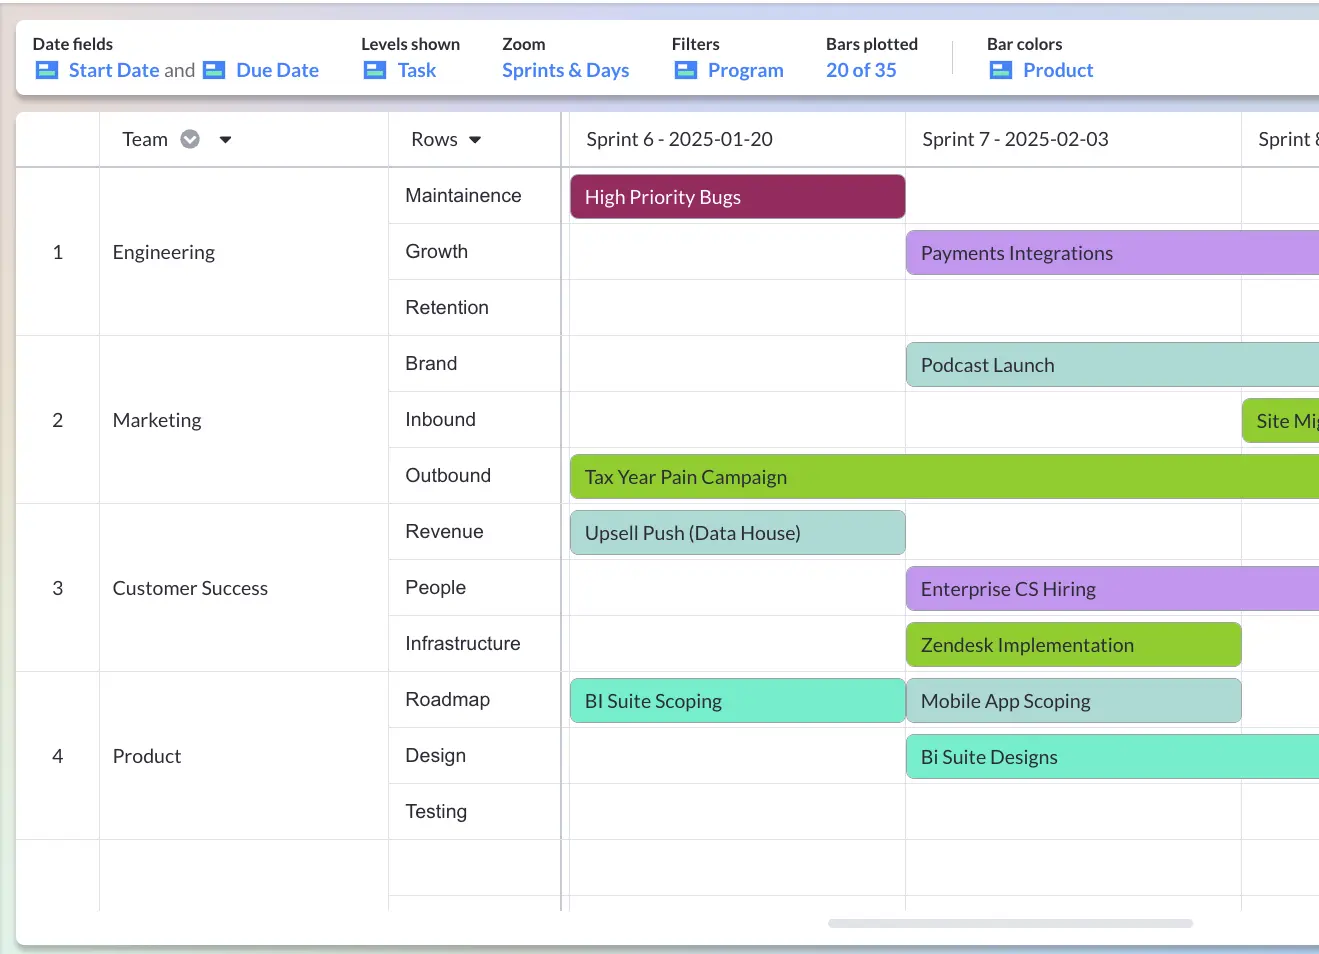
Try Visor for Free Today and take the first step toward more effective problem-solving and data-driven decision-making. In addition to offering dashboards and reporting that can help you drill down with your data, Visor also makes it easy to visualize your project data. Use our simple Gantt chart template to create a roadmap or explore our many other templates!