How to Build a Jira Customer Portal: A Complete Walkthrough

Start using Visor today
- Visualize all your projects and data

- Roll up multiple projects into portfolio views
- Try Visor for FREE
Exceptional customer service is a key feature in building lasting customer relationships, and the Jira customer portal is an invaluable tool to help you achieve that.
With the Jira customer portal, your customers can effortlessly submit requests, track their issues in real-time, and maintain clear communication with your support team, ensuring a smooth and satisfying experience every step of the way.
This blog post will walk you through the process of building out a Jira customer portal, including:
- Why you need a Jira customer portal
- How to set up and customize your portal
- How to share your Jira customer portal data with shareholders
Not to spoil that last one, but Visor offers a quick, easy, and inexpensive solution if you want to share your Jira customer portal data. Try it for free!
Why You Need a Jira Customer Portal
Before you dive into the setup process, it’s important to understand why a Jira customer portal is worth it for your organization. (Or, as you’ll soon see, why any customer portal would help your business!)
If you’re using Jira for project management, here are a few of the main reasons you should consider adding your own portal to it too:
- It streamlines communication: The portal gives customers an easy-to-access way to submit requests, ask questions, and track the status of their issues, which cuts back on back-and-forth emails or phone calls.
- You improve transparency: Customers can monitor the progress of their requests at any time. The information they get through the portal keeps them informed, which helps you build trust. In addition, the portal can display SLAs, helping customers understand expected response and resolution times.
- You’ll boost efficiency: Jira customer portals can automate repetitive tasks like ticket assignment, prioritization, and notifications. All of which frees up your support team to focus on more complex issues. You can also set up forms and fields to make sure that customers provide all necessary information upfront, reducing the need for follow-up questions.
- It improves the customer experience: The portal is designed to be intuitive and easy to navigate so that customers can quickly find what they need and submit requests with minimal effort. If you integrate Jira customer portal with a knowledge base, you can allow customers to find answers to common questions on their own, reducing the number of tickets submitted and empowering customers to resolve issues independently.
- You have room to scale: As your business grows, you can easily add new request types, forms, and fields to the portal to accommodate evolving customer needs. The portal can support multiple languages, making it a good choice for a global customer base.
Example of Enterprise Customer Onboarding Using a Free Customer Onboarding Template:
Here’s the thing. You can get all of that from something called Jira Service Management. (You can read up on that here.) But, odds are, you don’t have that – most teams using Jira to manage their work aren’t actually using Jira Service Management.
We’ll get into how to configure it if you are trying to use Jira Service Management as a customer portal in a moment, but you should know that you don’t have to buy a whole new product just to pull off having a customer portal while using Jira. Nor do you have to give away Jira seats.
There’s a better option.
Sharing Jira Customer Portal Data with Clients
Let’s start with the elephant in the room: sharing data with external users via Jira is a nightmare.
Can you build the customer service portal you need in Jira without using Jira Service Management? Yes… But it’s going to be tricky and it’s going to be expensive.
Running a successful customer portal requires an open flow of communication between your company and your clients. The trouble is, not everyone in every organization is going to know how to use Jira – and odds are good that they won’t even have access to Jira.
If you offer a highly technical, detailed set of offerings that requires extensive onboarding and an in-depth look behind the curtain, you’re in a particularly bad situation. The amount of information you’ll need to share with your clients all but requires you to get at least one Jira seat for them – if not more, as soon you’ll have other stakeholders at a company wanting to work with you more closely. That’s going to add up fast, and you don’t want to lose money on your clients.
You can’t give away Jira seats for free – each new user comes with an additional fee, and there’s no such thing as guest access in Jira. So if you’re looking to share data from your Jira customer portal, you have two options – pay extra to share data with all your stakeholders or connect your Jira account with a tool that won’t charge you every time a new person needs to set eyes on your data.
If you’re looking to do the latter, try Visor. Visor is a spreadsheet-inspired tool that lets you collaborate and share data from multiple sources, including Jira, Asana, and Salesforce.
You can visualize Jira data in many ways in Visor:
Visor seamlessly connects to your Jira data, allowing you to create customizable Views for different audiences. And those audiences cost a lot less than they would in Jira, since you can add all the Viewers you need. The two-way integration allows information to pass back and forth between Visor and Jira (or any other apps your team likes to use!) at the click of a mouse. No hassle, no stress, no stale data – ever.
Different levels of permission help you trust that your clients will never negatively impact your systems or workflows, even if they like getting their hands dirty and exploring the portal in-depth.
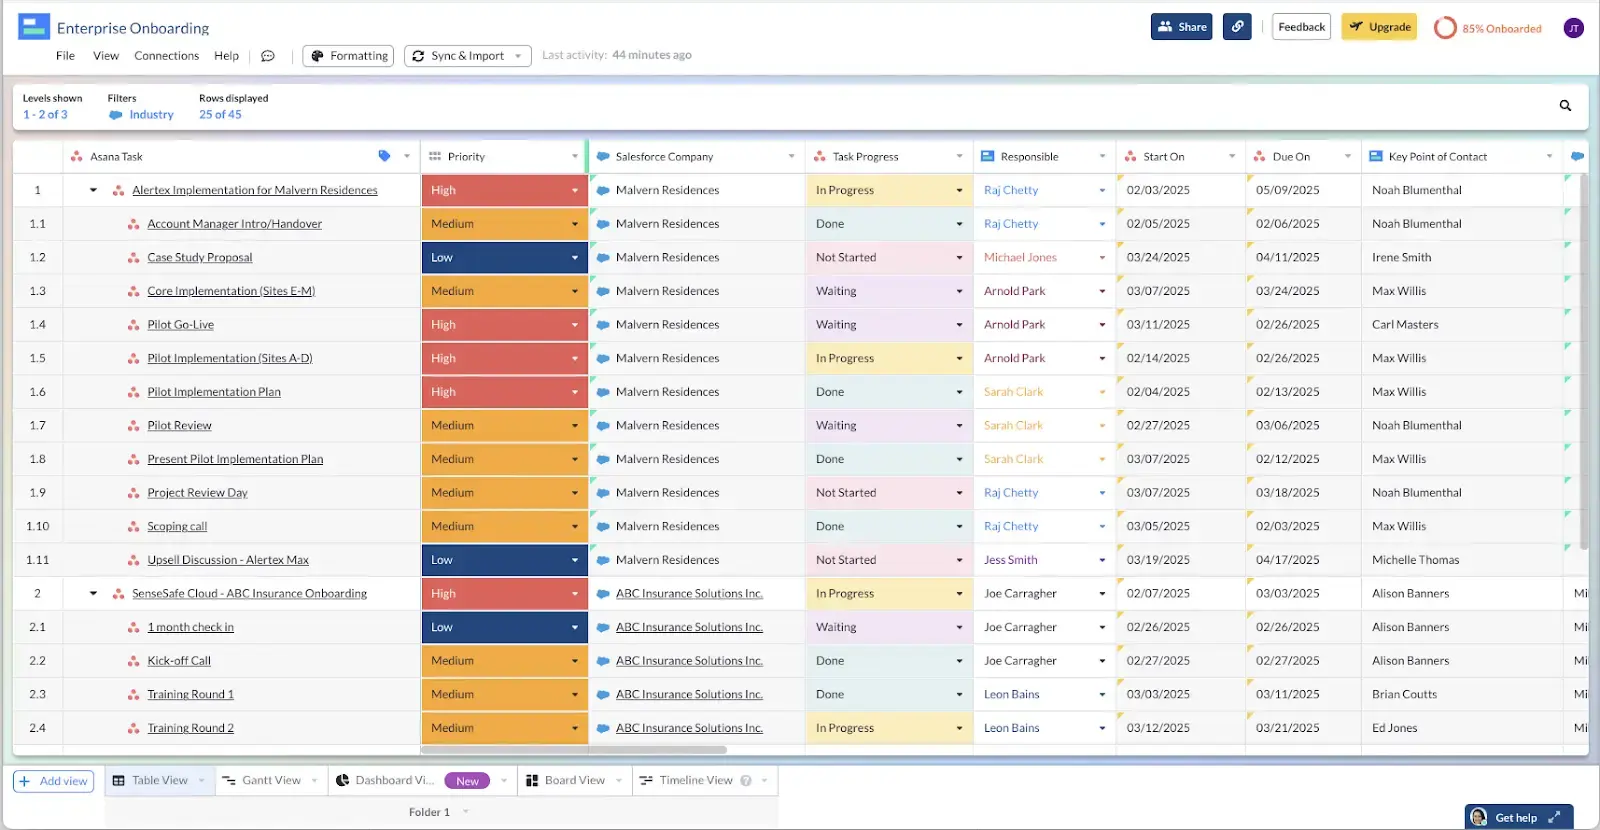
For example, Visor can give customer support teams insights into bug fixes or provide managers with quick, color-coded overviews into customer portal tickets. Tables like the one below make it easy to triage requests.
A Jira Spreadsheet Created in Visor:
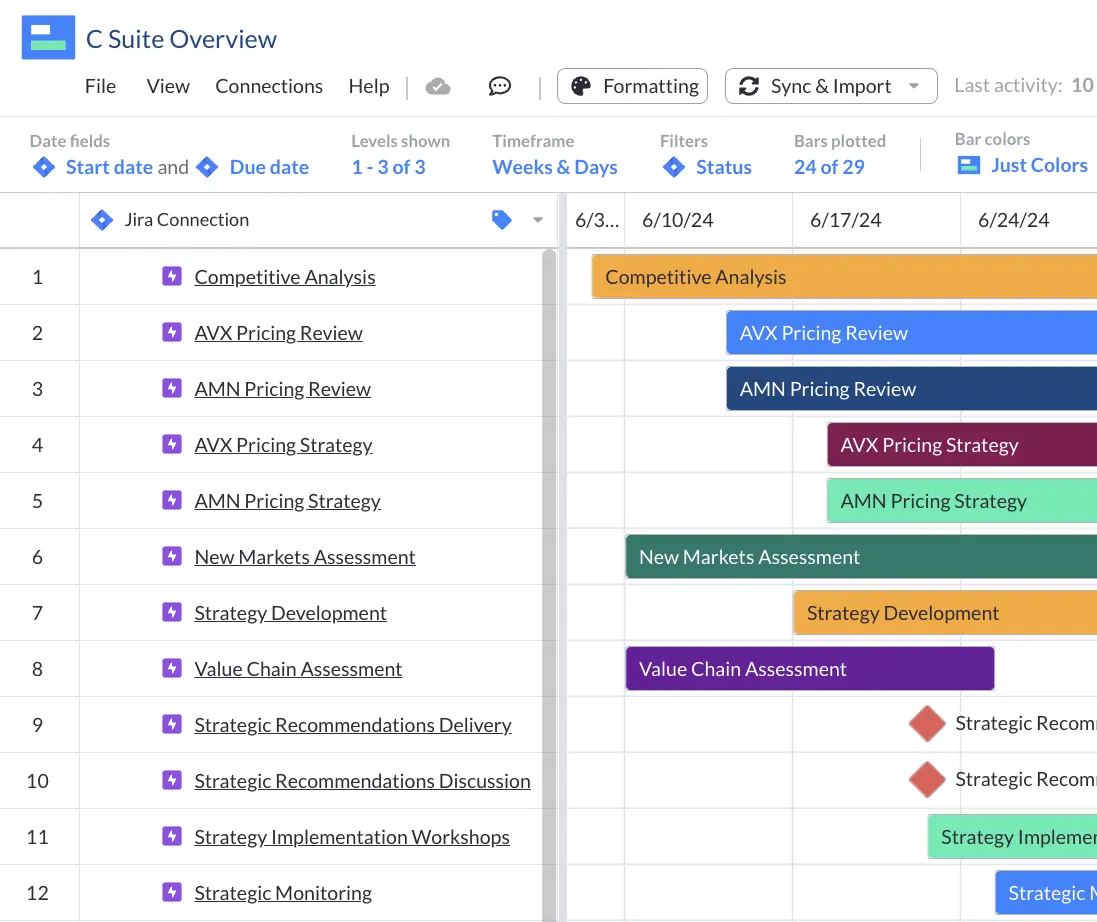
Timeline Views can give stakeholders insight into when bug fixes or product requests are on target, and you can even break these down into swimlanes to break down different types of customer requests into meaningful categories.
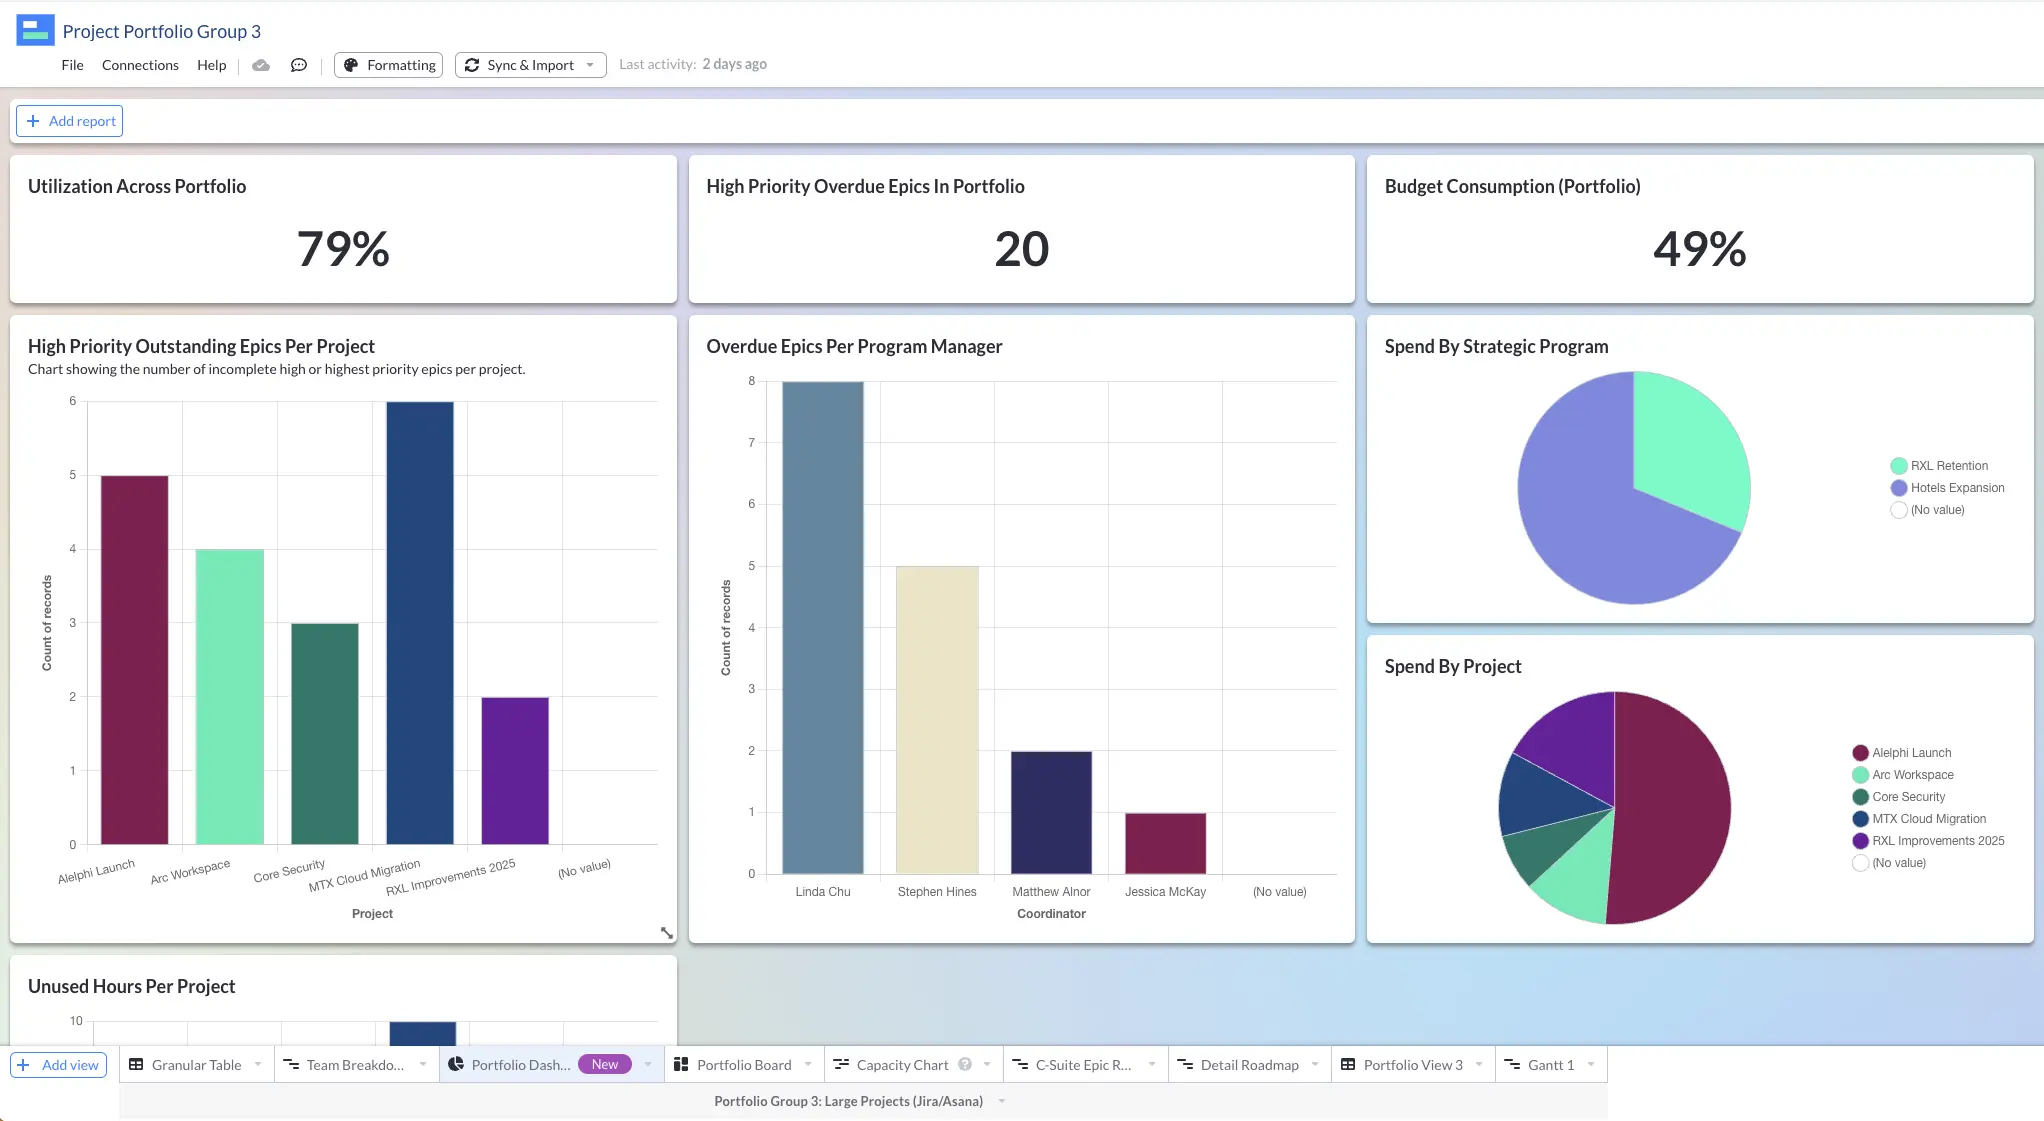
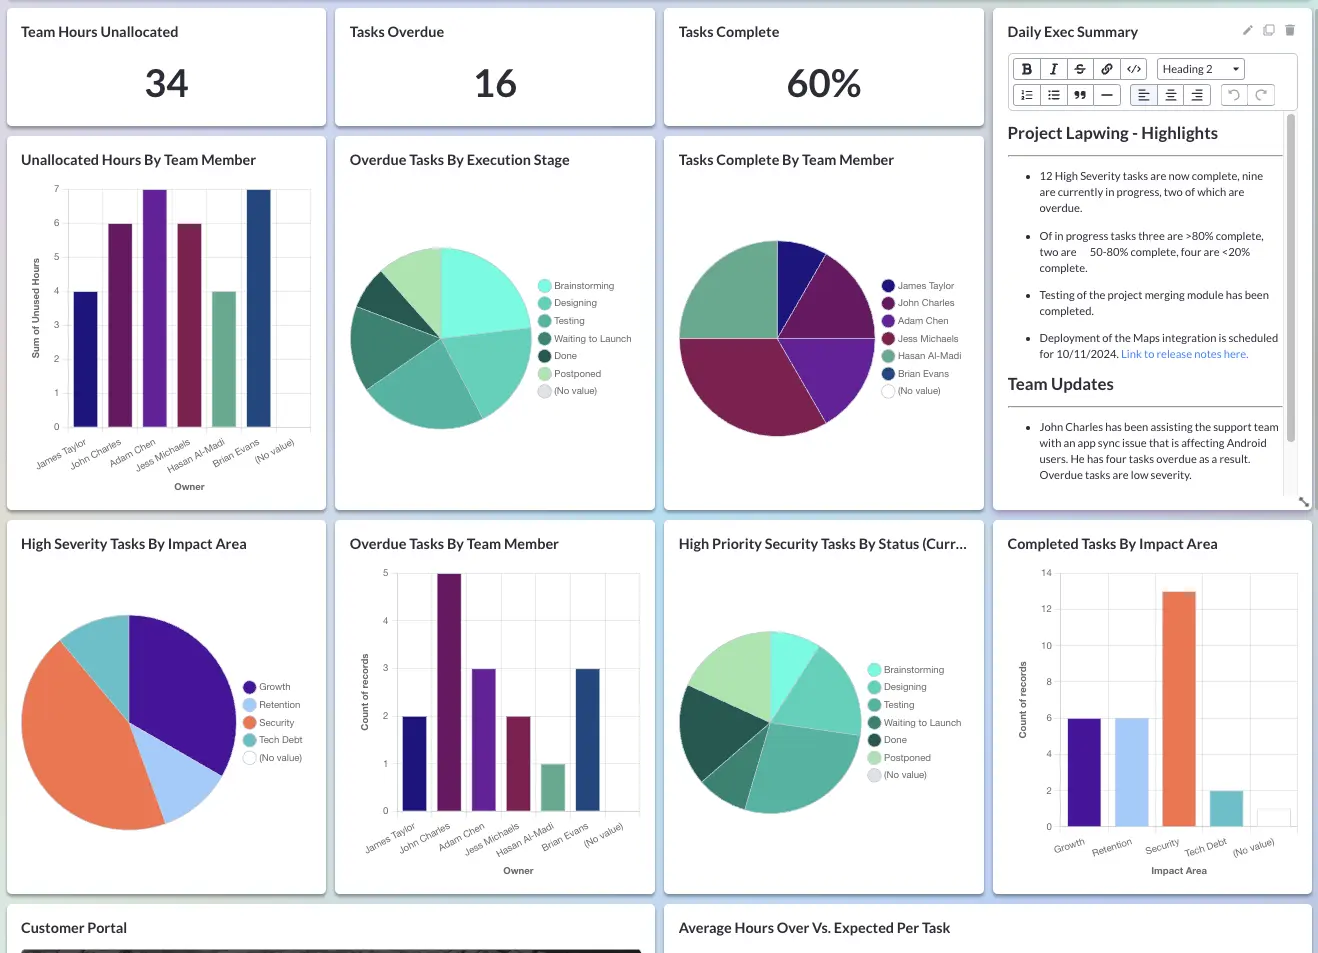
You can also share Jira Dashboards, which can give managers a rapid look into team member’s workloads. Imagine being able to share a high-level overview of everything you’re working on in Jira that’s relevant to your client, so they can self-serve the information they want without it negatively impacting the way you’ve set up your workflows. Combining this view with Visor’s two-way Jira integration makes it especially powerful as a customer portal.
A Dashboard View in Visor
Nested data and custom fields can be imported from Jira, ensuring no one misses a thing. You can even create multiple views tailored to different audiences, allowing you to share customer portal information in a way that’s meaningful to different stakeholders and teammates from each of your clients.
Visor is an extremely powerful tool that unlocks options that Jira simply doesn’t offer. If you want a powerful, intuitive, visually compelling customer portal, you want Visor.
How to Set Up Your Jira Service Management Project
Once you’ve enabled yourself to share data with clients using a tool like Visor, you’ll likely find that you won’t need to change how your team uses Jira at all. You’ll be able to choose how you want to share data between Visor, Jira, and any other apps you may way to use, so that the portal only offers the information you want clients to see.
You can select which fields are synced between Visor and Jira and never need to alter your Jira instance to suit different clients. You can even run multiple customer portals in Visor out of one Jira instance, if you care to set it up that way, making the process truly effortless and pain-free.
If you’d truly prefer to miss out on a free tool with more seats and built-in Jira integration, read on.
To start building your Jira customer portal, you’ll need to create a Jira Service Management (JSM) project. Here’s how:
Step 1: Create a New Jira Service Management Project
- Log in to your Jira instance and navigate to the main dashboard.
- Start a new project. To do that, click on “Projects” in the top navigation bar; then select “Create Project” to begin the setup process.
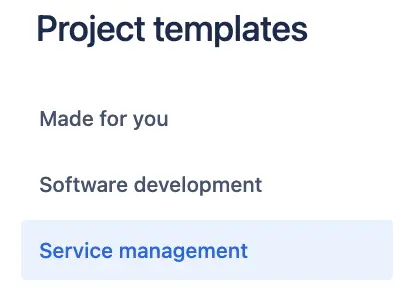
- At this point, you will be prompted to choose a template. Select “Service Management” as your project type.
- Then choose a template that aligns with your needs. A few of the ones you might want to try:
- IT Service Management: This template is ideal for handling IT requests, incidents, and changes.
- Customer Service Management: This one is focused on managing customer inquiries and issues.
- General Service Management: If you need to accommodate different kinds of service requests, this option will give you more flexibility.
- It’s time to configure your basic project details, including:
- Naming your project and selecting a project key (a unique identifier for your project).
- Setting the project lead and any other relevant settings.
- Choosing the appropriate access level (open, limited, or private) depending on who needs access to the project.
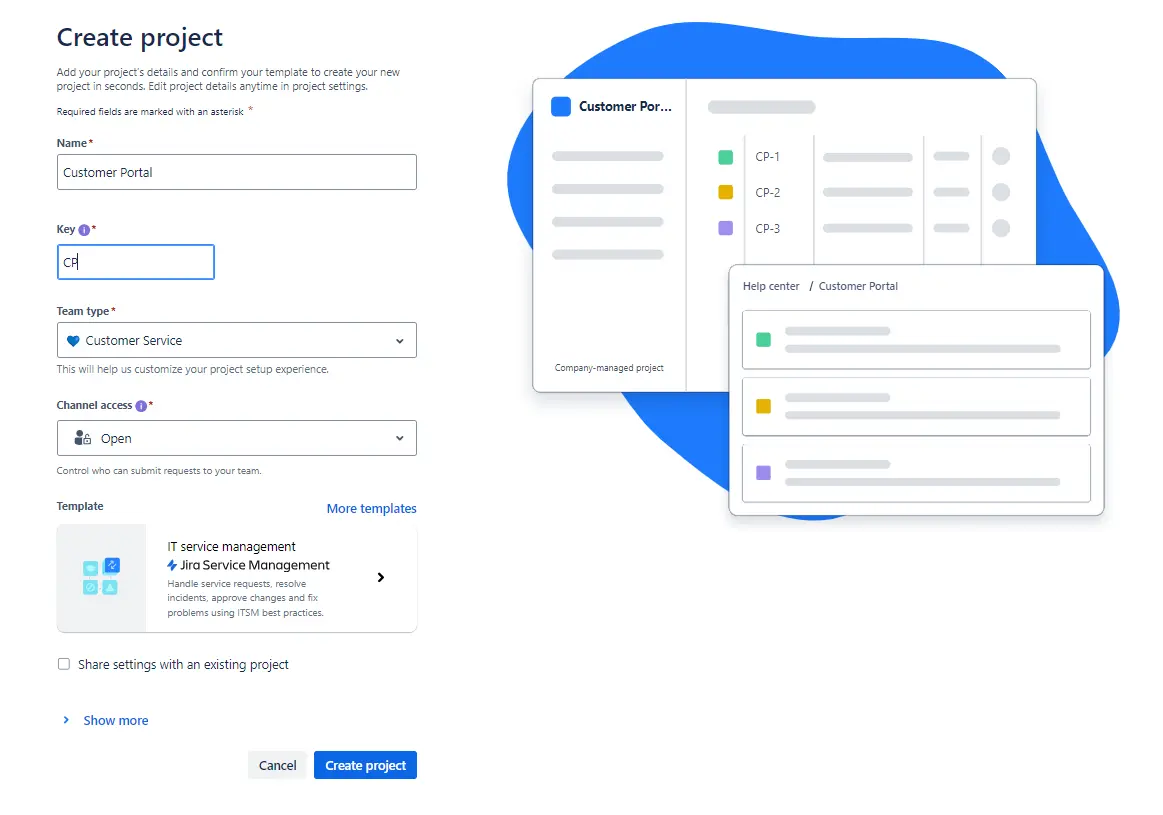
- Click “Create” to finalize the project setup. Jira will create the project with default configurations based on the template you selected.
Step 2: Define Request Types
Once you’ve got the basics covered, you’ll want to set up the type of requests customers will use to get in touch with you.
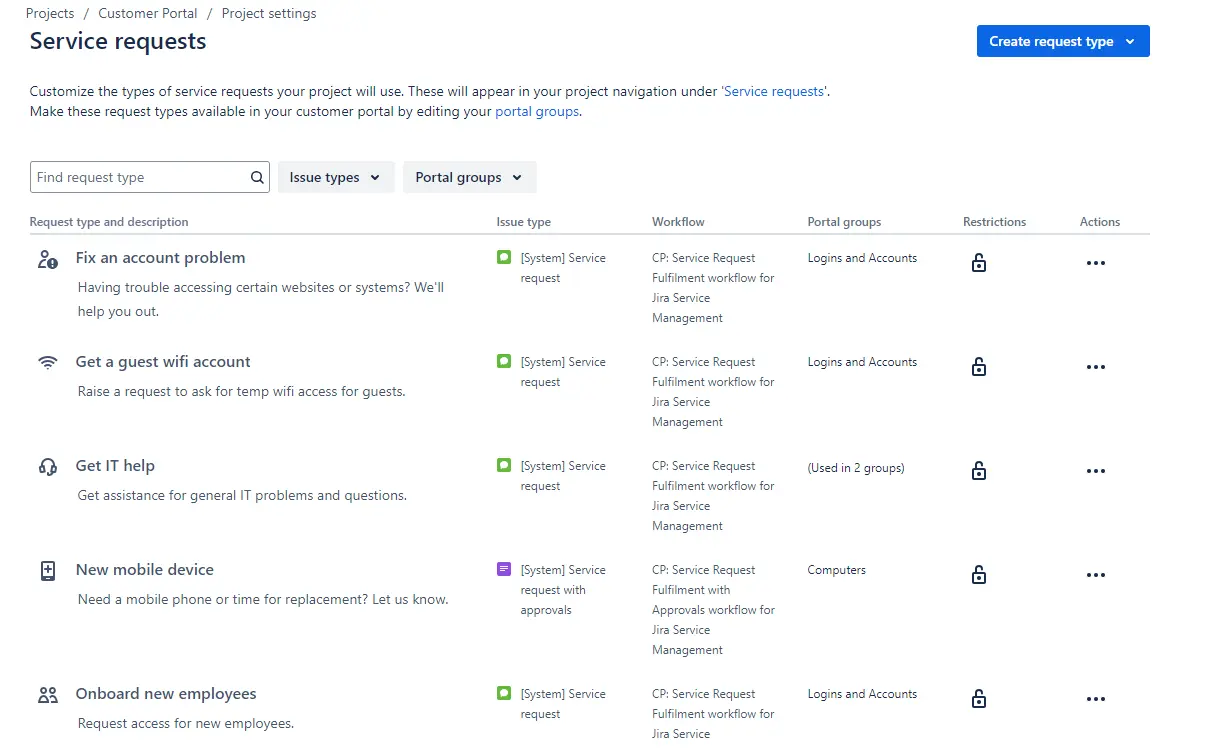
- Go to your project’s settings by clicking on the project name in the sidebar, then select “Request Types” under the “Project Settings” menu to find the access request types.
- Create request types with predefined request types like “Bug Report,” “Service Request,” or “Incident,” or create your own to fit your specific needs.
- You can customize each request type by adding or removing fields, and by defining which fields are required. For example, you might want to include fields like “Summary,” “Description,” “Priority,” or “Attachment.”
- Next, organize request types into groups. For better organization, group similar request types together. For example, you can put IT-related requests in one group and general inquiries in another.
- You can design custom forms for each request type. Add instructions or context-sensitive help to guide users on how to fill out each field.
Step 3: Configure Queues
You’ll want to manage incoming requests as efficiently as possible. To do that, you’ll need to configure queues that organize and prioritize tasks for your support team.
- In your project sidebar, select “Queues” then “Queue Settings” to start configuring how requests will be organized and displayed to your team.
- Create queues based on criteria like request type, priority, or assigned team members. For example, you might have queues like “High Priority Requests,” “New Incidents,” or “Unassigned Tickets.” Set up sorting and filtering rules to ensure that your team can easily find and prioritize requests.
- Define who can view and manage each queue so that team members only see requests that are relevant to them.
Step 4: Automate Workflows
One of the key features of the Jira customer portal is its ability to automate tasks. Here’s how to set up an automation:
- Navigate to “Project Settings” and select “Automation.” You can search for automation templates here or select Rules.
- Set up rules to automate repetitive tasks, such as:
- Automatically assigning requests to specific team members based on request type or workload.
- Sending notifications to customers when their request status changes.
- Transitioning issues to different statuses when specific actions are taken (e.g., closing an issue when it’s resolved).
- Test your automation rules to ensure they work as expected.
Step 5: Finalize Permissions and Notifications
Once you’ve set up the customer-facing side of your portal, you’ll need to consider who can access what on your team.
- Go to “Project Settings” and select “Permissions.” Select the “Action Menu” and “Edit Permissions” to change the existing permissions. Configure who has access to different features of the project, including who can view, edit, and manage requests.
- Set up notification schemes to ensure that the right people are informed at the right times (e.g., when a new request is submitted, when a request is assigned, or when it’s resolved).
If you’ve made it this far and haven’t yet, now is when you need to be integrating Visor to save yourself time, effort, and cost once you implement your customer portal.
Step 6: Launch and Monitor
- Before going live, test the portal and workflows with a small group to identify any issues.
- Once you’re satisfied with the setup, make the portal available to customers.
How to Customize Your Jira Customer Portal
Now that your project is set up, it’s time to customize the customer-facing portal to ensure it’s user-friendly and aligns with your brand. Let’s break down a few of the ways you can do that:
Customizing Your Jira Customer Portal Branding
You don’t want a portal that feels separate from your brand. Here’s how to customize your Jira customer portal to create a seamless experience for your users:
- Access Portal Settings: In the project sidebar, click on “Project Settings.” Then under “Channels,” select “Customer Portal” to access the customization options.
- Change the Portal Name: In the “Customer Portal” settings, you can change the name of the portal to reflect your brand. This name will appear on the portal’s landing page and in the browser tab.
- Add a Logo: Upload your company’s logo to replace the default Jira logo on the customer portal. You should ensure the logo is in a web-friendly format (such as a PNG or JPG image) and is the right size (Jira typically recommends 60×60 pixels for logos).
- Set a Favicon: A favicon is the small icon that appears in the browser tab next to the portal name. Jira lets you set your own favicon to match your company’s branding. Just upload a 16×16 or 32×32 pixel image in ICO, PNG, or GIF format.
- Customize Colors: You can change the color of the header and background to match your brand’s color scheme. There’s also the option to customize the colors of buttons, links, and other interactive elements to align with your brand’s palette. You can even use hex codes for precise color matching.
- Add a Welcome Message: Update the welcome message that appears on the portal’s homepage to reflect your brand’s tone and voice. This message can include a brief introduction, a slogan, or instructions for users.
- Modify the Portal URL: You can customize the URL of the customer portal to include your company’s name or a relevant subdomain (e.g., support.yourcompany.com). However, this step typically requires domain configuration, and you might need to get your IT team involved.
Creating Knowledge Base Articles
You can’t create a knowledge base directly in your Jira customer portal, but it’s pretty easy to connect your portal with Confluence. Atlassian Confluence is a great resource for creating your Knowledge Base, and it’s easy to integrate with your portal..
We won’t get into the details of how to put together your KB in Confluence, since Atlassian does a great job of that already, but we will explain how to integrate your existing knowledge base articles with your Jira customer portal.
- Enable Knowledge Base in the Customer Portal: In your Jira Service Management project settings, go to “Knowledge Base” under “Channels.” Ensure that the “Use Confluence Knowledge Base” option is enabled. This will integrate your Confluence space with the Jira customer portal.
- Make Articles Searchable: Once you enable the integration, customers can search for Knowledge Base articles directly from the Jira customer portal. When they enter keywords into the search bar, your portal will suggest relevant articles.
- Link Articles to Request Types (Optional): You can link specific Knowledge Base articles to particular request types in Jira. For instance, if a customer is submitting a “Password Reset” request, you can suggest a related Knowledge Base article before they submit the request. To do this, go to the request type settings in Jira, and under “Linked Articles,” select the articles you want to display.
Want to skip this hassle? When you set up a Visor Dashboard for your Client Portal, you can use the fully-editable rich text box to share whatever information you want. Use this to craft instructions for how to use the portal, or offer a bank of links to learn more.
Alternatively, you can use this text box as a set of passive updates, release notes, and information that will keep your clients abreast on everything your team does, without spending time on calls and emails.
Visor Dashboard with text:
Or, go even further and embed a video walkthrough, so your clients can see for themselves exactly how to use the portal, and what to do if they need to troubleshoot.
Visor Dashboard options:
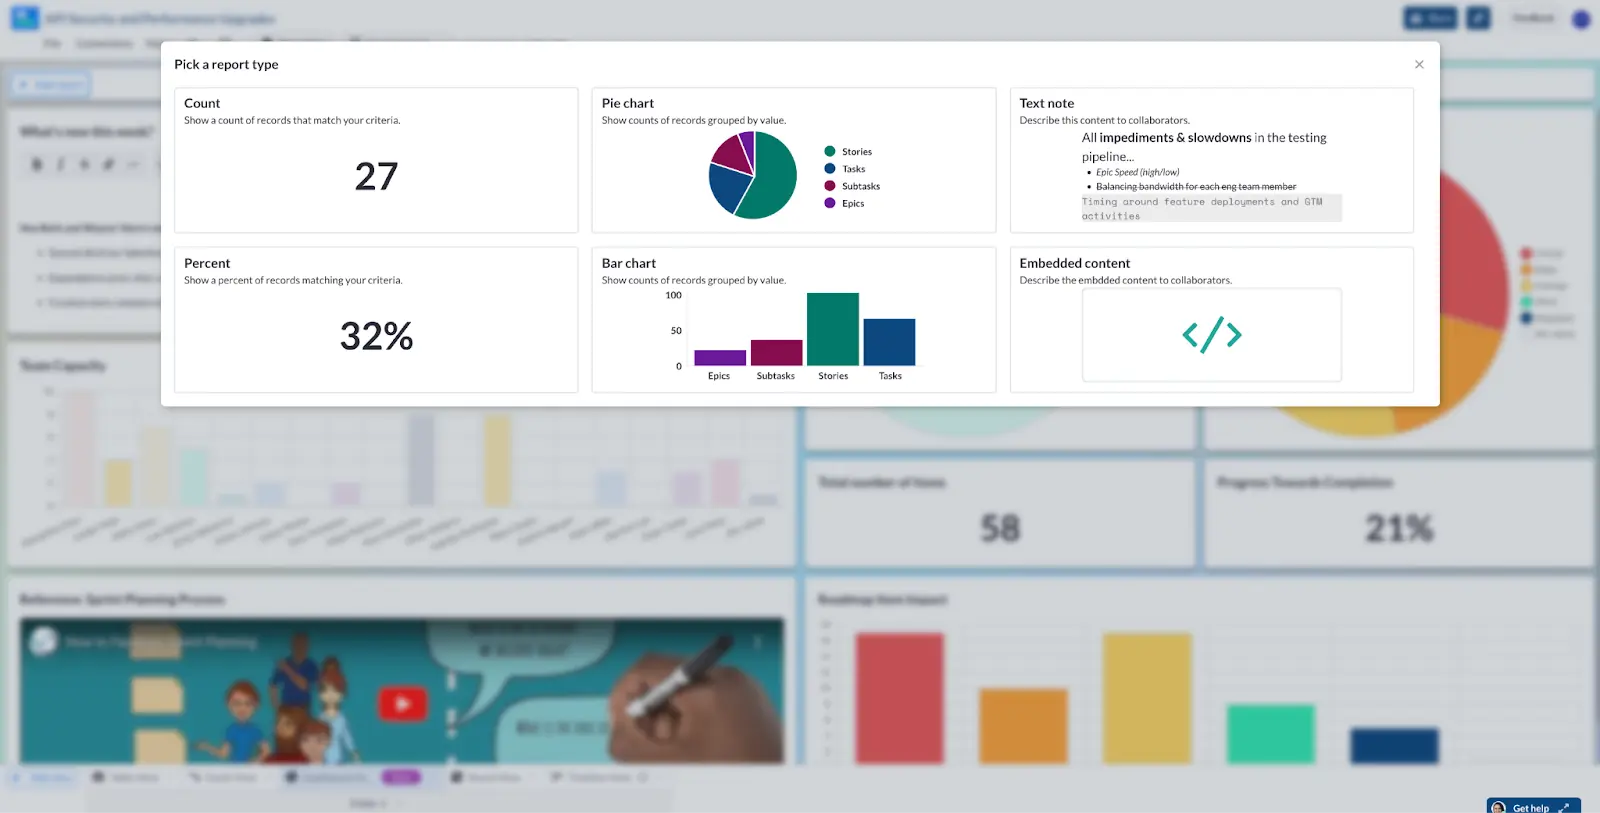
Visor’s Dashboard View is so customizable that you can add as many embedded elements or text notes as you need!
Setting Up Forms in Your Jira Customer Portal
If you want to set up forms in the Jira customer portal, you’ll need to create custom request types with tailored fields to capture the specific information you need from customers. Here’s how you can do it:
- Select the Project: From the list of projects, select the Jira Service Management project where you want to set up the form.
- Go to Request Types: In the project sidebar, click on “Project Settings.” Then, under “Request Types,” select “Create a request type.”
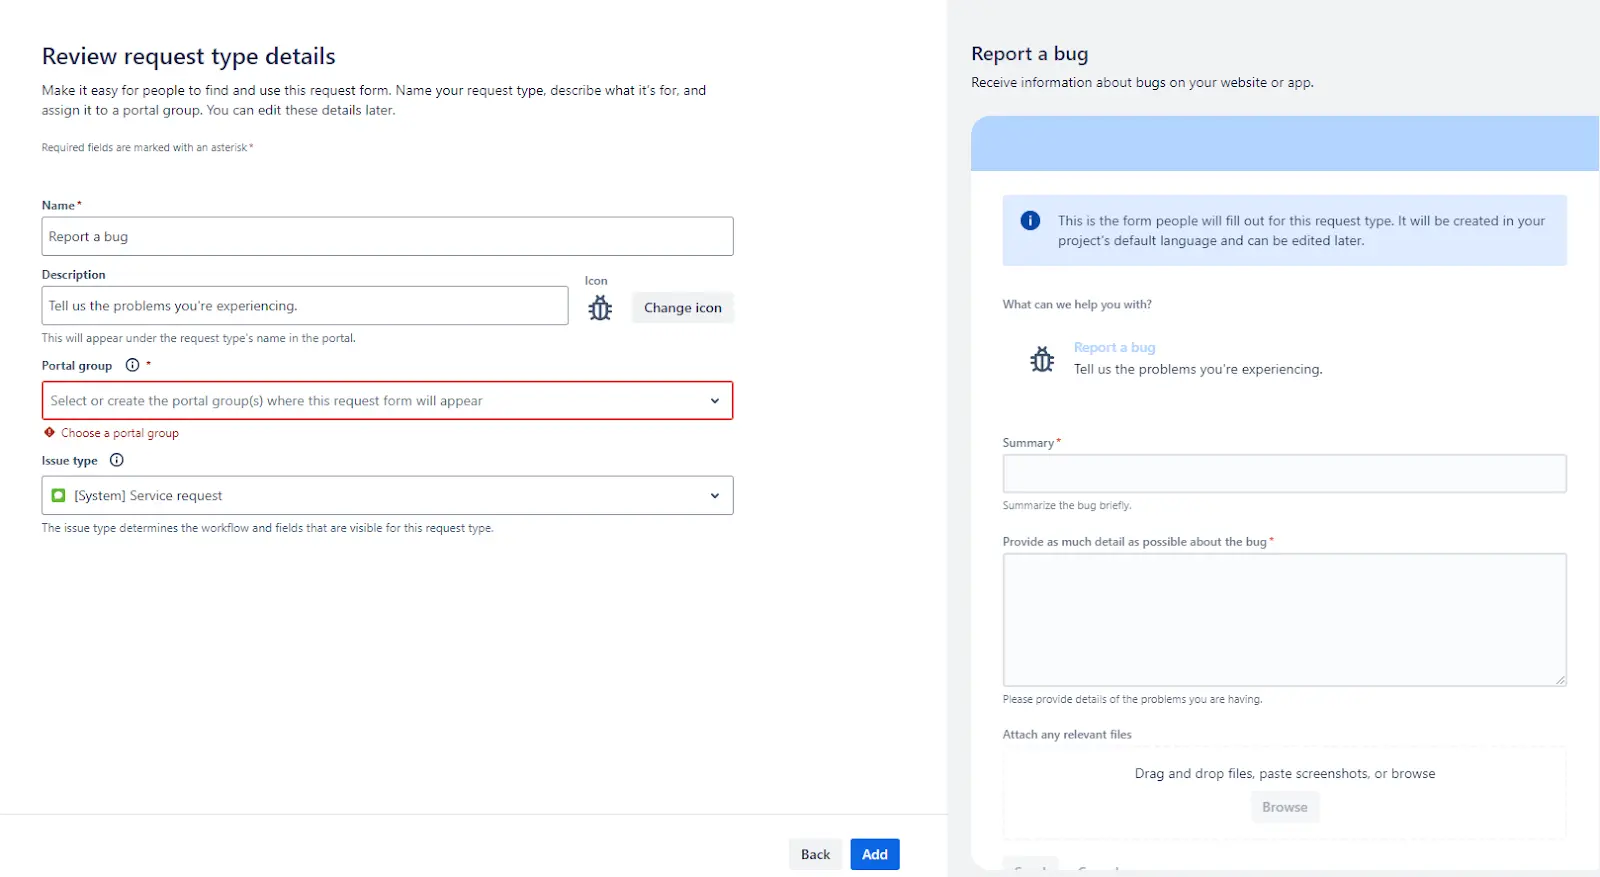
- Choose a Template: Choose a template that closely matches the type of request you want to create, or start with a blank request type.
- Name the Request Type: Give your request type a descriptive name, such as “New Service Request” or “Report an Issue.” Then add a brief description of the request type, which will help customers understand when to use this form.
- Add Custom Fields: Click on “Edit Fields” to customize the form. You can add the fields you need by dragging and dropping them from the available field options. Choose from standard fields (like Summary, Description, Priority) or create custom fields (like Date, Dropdown, Checkbox).
- Configure Field Settings: For each field, you can configure settings such as:
- Field Name: Customize the name that appears on the form.
- Required Field: Mark fields as required if customers must fill them out before submitting the form.
- Help Text: Add help text or instructions to guide customers in filling out the fields correctly.
- Rearrange Fields: Drag and drop fields to rearrange their order on the form, ensuring that the most important fields are at the top. If your form is complex, you can group related fields together for better organization.
- Save and Publish: Save your changes to make the new form available on the customer portal.
- Test the Form: Navigate to the customer portal as a customer would and test the form by submitting a request. Check that all fields work as expected and that the submitted information is captured correctly in Jira.
Tips for Running a Successful Jira Customer Portal
After launching your Jira customer portal, it’s crucial to monitor its performance and make adjustments as needed:
- Track metrics: You can use Jira’s reporting features to keep an eye on key metrics like response times, resolution times, and customer satisfaction scores. That way you can spot areas where you can tweak processes and make better, data-driven decisions.
- Make regular updates: If you want your customers to get the most value out of your portal, you should continuously update it with new knowledge base articles, request types, and workflow automations based on customer needs and feedback.
- Automate Workflows: We mentioned this up above, but it’s worth repeating – automations make life easier for you and your customers by cutting down on manual effort and speeding up response times. So spend some time setting up automation rules to streamline processes. For instance, you can auto-assign requests to the appropriate team or send notifications to customers when their request status changes.
- Enable Multilingual Support: If your customer base is global, consider enabling multilingual support for the portal. Jira allows you to translate the portal into different languages, which lets you make all that content accessible to a wider audience.
- Engage with Customers: The best way to tell if your Jira customer portal is providing value to your customers is by getting feedback from your customers. So encourage them to provide feedback on their experience with the portal and actively engage with them to resolve any issues. It’ll help you improve the portal, which in turn gives the customer a better experience and makes them more satisfied with your organization.
Enhancing Customer Service with Jira and Visor
Setting up a Jira customer portal is easier than you think, and it’s certainly worth it if you’re looking to simplify customer service operations.
By integrating tools like Visor, you can share crucial Jira data with stakeholders without the need for additional Jira licenses, simplifying collaboration and decision-making.
By combining and maintaining a connection between your Jira customer portal and Visor, you can not only improve customer satisfaction but also empower your team to deliver exceptional service at scale. It’s truly the secret to elevate your clients’ experience and make your business the most user-friendly it can be.
Interesting in seeing other options? Read up on the best customer portal software to see which combination of tools in your tech stack will give your customers and teams an optimal experience.
If this article was helpful, consider reading these related articles:
- Jira Dashboard Guide: How to Create & Share Reports in Visor
- Confluence Gantt Chart: Your How To Guide
- 5 Ways Visor Custom Views Help Teams Collaborate Better