Epics vs Features vs Stories – What Are They and How Should You Use Them?
Epic vs features vs stories. Sometimes these can seem more complicated than they actually are.
Epics, features, stories, tasks, and subtasks are just the different issue types that are used in Agile to contain and structure work into discreet chunks, with clear, hierarchical relationships.
Epics sit at the top of this hierarchy. Although sometimes people will group several epics together into initiatives. Beneath epics are features, then stories (also called user stories), then tasks, and finally subtasks. As the diagram below shows:
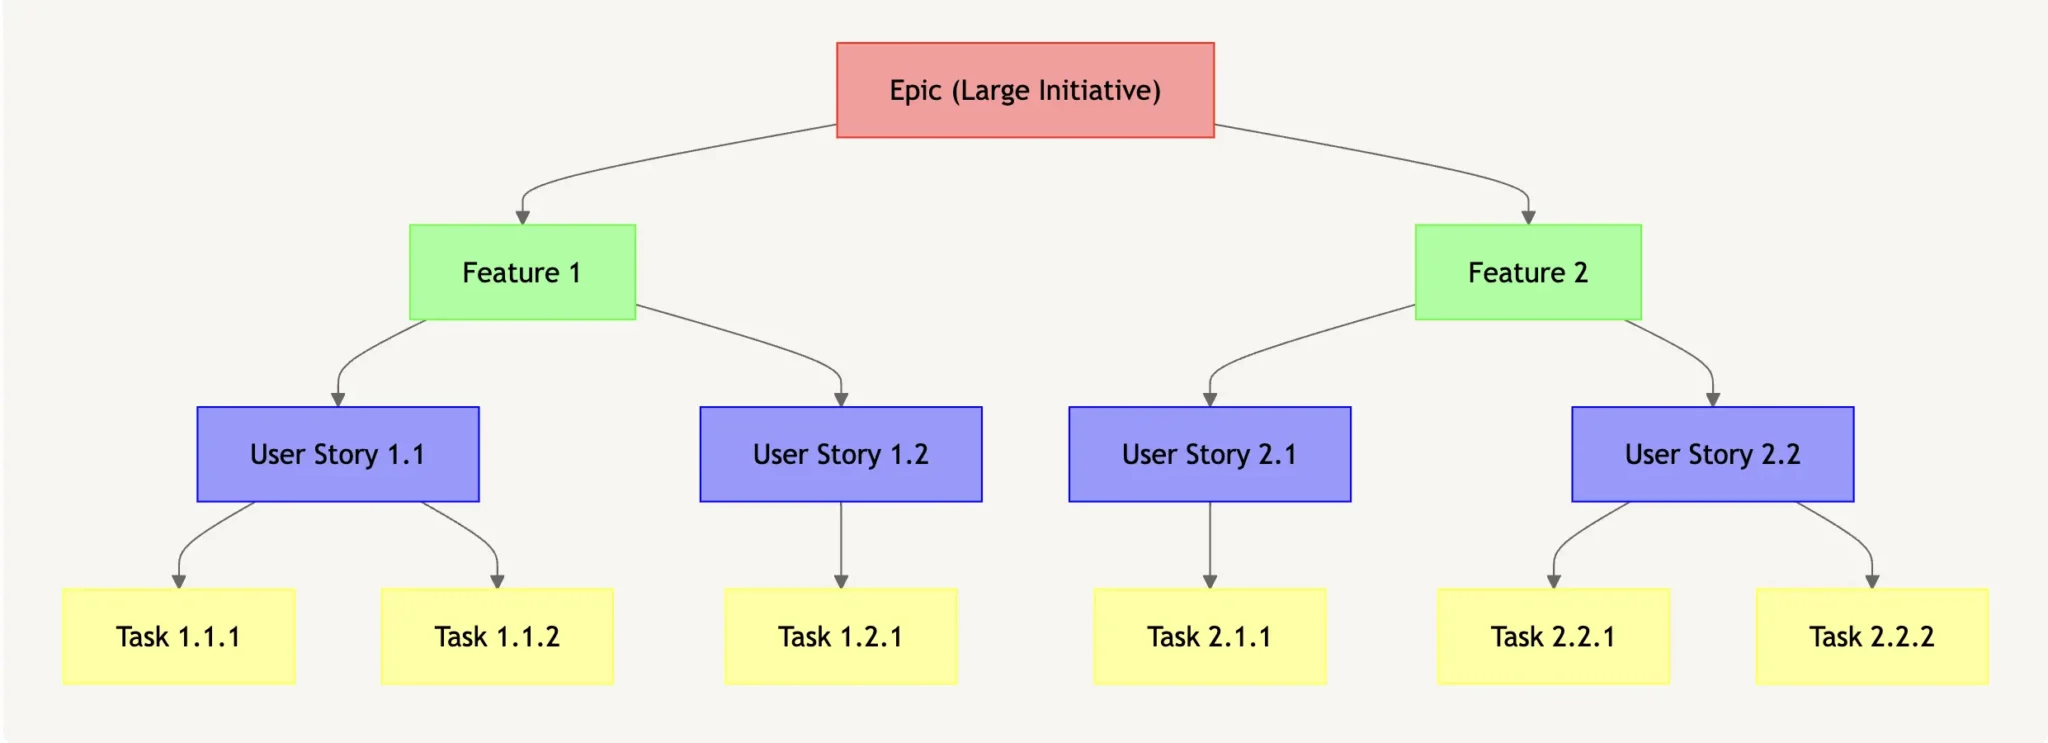
In this article, well dig into the nuances of epics, features, and stories, covering:
- The differences between epics, features, and stories
- How to write epics vs. features vs. stories
- How to visualize all three (and more) using Visor
Epic vs Feature: The Difference Between Them in Project Management
In project management, epics and features are both elements used to organize and describe work. However, they operate on different scales.
What is an epic?
An epic is a large body of work that can be broken down into smaller tasks or stories. It represents a significant, high-level initiative or goal for the product.
- Epics typically include multiple features and often span multiple sprints.
- Epics are used to capture big-picture objectives and strategic initiatives that require a lot of effort and resources to complete.
- They provide a way to prioritize and plan work at a high level and help stakeholders understand the overall direction and scope of the product.
How is a feature different from an epic?
Epics get broken down into smaller pieces of a work, called features. The epic is at the top of the hierarchy, and the features are the parts that’ll make the overall epic happen. Think of a feature as a smaller offshoot of its epic, like one branch on a tree. That branch is part of the larger plant and helps make up the whole.
- Usually, a feature is a concrete, actionable item, whereas an epic is an overarching goal.
- While an epic can take several sprints to complete, a feature can usually be implemented within one to three sprints.
- Features are more detailed than epics. That’s because features key into a particular objective or address a specific user need. Epics can focus on the bigger picture, whereas features have to lay out the details that will help team members understand what needs to be built.
- You have to be able to test a feature and have some idea what the feature must do to pass the test and be valuable to the customer.
- Features often correspond to user stories, which we’ll get into more deeply below.
Epic vs Feature Example
So what does the difference between an epic and a feature look like in practice?
Ultimately, the epics and features you use depend on the work your team does. Here are a few examples you can consider:
- Epic: An epic might be developing a checkout feature for your product. This could include design, testing, copy, and other elements necessary for the checkout feature to work.
- Feature: A possible feature would be choosing a payment provider or setting up an API integration with a selected payment gateway.
- Epic: Create a mobile app. The complex mix of design, creation, testing, and delivery all offer a good-sized mix for an epic.
Feature: One feature you might include would be setting up push notifications for your app or possibly offline capabilities.
Feature vs Story: Breaking Things Down Further
Before we get into the difference between features and stories, let’s take a second to define what a story is:
What is a story?
Stories, also known as user stories, are short requests written from an end user’s point of view. They’re the smallest of the units we’re discussing here. Usually a user story can be completed within the space of a single sprint, and are typically written using the following format:
As a [type of user], I want to [perform an action] so that [I can achieve a goal].
To check out how this works in practice, take a look at some sample user stories below.
The Difference Between a Feature and a User Story
Now that we’ve covered what a story/user story is, how does that compare to a feature?
- Features are typically larger in scope compared to user stories and often encompass multiple user stories.
- Features are often derived from epics and serve as the intermediate level between epics and user stories in the agile development hierarchy.
- User stories focus on the user’s needs, goals, or actions within the system and are written in a simple, non-technical language. Features often have a more technical description to outline what has to happen to achieve success.
- User stories are usually small enough to be completed within a single iteration or sprint and are prioritized based on their importance to the user and the business. Features may take more than one sprint.
Overall, user stories provide specific, user-centered descriptions of features or requirements. To put it another way, features help to organize and prioritize work at a higher level, while user stories provide the detailed context necessary for development and testing.
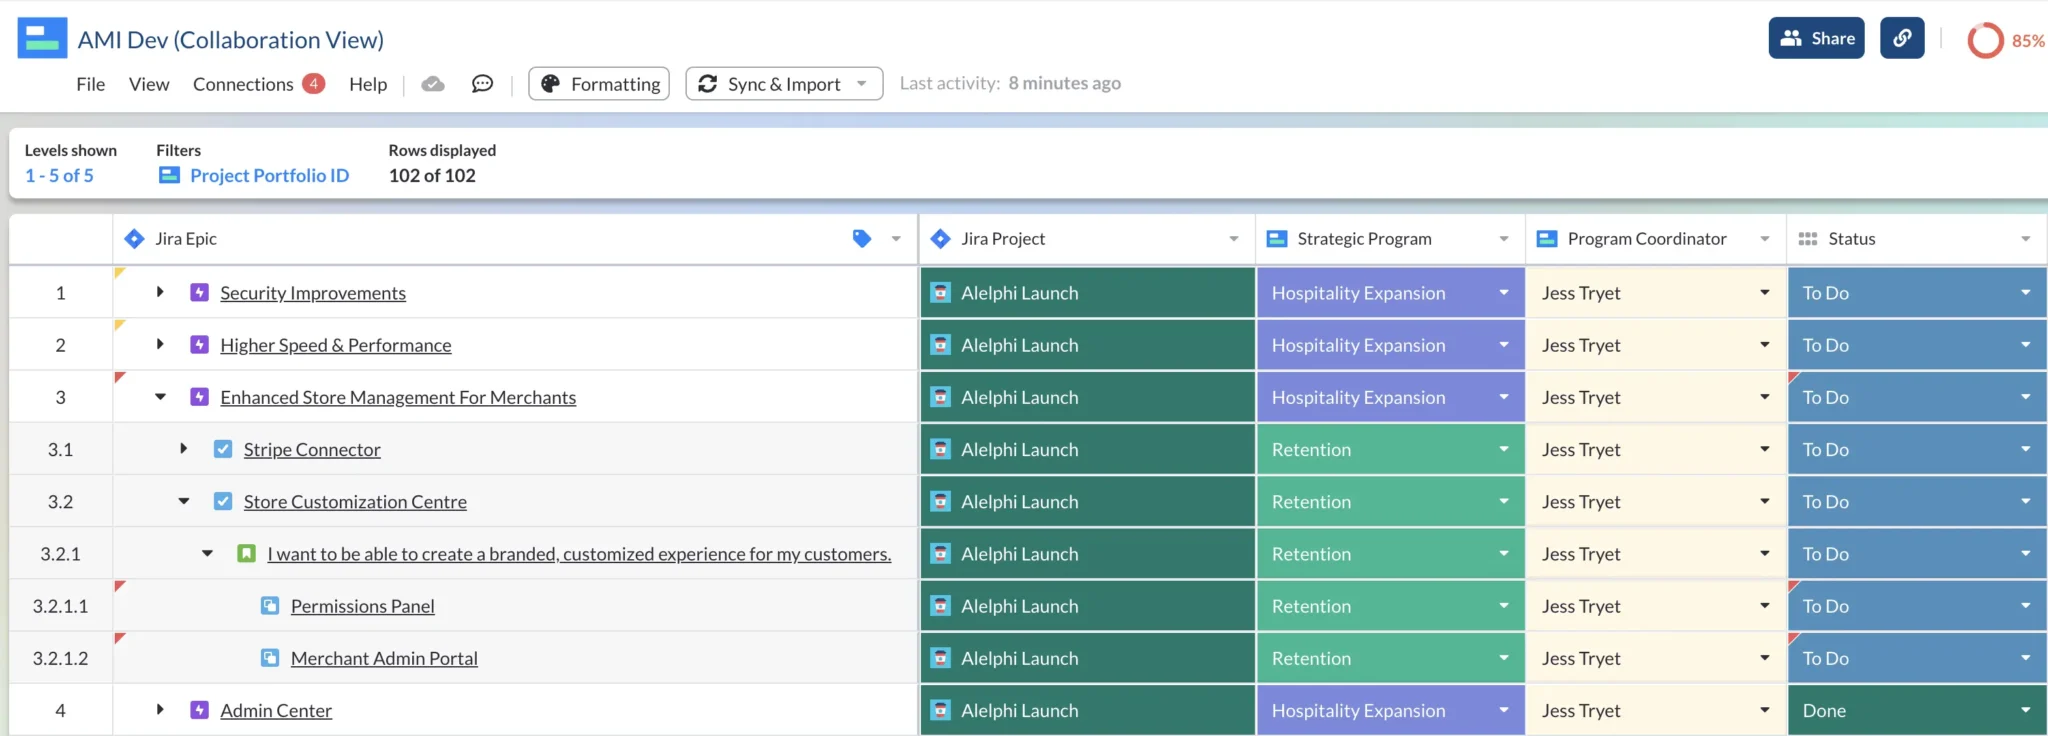
Below is a real world example of how epics, features, stories, tasks, and subtasks can be put into a hierarchy and nested. It’s a view I created in Visor using live data from my Jira projects and the standard Jira issue hierarchy.
Nesting of Jira issues in Visor’s Table View, including epics, features, user stories, tasks, and subtasks:
How to Write Epics vs Features vs Stories
There are different strategies for crafting an epic vs a feature vs a user story. We’re going to break down each for you, as well as provide tips to help you write them successfully.
Tips on How to Write an Agile Epic
Explaining a large, high-level initiative or goal in a way that’s concise and easy to understand can be a challenge. Here are a few tips to help you get started:
- Understand the scope: Before writing the epic, ensure you have a clear understanding of the scope and objectives. Discuss with stakeholders, product owners, and team members to decide what your overarching goal will be.
- Write your epic first: It may seem obvious, but don’t forget to set your goals before working on features or user stories.
- Use a template or format: You can treat an epic a little bit like a user story. Including certain key elements for each epic will help you keep organized. Consider including:
- Title: A descriptive title will cut down on confusion later on.
- Description: A brief overview of the initiative, including its purpose, objectives, and any relevant context will allow your team to understand the goal more clearly.
- Acceptance criteria: Include high-level criteria that let you know when the epic will be considered complete or successful.
- Dependencies: It helps to add in dependencies or prerequisites that need to be addressed for the epic to be implemented.
- User story: If it’s helpful, you can even create an epic user story that hits on the overall goal. For instance, “As a new user, I want an onboarding experience that guides me through the platform’s features to help me get started effectively.”
- Focus on value: Ensure that the epic delivers value to the end user or contributes to the overall goals of the product.
- Keep it flexible: Epics are not set in stone and may evolve over time as more information becomes available or as priorities change. Keep the epic flexible and be open to revising or refining it based on feedback and new insights.
- Collaborate: Writing epics should be a collaborative effort involving key stakeholders, product owners, and team members. Encourage open communication and feedback to ensure that everyone understands the epic and its objectives.
Example of an Agile Epic
Title: Onboarding Experience for New Users
Description: As a new user joining our platform, I want the onboarding experience to be informative and intuitive, guiding me through the key features and functionalities to help me get started effectively. By enhancing the onboarding experience, we aim to reduce the learning curve for new users, increase user engagement, and foster a positive first impression of our platform.
Acceptance Criteria:
- New users are greeted with a personalized welcome message upon signing up, providing a brief overview of the platform’s capabilities.
- Interactive tutorials are available to guide new users through the key features and functionalities, allowing them to learn at their own pace.
- Tooltips are strategically placed throughout the platform to provide contextual guidance on how to perform specific actions or tasks.
- The onboarding experience is customizable to accommodate users with different levels of expertise and preferences.
- User feedback mechanisms are in place to gather insights on the effectiveness of the onboarding experience and identify areas for improvement.
Epic User Story: As a new user, I want an onboarding experience that guides me through the platform’s features to help me get started effectively.
Tips on How to Write a Feature
Describing a feature requires a whole different set of details. Here’s what you should include:
- Identify the purpose: What’s the point of this feature? How does it match the goals you set out in your epic?
- Define the scope: As you did with your epic, be sure you include what your feature will and will not include. Consider any dependencies or prerequisites that may affect implementation, too.
- Describe the benefit: Write a short description that tells the reader what the feature will deliver. Focus on what the feature will let users do or accomplish within the product.
- Set out acceptance criteria: What has to happen before the feature can be considered complete and ready for release? These criteria should lay out the specific behaviors or outcomes that will demonstrate success.
- Prioritize: Prioritize the feature based on its importance to the end user and the business. (You can always reprioritize later during backlog grooming.)
- Keep it actionable: Make sure the feature can actually be implemented within a reasonable timeframe. Avoid overly broad or vague descriptions that may be difficult to implement or prioritize.
Example of an Agile Feature
Feature Name: Advanced Search Filters
Benefit of the feature: This feature will improve search functionality by introducing advanced search filters. This will allow users to refine their search results based on specific criteria. Users can apply multiple filters simultaneously to narrow down search results and find content that matches their interests more accurately. Advanced search filters provide users with greater control and customization options, improving the overall search experience on the platform.
Acceptance Criteria:
- Users can access the advanced search filters from the search interface, either through a dedicated button or dropdown menu.
- Advanced search filters include options to filter content by various criteria, such as date range, location, content type (e.g., posts, photos, videos), and user attributes (e.g., author, user role).
- Users can apply multiple filters simultaneously and see the updated search results in real-time.
- The system provides clear feedback to users when applying or removing filters, indicating the impact on search results.
- Advanced search filters are intuitive and easy to use, with descriptive labels and tooltips to help users understand their purpose and functionality.
- Users have the option to save custom filter presets for future use, allowing for quick access to frequently used filter combinations.
Tips on How to Write a User Story
Writing a user story involves capturing a specific requirement or piece of functionality from the perspective of an end user. It has a very basic format, which we discussed earlier in the post. As a refresher, a user story is structured as follows: As a [type of user], I want to [perform an action] so that [I can achieve a goal].
Here are some tips to make it easier to fill out that template:
- Identify the user role: Start by labeling the user or stakeholder who will benefit from the feature or requirement. Typically, the person working on the user story is not the person fulfilling the user role here.
- Describe the action: Write out the goal – what does the user want to accomplish or what is the action they need to perform within the system?
- Specify the benefit: Explain the value or benefit that the user will gain from accomplishing the action. This helps to provide context and justify the importance of the user story.
- Keep it simple and specific: Focus on a single requirement or piece of functionality. Avoid including technical details or implementation specifics.
Examples of User Stories
The basics of the user story format works across dozens of different use cases. You can even use it for your basic day-to-day chores! For instance, “Molly wants to go to the store to get the ingredients she needs to make dinner.”
However, if you’re looking for examples you’re more likely to spot within your workday, here are a few options:
- As a user, I want to be able to reset my password so that I can regain access to my account if I forget my password.
- As an online shopper, I want to be able to track my package so that I know when to expect delivery.
- As a user, I want to be able to use dark mode so that I can cut glare and reduce eye strain.
- As a CEO, I want to see a high-level overview of the Dev Team’s progress without accessing Jira. (Shameless plug – if this user story sounds like a problem you’re solving for, Visor can help.)
The important elements, regardless of your use case, are who your user is, what they want, and why. If you want, you can also include acceptance criteria – the elements that show when a user story has been successful.
Visualizing Epics, Features, and Stories Using Visor
One of the elements that unite epics, features, and stories, is the importance of collaboration and getting stakeholder input for all three. Since managing the elements of a project are most often done in a software like Jira, it can be tricky to share plans with contractors, C-Suite, and colleagues that just don’t use Jira.
Even if these stakeholders wanted to use Jira, there is really no direct way to provide guest access to Jira.
A simple way to connect stakeholders with data is by creating a Visor workspace. Visor allows you to share data in an easy-to-use workspace that can be accessed by people without the access to Jira.
You can echo the hierarchy visually by nesting tasks/features and stories below epics, as shown below.
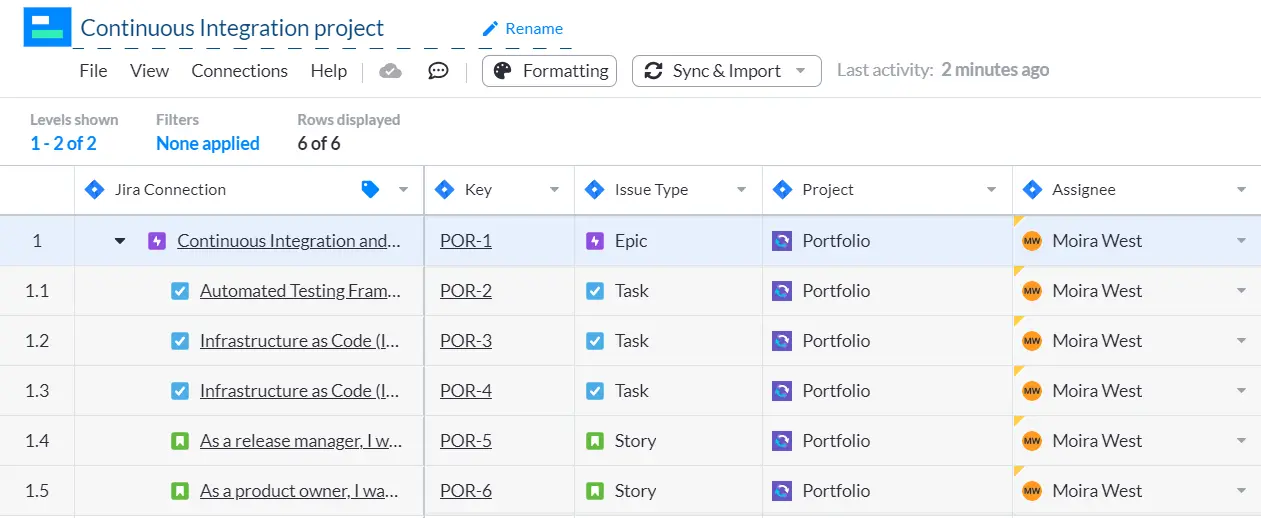
Using Visor you can transform complicated, overwhelming Jira project data into elegant Jira Gantt charts, crystal clear dashboards for your Jira data, structured and easy to customize portfolio timeline visualizations, and a range of other view types.
These visualizations are easy to create, and enable you to share your projects in a way that is clear, and compelling.
If you want to start taking a higher level view and create portfolios of your Jira projects (AKA: project portfolio management), you can easily import multiple projects from Jira into Visor.
This unlocks Jira portfolio management capabilities that you could only otherwise get with expensive enterprise level add-ons like Jira Align.
You can even have multiple Views, customizing what different groups see. Simply connect your Jira account to Visor, and you can share all the information you need with all of your stakeholders.
If this article was helpful, considering reading these related articles:


