Jira and Salesforce Integrations – Tutorial and Options

Start using Visor today
- Visualize all your projects and data

- Roll up multiple projects into portfolio views
- Try Visor for FREE
A Jira Salesforce integration can help you improve information flow, alignment, and workflow between people working on your product and people working directly with your customers.
However, choosing the best option is not always easy. In fact, there are at least ten different ways you can connect Jira and Salesforce data. Each app or method has strengths and weaknesses, and is better suited for different uses.
To help you, I’m going to compare the main options for setting up a Jira and Salesforce integration. I’ll explain what you can achieve with each of them, how much they cost, and how easy they are to set up so you can clearly see which option is best for you.
Jira Salesforce Integrations – Here Are Your Options
This curated list isn’t necessarily in order of which is best, as the best option for you will depend on what you need your Jira and Salesforce integration to do.
- Visor: Visualize combined Jira and Salesforce data in formats like Gantt charts, timelines, dashboards and Kanban boards. Has a two-way integration to keep data in sync across Jira and Salesforce.
- MuleSoft: A robust, but very costly all-rounder. Lacks Visor’s visual and project management functionality, but makes up for it with workflow automation.
- Exalate: Great for syncing data between Jira and Salesforce in a controlled way – but light on automations, and could be expensive (I don’t know as they don’t publish their prices!)
- Zapier: A good solution if you only need automations and don’t need a two-way sync. Can become costly and you need to take care to avoid the dreaded Zap loops.
Jira Salesforce Integration Options – Comparison Table
| Visor | Mulesoft | Exalate | Zapier | |
| Minimum monthly cost | Free | $2250 | Pricing on request only | $29.99 |
| Minimum annual cost | Free | $27,000 | Pricing on request only | $360 |
| Project plans and other visualizations with combined, real-time Jira & Salesforce data | Yes | No | No | No |
| Integrated Jira & Salesforce reporting | Yes | No | No | No |
| Automations between Jira & Salesforce | No | Yes | Yes | No |
| Synchronize and update data across Jira & Salesforce | Yes | Yes | Yes | Yes |
| Two-way Jira & Salesforce integrations | Yes | Yes | Yes | No |
Read the overviews below to learn what each option is best for, and uncover any key pricing details, or other requirements you should consider.
Jira Salesforce Integration Option #1: Visor
Visor isn’t your typical integration solution; it doesn’t just sit in the background and run small pieces of automation and data transfer from Salesforce to Jira and vice versa. Instead, you can use Visor to work with and visualize integrated Jira and Salesforce data.

What Can You Use Visor For?
In Visor you can combine your selected Jira and Salesforce data in one place, in a range of visualizations for tasks, projects, and processes. These visualizations include Gantt charts, Kanban boards, dashboards, and timeline visualizations.
People use Visor’s two-way integration with Jira and Salesforce to collaborate on shared work and processes, to carry out bulk updates, and speed up admin across both systems.
You can also create project portfolio dashboards, timelines, program roadmaps, or other view types like Gantt charts that combine multiple projects (aka your portfolio of projects), enabling you to track performance, balance resources, and spot issues at a portfolio level.
Another popular use is creating powerful visualizations of any project or situation with work or data spread across Jira and Salesforce. For example, you can create:
- C-Suite overviews that combine Jira and Salesforce data
- Live bug tracking and support monitoring views for Customer Success/Sales teams (without them having to use or enter Jira)
- Integrated product roadmaps that link features to customer requests and ARR
- Customer-product impact dashboards
- Cohesive customer onboarding projects and plans
- Keep non-Jira using stakeholders up to date with QA and testing in Jira
Here’s a Bug/Feature tracker using Jira and Salesforce data in one view. It’s used by a customer success team uses to stay updated on bug fixes and feature releases:
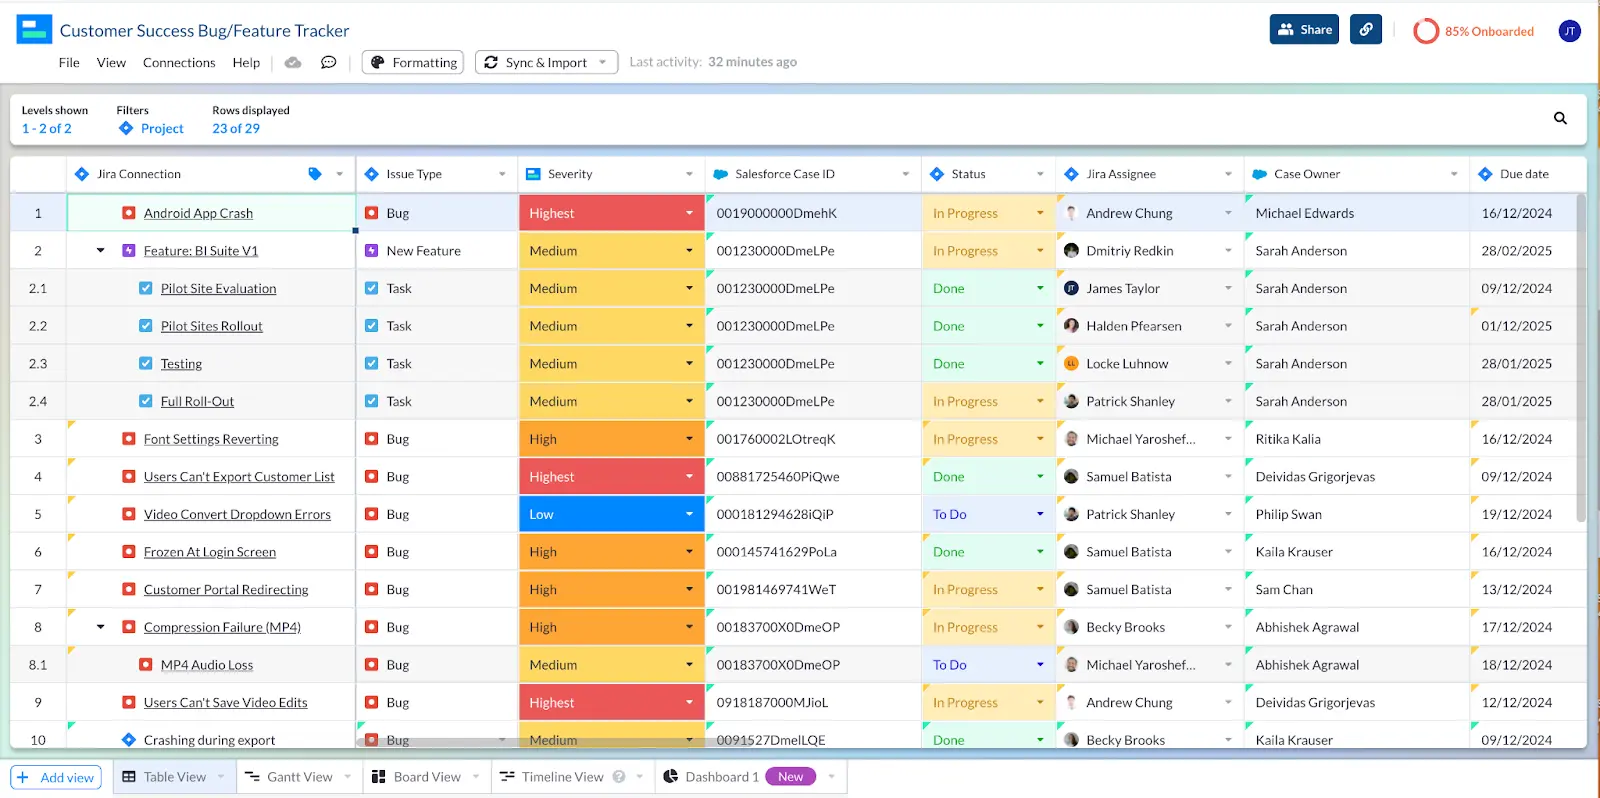
Visor synchronizes live data from Jira and Salesforce in filterable table views that can be customized for different stakeholders, teams, or individual team members.
You can also connect Visor with each app separately, to create beautiful Salesforce Gantt charts, or Jira Gantt charts, without having to wrestle with the clunky native options, or digging away at your budget to buy expensive add-ons. You can share these visualizations with anyone, even if they don’t have access to Jira or Salesforce, making Visor a smart way to overcome Jira’s barriers to guest access.
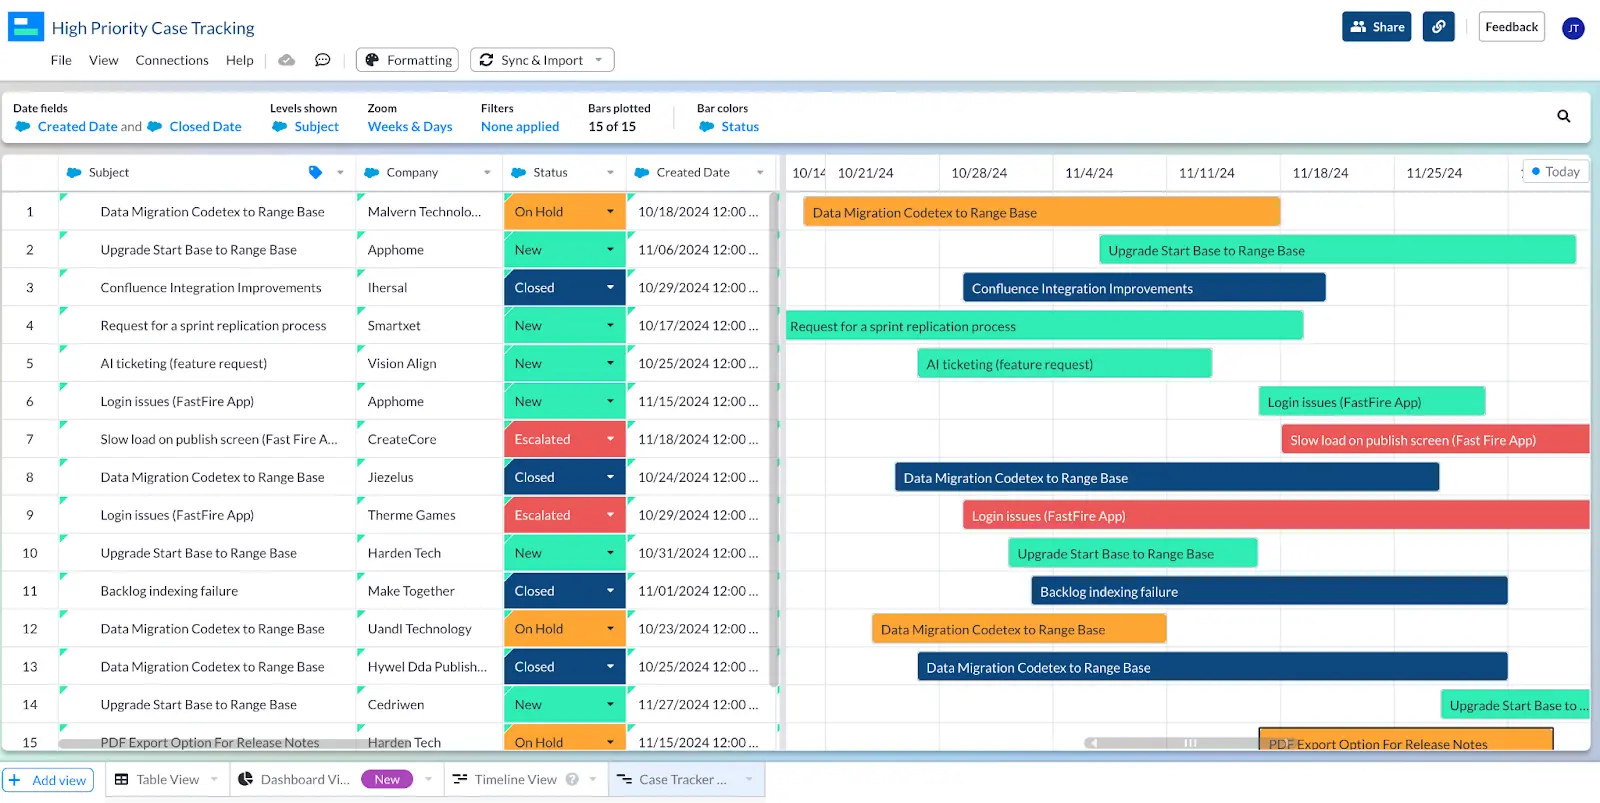
A Gantt chart I created in Visor using connected using Salesforce data:
Visor offers a few integrations, allowing you to connect apps together. For instance, if you also use Asana, you can explore our Salesforce Asana integration.
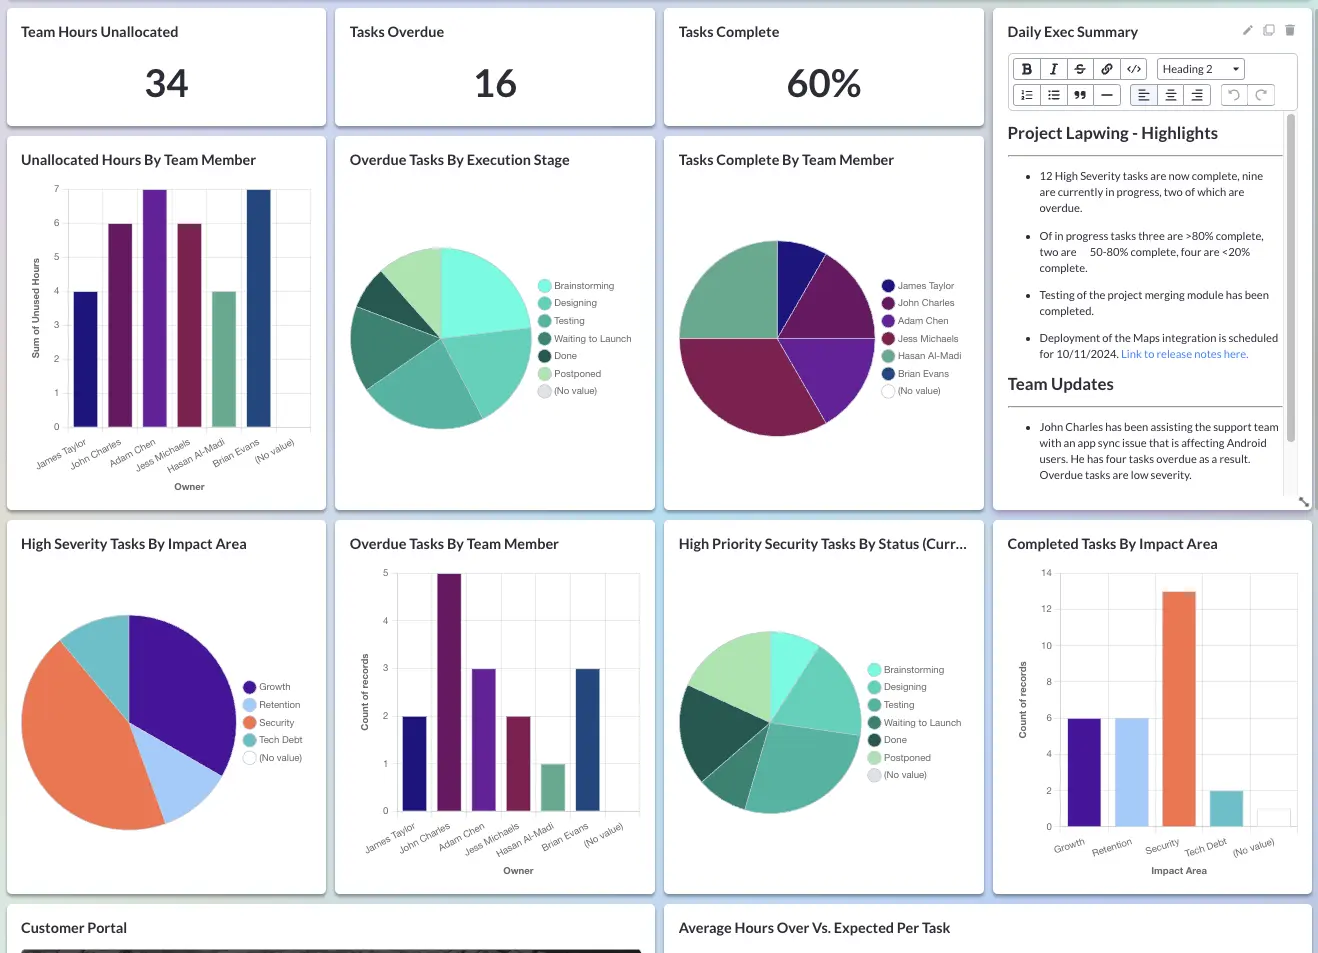
A Dashboard view I created in Visor using connected Jira & Salesforce data:
Visor is the only solution that enables you to show stakeholders project plans and other visualizations using integrated, real-time Jira and Salesforce data.
Pricing
Visor’s Free Trial has everything you need to get started and see which visualizations are most beneficial for you, your stakeholders, and colleagues.
Visor’s Free plan includes both Jira and Salesforce bi-directional integrations and a Table and Kanban board view to visualize data from both apps, and combined, integrated, real-time data fro both apps.
You can upgrade to more premium plans for as little as $18 / month / user. Each Visor plan includes free view-only users, and the Team plan allows unlimited free view-only user, which makes it much easier (and less expensive) to share your Jira and Salesforce data with others. Try it for free now.
How To Set Up a Jira-Salesforce integration in Visor
It’s very easy to set up a Jira Salesforce integration in Visor. All you need to do is:
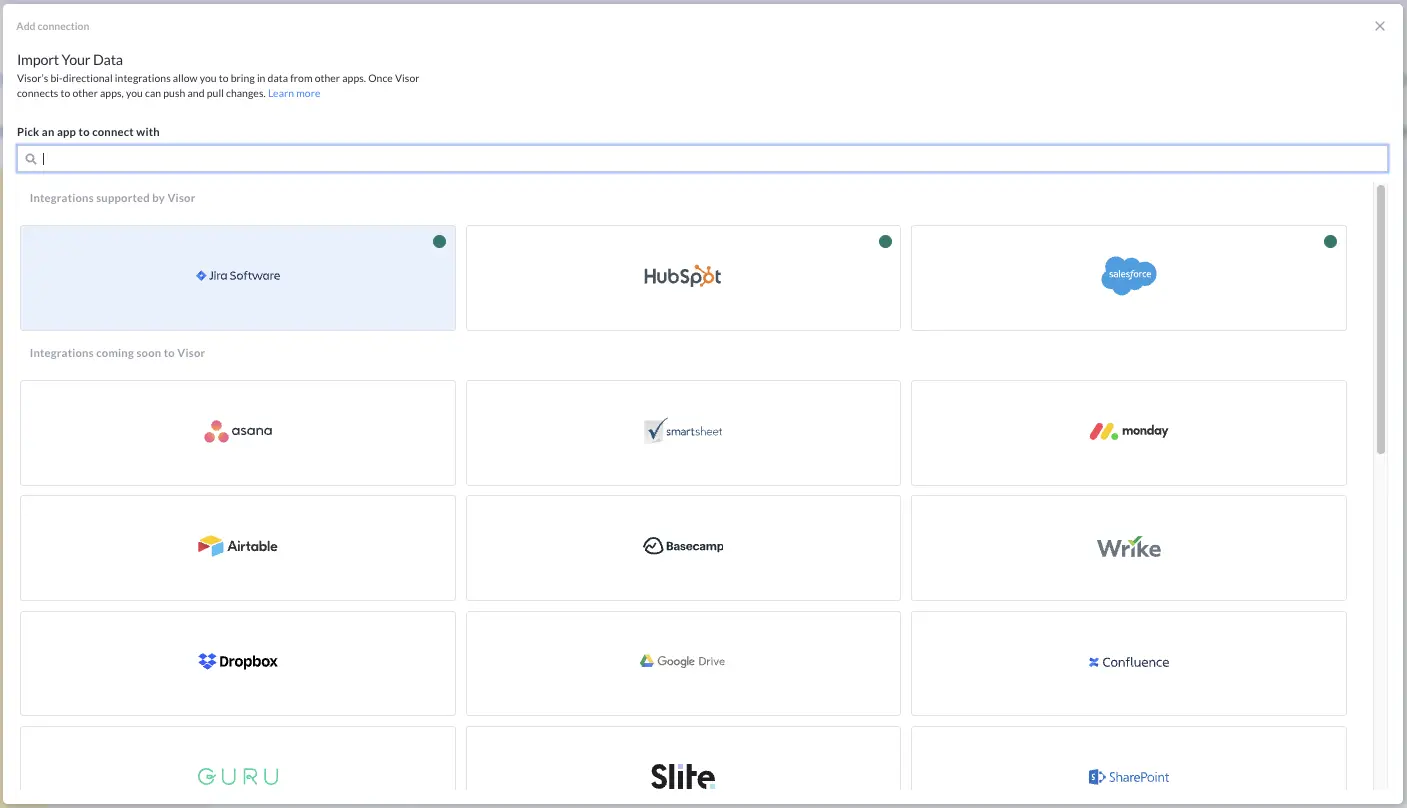
- Click on the Connections menu
- Select Jira and/or Salesforce (each app is connected one at a time):
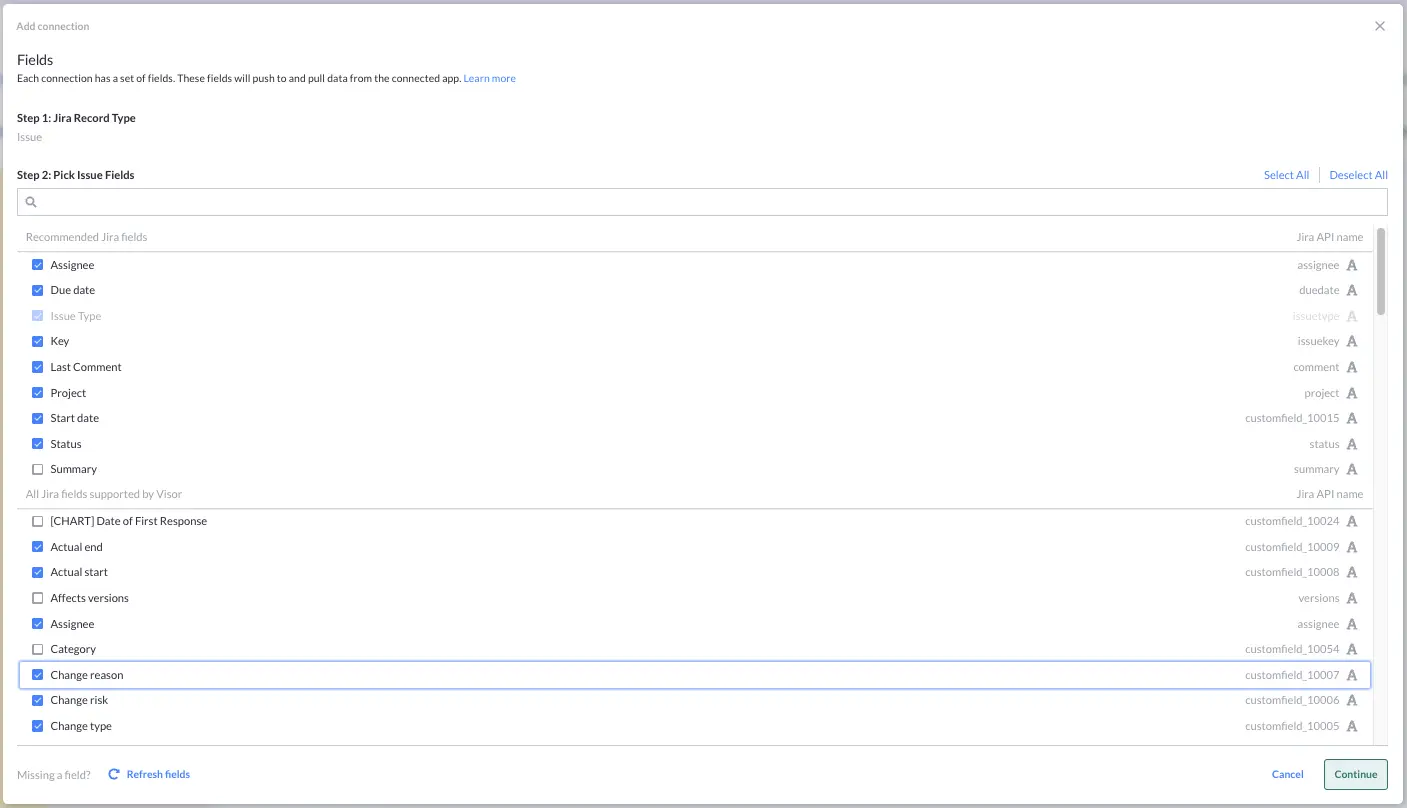
- Pick the Jira Issue fields you want to connect to (you can change these later too):
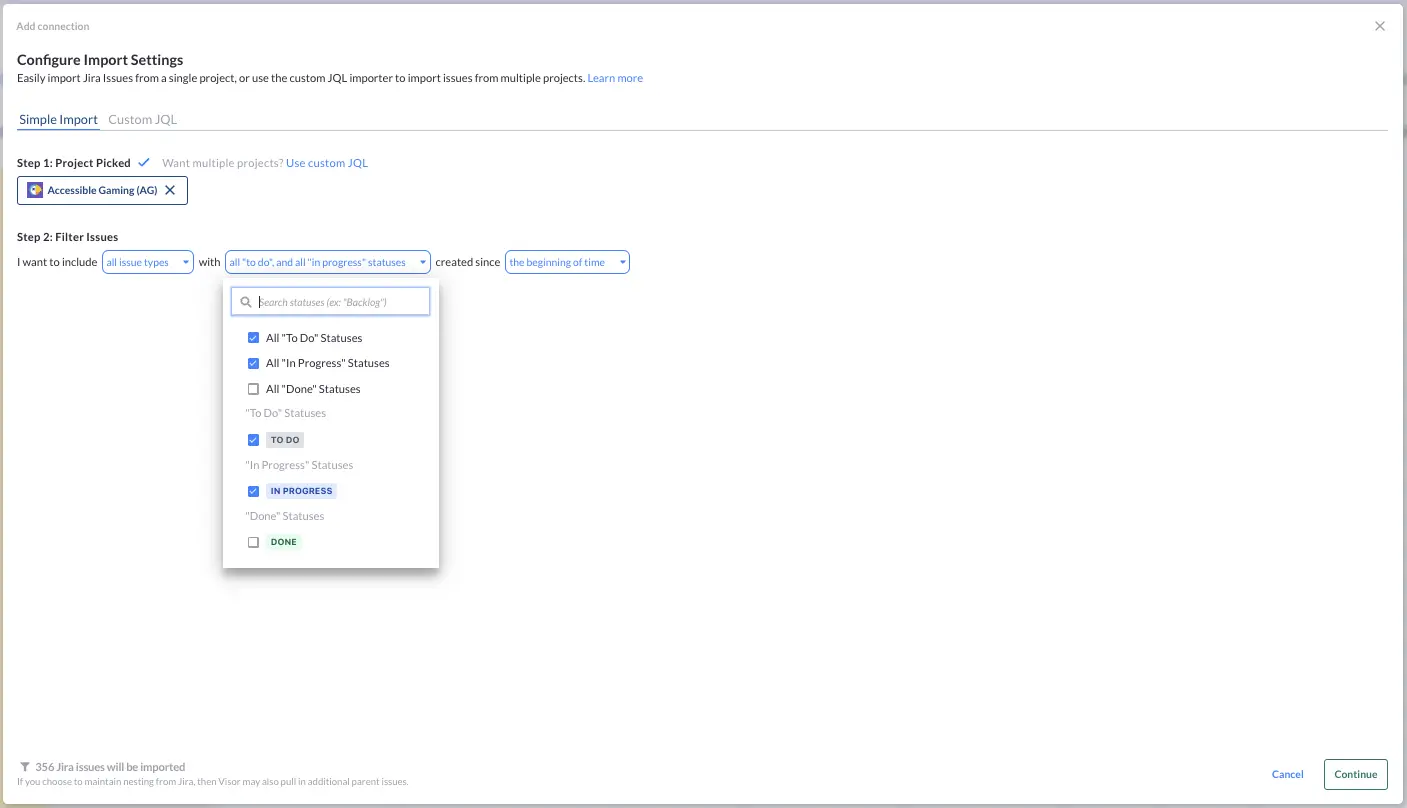
- Select the Project or Projects you want to connect to this Visor workbook (you can create multiple workbooks that connect to different Jira projects) and apply any filters to control which issues are imported. You can also use JQL for Jira and must use SOQL for Salesforce.
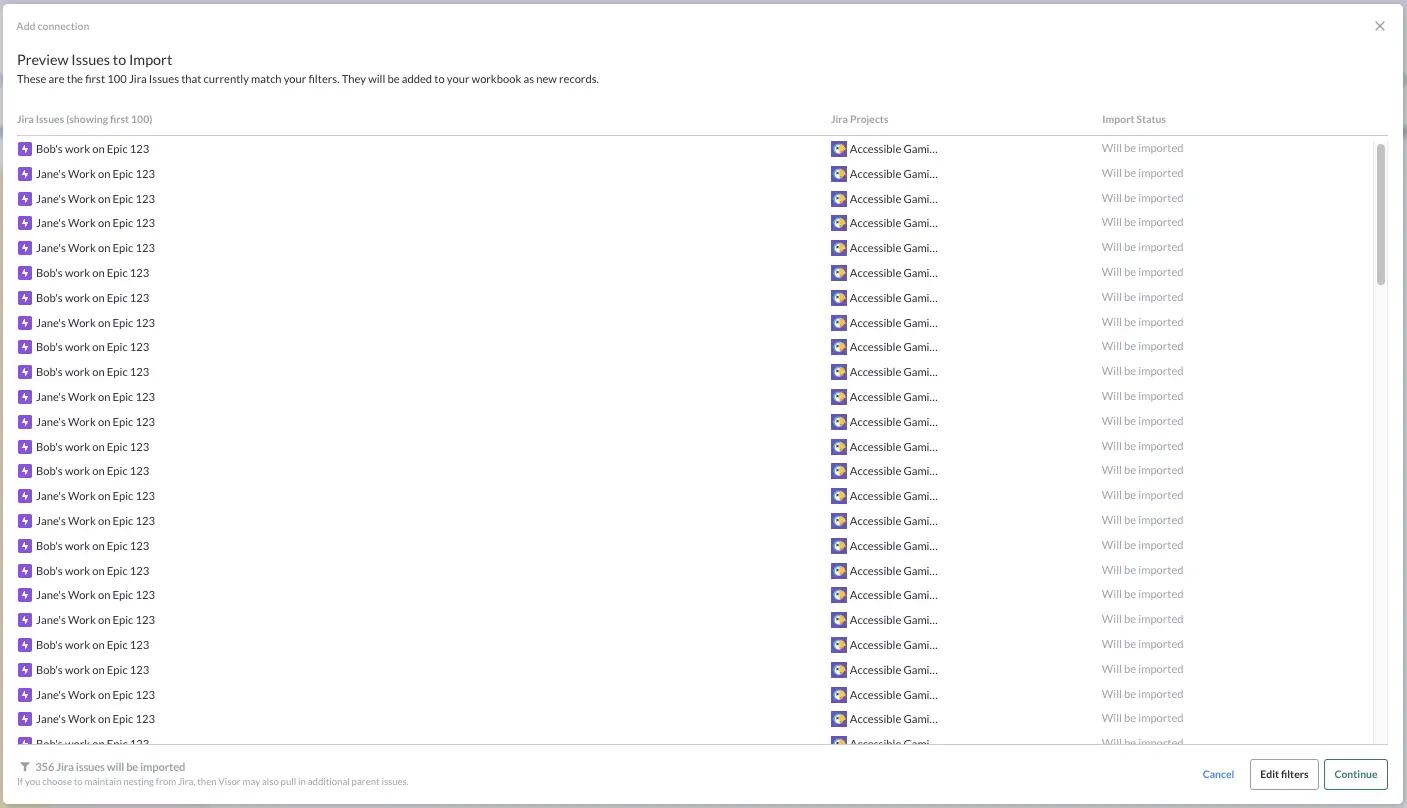
- Check the preview and if click continue
Jira Salesforce Integration Option #2: MuleSoft Composer
MuleSoft Composer enables you to create a Jira to Salesforce integration using their no-code visual interface.
What Can You Use MuleSoft Composer For?
You can use MuleSoft Composer to synchronize data between Jira and Salesforce and automate workflow between the two apps.
Like Visor, it creates a two-way (or bi-directional) integration between Jira and Salesforce. Unlike Visor, MuleSoft only sits in the background. You can’t use MuleSoft to create visualizations like Gantt charts or dashboards that combine data from Jira and Salesforce.

You can’t use MuleSoft to display, manipulate, and update your data, either. However, you can do this in Visor, which acts as a project management layer between Jira and Salesforce.
As I explained above, you can’t use Visor to automate workflow. It can help you speed up your admin and perform bulk updates fast, but it doesn’t share the workflow automation features that MuleSoft (and Zapier) have.
All this means you can use MuleSoft to automatically:
- Create Jira issues for feature requests automatically via Salesforce opportunities
- Pass updates from tickets in Jira to entities like products, accounts, and contacts in Salesforce
- Create new Jira issues when Salesforce cases are created
- Update matching fields in Jira and Salesforce to keep data in sync
Pricing
MuleSoft Composer is a relatively expensive option. You’ll have to buy an annual subscription too as there isn’t a monthly payment option.
Their Starter plan is $27,000 per year. It is limited to three connectors (i.e., three connected apps) and gives you an allocation of 250,000 tasks per year.
The Plus plan is $57,000 per year. It gives you unlimited connectors and 2,500,000 tasks per year.
For a complete breakdown of what’s included read MuleSoft’s pricing.
How Easy Is It To Set Up?
Creating the integration between Jira and Salesforce in MuleSoft Composer is straightforward. You don’t need to use code and there are pre-built templates available. You can use these to accomplish common use cases, and understand the right way to build integrations.
You can also test your integrations before deploying them to prevent errors.
Jira Salesforce Integration Option #3: Exalate
Exalate is a customizable integration tool that allows you to sync data across tools like Jira and Salesforce.
What Can You Use Exalate For?
Exalate’s Jira to Salesforce integration enables you to sync data between a range of standard and custom entities in Jira and Salesforce.
For example, you can:
- Synchronize comment threads across Jira and Salesforce
- Link Salesforce opportunities or accounts with Jira issues and projects
- Connect billable hours in Jira to customer invoicing in Salesforce
- Sync development requests in Jira with open opportunities in Salesforce
- Connect product entities in Salesforce to their development plans in Jira
Exalate supports decentralized integration. This means sync rules are created in Jira and Salesforce to control information flow and ensure data is added as desired at both ends of the integration.
You can also write Groovy scripts in Exalate using a helpful scripting engine that helps you tackle more complex integration needs without as much brain-busting trial and error.
Automating processes (such as creating new issues in Jira via Salesforce) is much more limited and long-winded than with tools like Zapier or Workato.
Pricing
Exalate offers a 30-day free trial, but you must purchase a Premium or Enterprise plan after that.
Unfortunately, Exalate hasn’t published their pricing for any of these plans, so if you’re interested in using their Jira to Salesforce integration you’ll have to contact them directly, which is a little frustrating.
How Easy Is It To Set Up?
Setting up a Salesforce to Jira integration using Exalate is relatively easy. You can choose between a basic mode that’s much more visual and simplified, or a script mode if you have the necessary technical knowledge. Read Exalate’s instructions in full.
Jira Salesforce Integration Option #4: Zapier
Zapier is an integration platform that automates workflow between different apps. It performs an action in app A when a specified action occurs in app B.
What Can You Use Zapier For?
You can create a wide range of workflow automation using Zapier’s Jira to Salesforce integration. Here are some examples:
- Create a new lead in Salesforce when a Jira issue is created
- Updating Jira issues when new messages are created in Salesforce
- Create an issue in Jira when needed
The above are just a few examples of what you can do. In Zapier, triggers and actions (such as creating or updating an entity) are like a big pantry full of ingredients, which you can combine in different ways to make recipes to automate a wide range of workflows.
Zapier doesn’t support two-way syncing. Unlike Visor, Exalate, and MuleSoft Composer, Zapier isn’t designed to keep data in two different apps in sync. However, there are Zapier alternatives you can explore.
Pricing
Zapier charges based on tasks. A task is an action that a Zapier workflow successfully completes. For example, if you use Zapier to automatically create a new contact in Salesforce, then each contact created counts as one task.
The Zapier Free Plan includes 100 tasks per month, which is great for trying it out. However, as you can imagine, you will eat up your task allowance very quickly once you have a few automations created.
Then, you can choose from Professional (starting at $29.99 per month) or Team (starting at $103 per month) plans. These monthly fees rise the more tasks you use up. For example, if you need 2,000 tasks and use the Professional plan, you’ll pay $73.50 monthly.
How Easy Is It To Set Up?
Zapier is designed to replace complex, manually created automation and integrations with a simple visual process. This means they’ve put an emphasis on ease of use and removed as many technically challenging tasks from the process as possible.
Overall it’s straightforward to create Zaps, even for nontechnical users. Further, there are lots of instructions for setting up straightforward Jira Zapier integrations or Zaps between apps like Jira and Salesforce.
Challenges with Zapier can arise when you need to understand and fix errors, for example, when a Zap is not functioning as intended or when you accidentally create a ‘Zap loop’ that can create hundreds or thousands of duplicate records, contacts, issues, etc.
Choosing The Right Jira-Salesforce Integration For You
As I hope you’ve learned, there are many options for integrating Jira and Salesforce. I’ve selected the four above because they’re good examples of the different categories of integration apps you can use and what they enable you to do with Jira and Salesforce.
Below, I’ve added a quick summary and some alternatives in each category that you might want to consider.
Use Case 1: Combine, Collaborate With, and Visualize Jira and Salesforce Data
Visor is the only app in this category that I’ve found. There are many other apps for visualizing data, but none have the same quality two-way integration with Jira and Salesforce.
Similarly, many apps integrate Salesforce and Jira data, but none have Visor’s visualization, reporting, project planning, and project management features.
Visor is a unique tool, and you should try it if you’re an organization that uses Jira and Salesforce. You can use it to make visualizations using live data, that just aren’t possible in the native apps (such as Gantt charts for your Salesforce data), which can save your skin and really impress your key stakeholders when it’s time to give them an update.
There’s a full-feature free trial too so you can really test it out and see if it is right for you.
Use Case 2: Automate Workflow Between Jira and Salesforce
Zapier and Mulesoft Composer can both be used to automate workflow between Jira and Salesforce. Mulesoft has the advantage of a two-way sync between Jira and Salesforce, which Zapier cannot do.
Aside from Zapier and Mulesoft Composer, there are other integration options, such as Unito, that focus on automating actions between Jira and Salesforce. Our blog on the best alternatives to Zapier provides information about these options.
Use Case 3: Sync Data Between Jira and Salesforce
Mulesoft Composer, Exalate, and Visor can all be used to sync data between Jira and Salesforce. Mulesoft and Exalate do this more straightforwardly by connecting matching fields in each app and then setting rules to ensure they automatically stay in sync when an update is made in either system.
Visor is different. It’s true that Visor keeps your data across Jira and Salesforce in sync, and any changes you make in Visor can be synced back to Jira and Salesforce records.
However, Visor’s value for you is more about being able to use, collaborate on, and visualize your Jira and Salesforce data together rather than acting as a simple mechanism to keep multiple apps in sync.
If you want a simple way to keep matching/counterpart Jira and Salesforce fields in sync, you might also want to check out:
What To Do Next
Now you should know which solution fits your needs.
Jira is a powerful project management tool, while Salesforce works well as the source of truth for customer data. Our spreadsheet-inspired workspace is flexible enough to work for many different use cases you might have for your Jira and Salesforce data. Whether you use our Mutual Action Plan template, an agile roadmap template that pulls in customer feature requests, or templates for onboarding customers, you will find that visualizing Salesforce and Jira data in Visor is easy.
If you want a better way of bringing your Jira and Salesforce data together, in a way that wows your colleagues and stakeholders you should try Visor. Get started for free now.